
1. Overview
Each project includes a time dimension with hierarchies ready to use for filtering, sorting, grouping, and drill down.
This time dimension has various settings you are able to customize. You can also create new time dimensions based on typical Gregorian calendars, or other calendar systems such as 13 Period, Fiscal, ISO 8601, and Reporting (Marketing).
Related video: Introduction to Time Dimensions
2. Creating a new time dimension
There are multiple ways you can open the New Time Dimension dialog:
- In the main menu, choose Business and then Time Dimension, then click Create.
- When you have another file open with an Explore window, right-click the Time Dimensions folder and choose New Time Dimension.
Click inside the Name text box and enter a name for your time dimension in the Save dialog, then click Save.
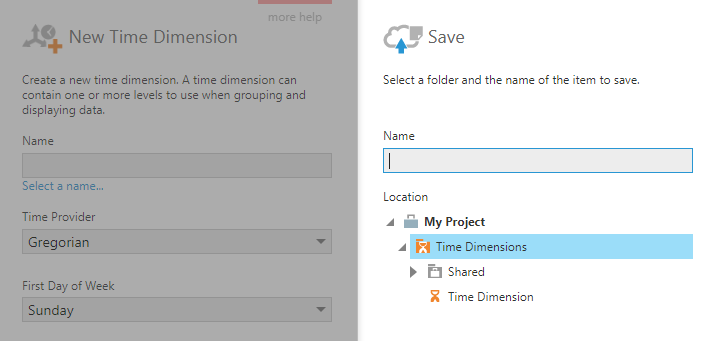
Returning to the New Time Dimension dialog, set Time Provider to the type of calendar you want: Gregorian, Fiscal, ISO 8601, Reporting (Marketing), or 13 Period. The remaining fields are different depending on your choice.
2.1. Gregorian
A Gregorian calendar is also known as a Western calendar and is the most widely used general purpose calendar.
The First Day of Week can be changed from the default value of Sunday if needed.
Next, select the Time Periods. The time dimension hierarchies and their levels will be automatically created based on this selection.
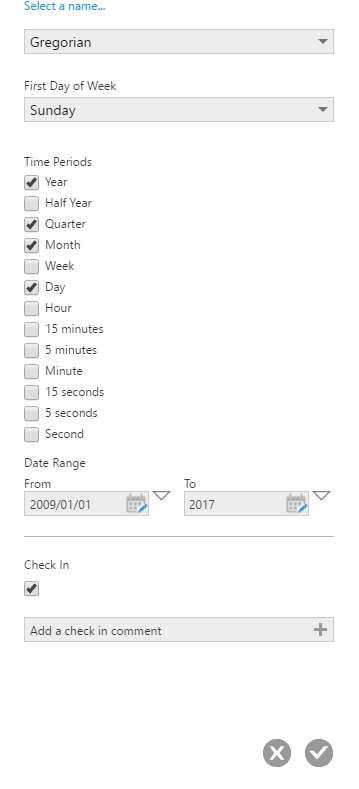
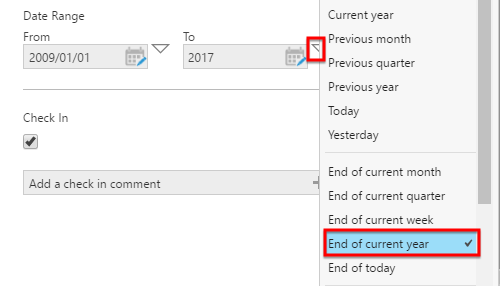
Adjust the Date Range of the time dimension according to the data you're working with, which can determine the range of dates selectable in filters.
By default, the start date is set to a fixed value equal to eight years before the beginning of the current year. The To or end date is not fixed by default and is instead set to the token value End of current year. By using a token, the end date will change automatically as time advances from year to year.
Click Save at the bottom to create the time dimension.
You can now find and expand your time dimension in the Explore window in metric sets and views, and find one or more hierarchies and attributes generated based on the time periods you chose. These are described in more detail in a later section.
2.2. Fiscal
A Fiscal calendar corresponds to the 12-month accounting period (or fiscal year) for an organization. This period may be different from the typical Gregorian calendar year.
To set up a fiscal calendar, choose the First Day of Week.
Next, you can optionally set Fiscal Calendar Naming Convention to Calendar year + 1 if the start of a fiscal year should be named after the following calendar year.
Then choose the starting month, day, and hour of the fiscal year.
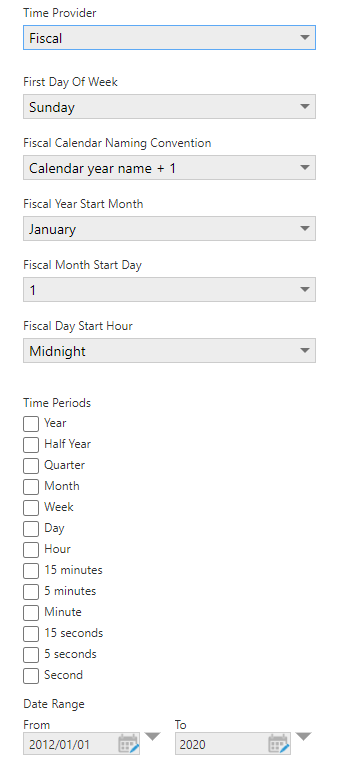
Select the Time Periods, which will define the time dimension hierarchies and their levels.
Update the Date Range if needed as described in the Gregorian case, and then click Save at the bottom to create and check in the time dimension.
2.3. ISO 8601
The ISO 8601 calendar is an international standard based on week numbers (e.g., 2016-W01 represents the first week of 2016).
To set up the ISO 8601 calendar, select the Time Periods, which will define the time dimension hierarchies and their levels.
Update the Date Range if needed as described in the Gregorian case, and then click Submit to create and check in the time dimension.

2.4. Reporting (Marketing)
A Reporting calendar (also known as Marketing, 4-4-5, 4-5-4, etc.) is commonly used in retail and manufacturing industries. This calendar divides a year into 4 quarters, where each quarter is comprised of 13 weeks.
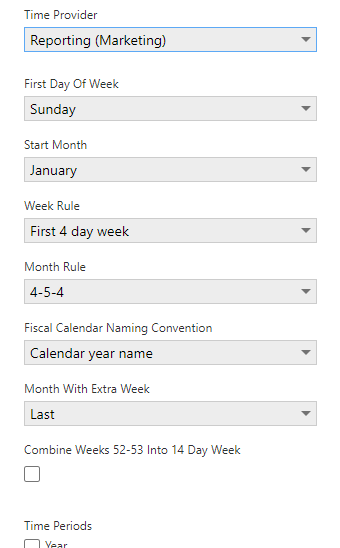
The 13 weeks within each quarter may be further divided into a combination of 4-week months and 5-week months. For example, a 4-5-4 reporting calendar defines a quarter using the combination of a 4-week month, followed by a 5-week month, and then followed by a 4-week month. The other possible Month Rule options you can select are 4-4-5 and 5-4-4. The reporting calendar effectively lets you define a month-week hierarchy, whereas weeks do not divide evenly into Gregorian calendar months.
Since a reporting year consists of 52 weeks, totaling 364 days, after a certain number of years an extra week is inserted into a year to ensure it remains close to Gregorian calendar years that are typically 365 days. The Week Rule options determine when each reporting year starts based on the day of the week on which the Gregorian year starts, which results in most years having 52 weeks but some having 53. The reporting year can start on the first day of the week of the First 4 day week, the First full week, or the First day that occurs within the Gregorian year.
When a year is made up of 53 weeks as described above, the Month With Extra Week setting determines whether this week is added to the First or Last month of the year (e.g., turning the Last 4-5-4 month into a 4-5-5 month). You can also choose Combine Weeks 52-53 Into 14-day Week if preferred (in version 8.0.2 and later).
2.5. 13 Period
The 13 Period calendar divides each typical year into 13 periods of 4 weeks each, making each period similar to a month but with an equal number of days for easier 'monthly' comparisons.
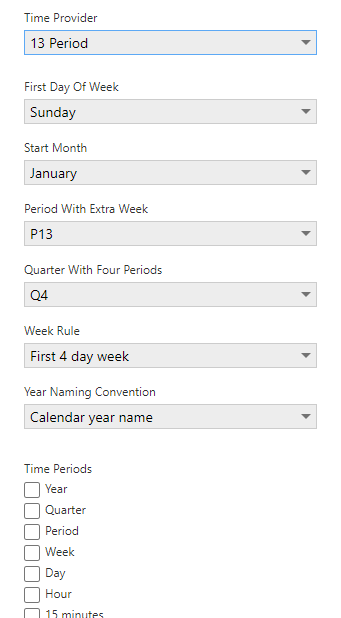
As with the reporting calendar, a 13 Period year consists of 52 weeks, totaling 364 days, and an extra week must be inserted into certain years to ensure it remains close to Gregorian calendar years. The Week Rule options determine this as described above for the reporting calendar.
When this causes a year to have 53 weeks, the extra week is typically assigned to the 13th period of that year, but you can customize this with the Period With Extra Week setting.
If you select to include the Quarter time period in your time dimension, one of your four quarters must be made up of four periods rather than three in order to have 13 periods per year. This is customizable with the Quarter With Four Periods setting.
3. Formatting time dimension levels
You can change the formatting of a time dimension's levels once it's been created (click to Save a new time dimension first). Find and open it in the main menu under Business, or right-click it in the Explore window and choose Edit.
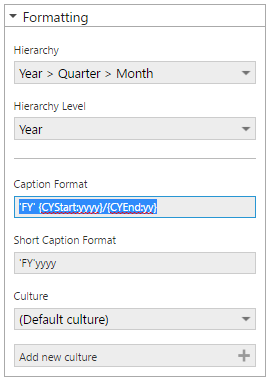
In the Time Dimension dialog, scroll down and click to expand the Formatting section, which lets you choose different formatting options for each hierarchy level as well as for different cultures.
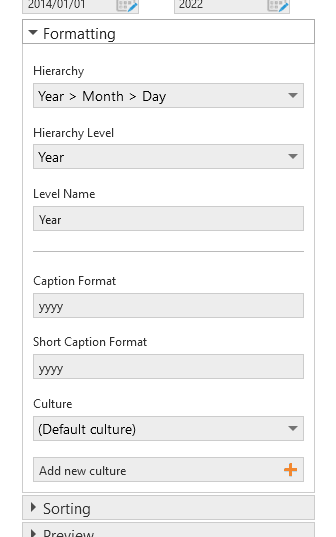
If the time dimension you're editing has multiple hierarchies, first select a Hierarchy for formatting.
Next, choose a Hierarchy Level to format. You can optionally customize the Level Name.
Set the desired formats in the Caption Format and Short Caption Format boxes. These can be .NET standard date and time formats or custom date and time formats, or see the sections below for additional options for certain calendar types and levels.
Standard date and time formats are specified by a single character and place their date and time components automatically according to the culture of each logged-in user. Below are some examples:
| Standard Format | Specifier | Sample Text |
|---|---|---|
| Short date | d | 6/12/2015 |
| Long date | D | Friday, June 5, 2015 |
| Short time | t | 8:31 AM |
| Long time | T | 8:31:05 AM |
| Long date, short time | f | Friday, June 5, 2015 8:31 AM |
| Long date, long time | F | Friday, June 5, 2015 8:31:05 AM |
| Month/day | M | June 05 |
| Month/year | Y | 2015 June |
Custom formats allow you to place each date and time component yourself. An example of a complete custom format is yyyy-MM-dd. Some common custom format specifiers:
| Custom Format | Specifier | Sample Text |
|---|---|---|
| Year | y, yy, yyyy | 5, 05, 2005 |
| Month | M, MM, MMM, MMMM | 4, 04, Apr, April |
| Day | d, dd, ddd, dddd | 9, 09, Wed, Wednesday |
| 12-hour clock | h, hh | 9, 09 |
| 24-hour clock | H, HH | 9, 09 & 21, 21 |
| Minutes | m, mm | 6, 06 |
| Seconds | s, ss | 8, 08 |
| AM/PM | t, tt | a, AM |
| Fractional seconds | f, ff, fff | 6, 61, 611 |
| Literal text | 'My Text' | My Text |
The Culture dropdown optionally allows you to set up different format settings for users logged in with different cultures (languages). You can click Add new culture and enter a localization culture code/tag such as fr-Fr or de-AT, then switch between options in the culture dropdown while setting up your formats.
Click the Save button at the bottom of the dialog when finished.
3.1. Fiscal month formatting
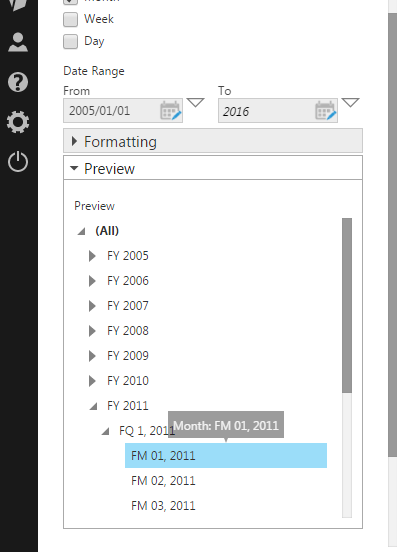
Fiscal time dimensions provide the option of formatting months using either fiscal or calendar values, or a combination of both.
After opening your fiscal time dimension, scroll down and expand the Preview section, and observe that the month level is formatted to display Fiscal Month Number and Fiscal Year values.
The following table summarizes the formats that are supported when setting up the captions in the Formatting section:
| First Character of Format | Displays | Options |
|---|---|---|
| Not @ or ! | Fiscal Month Number and Fiscal Year |
|
| @ | Calendar Month and Fiscal Year |
|
| ! | Calendar Month and Calendar Year |
|
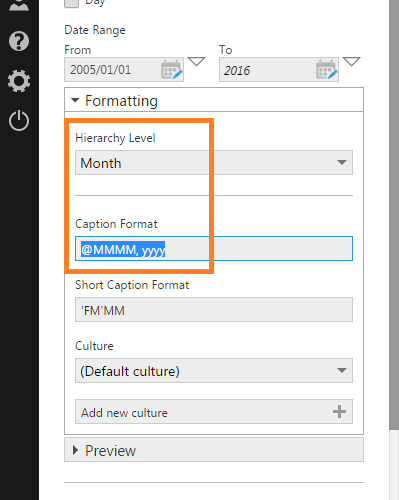
As an example of displaying the Calendar Month Name and Fiscal Year values, set the Hierarchy Level to Month and change the Caption Format from 'FM' MM, yyyy to @MMMM, yyyy.
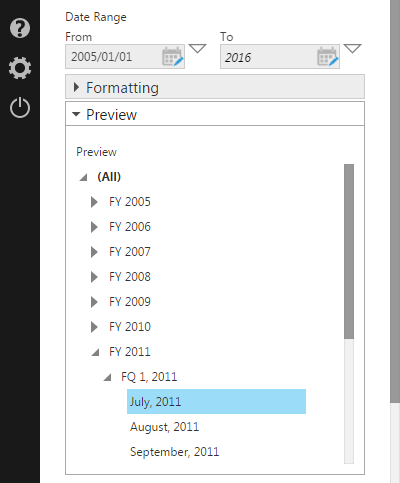
Click Save when finished. Re-opening the time dimension again and going to the Preview section then shows different results:
3.2. Fiscal year formatting
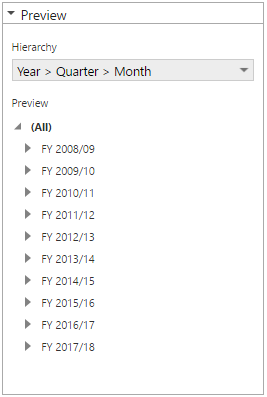
You can change the default fiscal time dimension formatting to include both calendar years at the Year level by using {CYStart:<format>} and {CYEnd:<format>} placeholders, where you can specify the formats for each.
For example, with the Hierarchy Level set to Year, change the Caption Format to 'FY' {CYStart:yyyy}/{CYEnd:yy}.
After clicking to Save your changes, opening the time dimension again and expanding the Preview section shows these results:
3.3. Week start/end formatting
When Time Provider is set to Gregorian, Fiscal, Reporting (Marketing) or 13 Period, you can format the Week level to include the start and/or end of the week. Use {CWStart:<format>} and {CWEnd:<format>} in the caption settings.
For example, if the Caption Format is set to {CWStart:MMM/d/yyyy} 'to' {CWEnd:MMM/d/yyyy}, weeks will be displayed in the style May/26/2019 to Jun/1/2019.
3.4. Quarter start/end formatting
When Time Provider is set to Gregorian, Fiscal, Reporting (Marketing) or 13 Period, you can format the Quarter level to include the start and/or end of the quarter. Use {CQStart:<format>} and {CQEnd:<format>} in the caption settings.
For example, if the Caption Format is set to {CQStart:MMM/yyyy} 'to' {CQEnd:MMM/yyyy}, quarters will be displayed in the style Apr/2019 to Jun/2019.
3.5. Reporting and 13 period weeks
Weeks in a Reporting (Marketing) or 13 Period time dimension are identified by default by week numbers relative to the year. Since weeks are evenly divisible into 'months' or 'periods' in these time dimensions, you can choose to format them instead to display the week numbers relative to each month or period.
When setting captions for the Week level, you can type {WeekOfMonth} for a reporting time dimension, and {WeekOfPeriod} for a 13 period time dimension.
4. Sorting time dimension levels
You can optionally change the sorting of the time dimension's hierarchy levels. This will determine the default sorting of the time dimension's members when used in metric sets and when listed in filters connected to the time dimension.
Open your time dimension from the main menu or Explore window, and click to expand the Sorting section of the Time Dimension dialog.
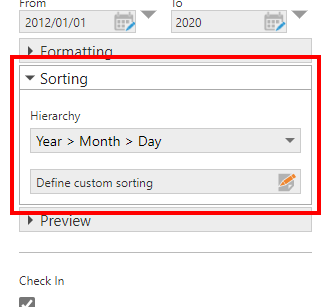
If your time dimension has multiple hierarchies, choose one in the Hierarchy dropdown.
Click Define custom sorting to open the Set Up Hierarchy Sorting dialog, where you can click the Edit button next to each of the hierarchy's levels to set up its sorting.
Sorting each level of a time dimension is similar to how you can configure each hierarchy level's sorting in a metric set, allowing you choose between Ascending, Descending, and specific members to display at the top & bottom. For details on these settings, see Define custom hierarchy sorting.
5. Previewing your time dimension
Open an existing time dimension after it's been created or saved to preview how its members are organized, formatted, and sorted.
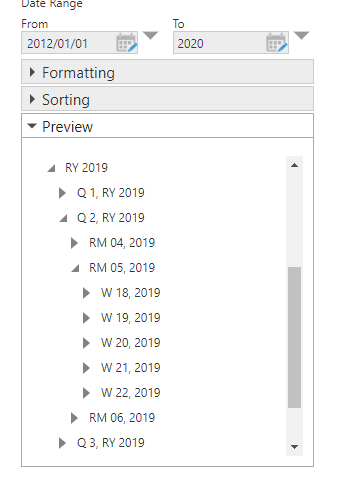
In the Time Dimension dialog, scroll down to find the Preview section which lets you preview the hierarchy levels and members of your time dimension.
For example, the figure below shows the preview for a Reporting calendar used by a large retail company.
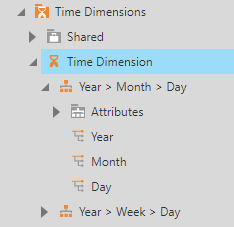
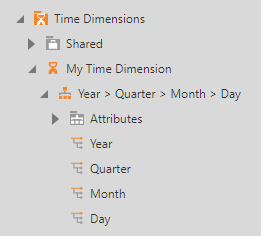
6. Time hierarchies and attributes
Hierarchies with multiple levels will be automatically available from a time dimension based on the indicated type of calendar and the selected time periods. For example, the built-in default time dimension has a Gregorian calendar with the Year, Month, Week, and Day time periods selected. Since weeks are not divisible into months, there will be two hierarchies available from the same time dimension:
- Year > Month > Day
- Year > Week > Day
Within each hierarchy there may also be attributes available to use in metric sets:
- Quarter of year
- Month of year
- Week of year
- Day of week
- Day of month
- Hour of day
These attributes are available for any calendar type and behave differently from the Month and Day levels of hierarchies as shown below:
-
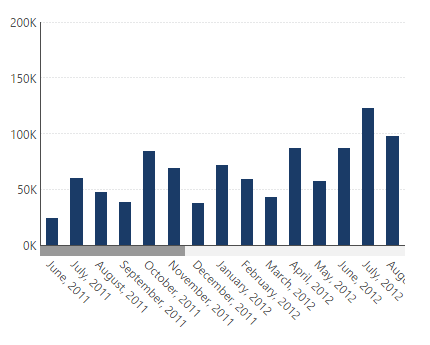
The Month and Day levels group values occurring during a single month occurring in a particular year, or a single day occurring during a particular week:
-
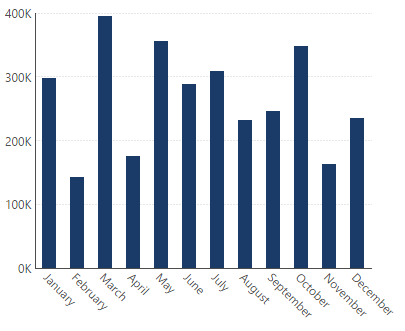
Month of year groups the values by month from all years, and Day of week groups the values occurring during a single day of any week:
-
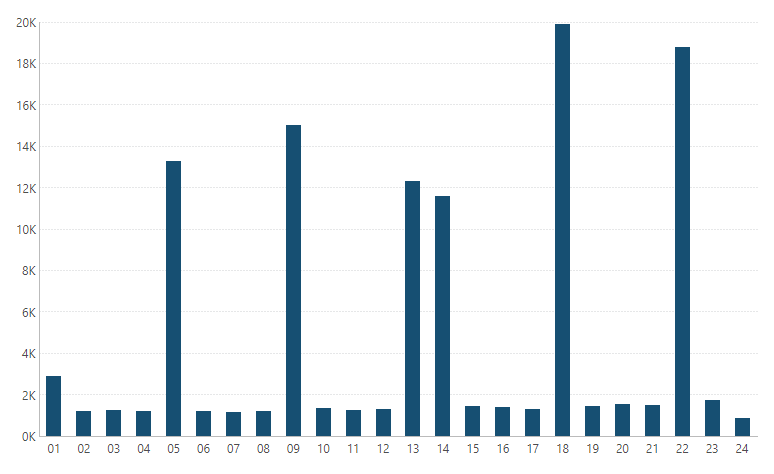
Week of year groups the values by week number for all years:
-
Day of month groups the values by day number for all months and years:

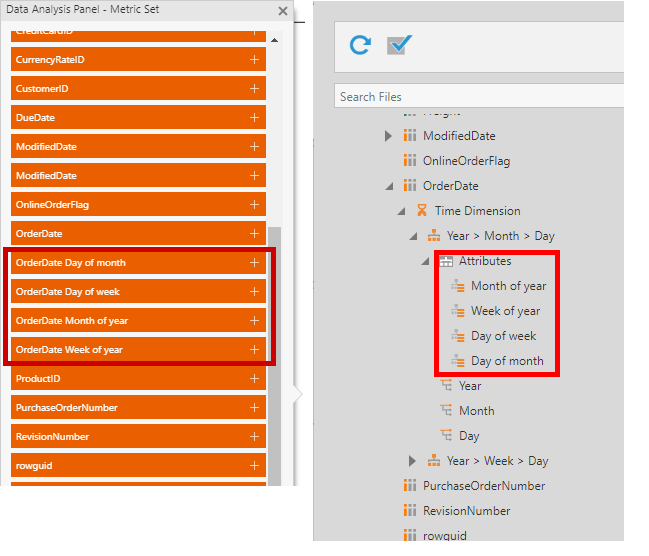
To apply a time dimension hierarchy or attribute to your data to group by a level like Year or attribute like Month of year, drag it from the Explore window to the Data Analysis Panel. You can drag it on top of some existing 'raw' date and time data in the Data Analysis Panel previously dragged directly from a data connector, or you can drop it onto the area labeled drop a hierarchy to add this data and apply the time dimension in one step.
For details, see Metric set analysis tools or the walkthrough View data with a chart and drill down. For data that was prepared as a data cube, the data cube can be edited and its Process Result configured to use a time dimension hierarchy.
If you already used a time dimension hierarchy in your metric set or if one was used in the data cube you're using, you can also click to add its attributes in the Data Analysis Panel from the list that's displayed. You can also drag them from the Explore window, and time dimension attributes can be dragged on their own if you only want the attribute and not its hierarchy in your metric set.