
1. Overview
This article shows you how to manage projects and their files as an administrator, including data cubes and their storage.
All of your work items such as data cubes and dashboards, are treated as files within the file system. A project lets you organize related files and collaborate with other users who have access to the same project. See Working with projects for more details.
2. Add a new project
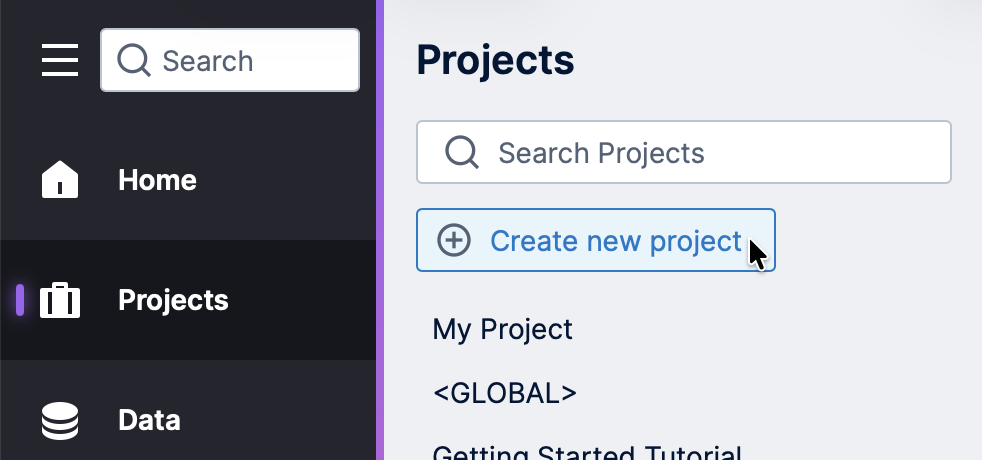
Administrators can add new projects from the main menu on the left.
Create a new project at any time by clicking Projects, and then click Create new project or Add New... in the list of projects that appears.
You can also add a new project from the toolbar of the Projects page in Administration, shown in the next section.
In the Create a New Project dialog, type a name for the new project and set the Initial Project Privileges:
- Private – After the project is created, only the creator will have access to it.
- Public – After the project is created, the Everyone group will have Read access to it.
- Custom – After the project is created, the project's Security dialog will open.
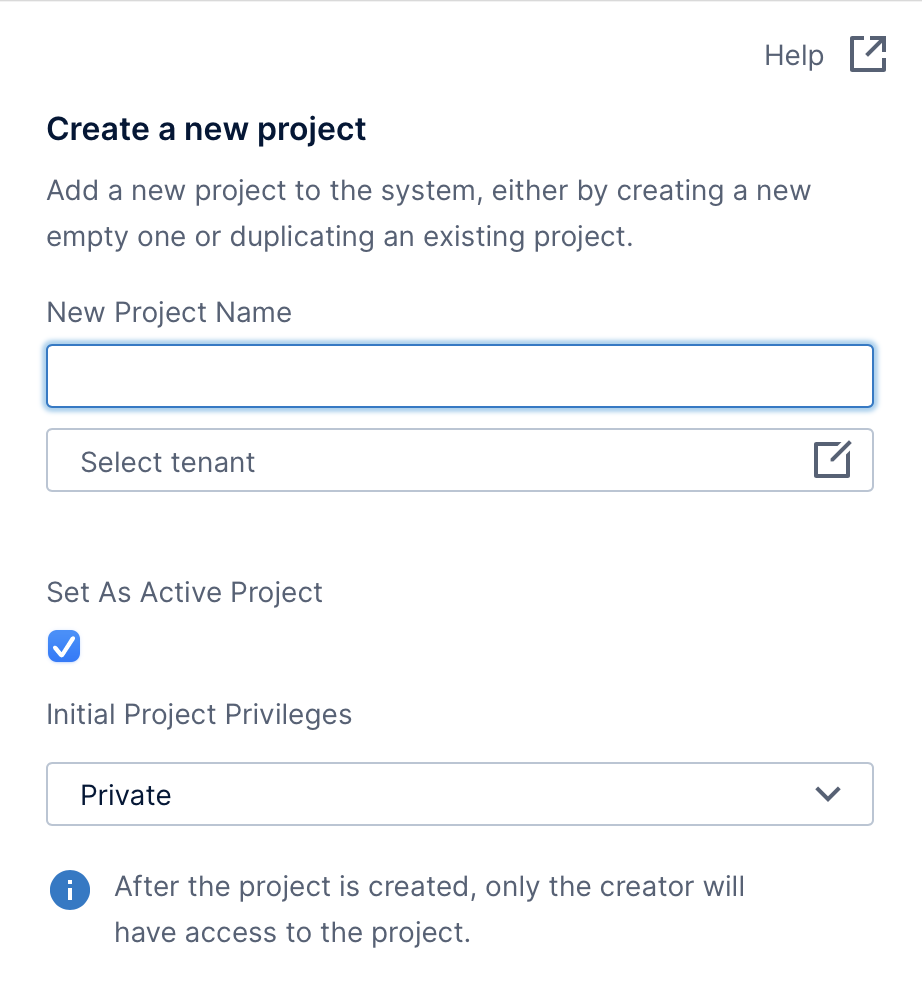
If you're using multi-tenancy and have existing tenants, you can choose a tenant to be associated with the new project. Projects not assigned to a tenant can be accessed by all tenants with access according to the project's security privileges.
Select the Active Project option if you also want the new project to be set as the active/current project once it's created, otherwise you and other users with access can select it from the main menu.
3. Manage projects
You can manage existing projects from the Administration area, which administrator users can access from the main menu.
Under the Projects / File System section on the left, click on Projects.
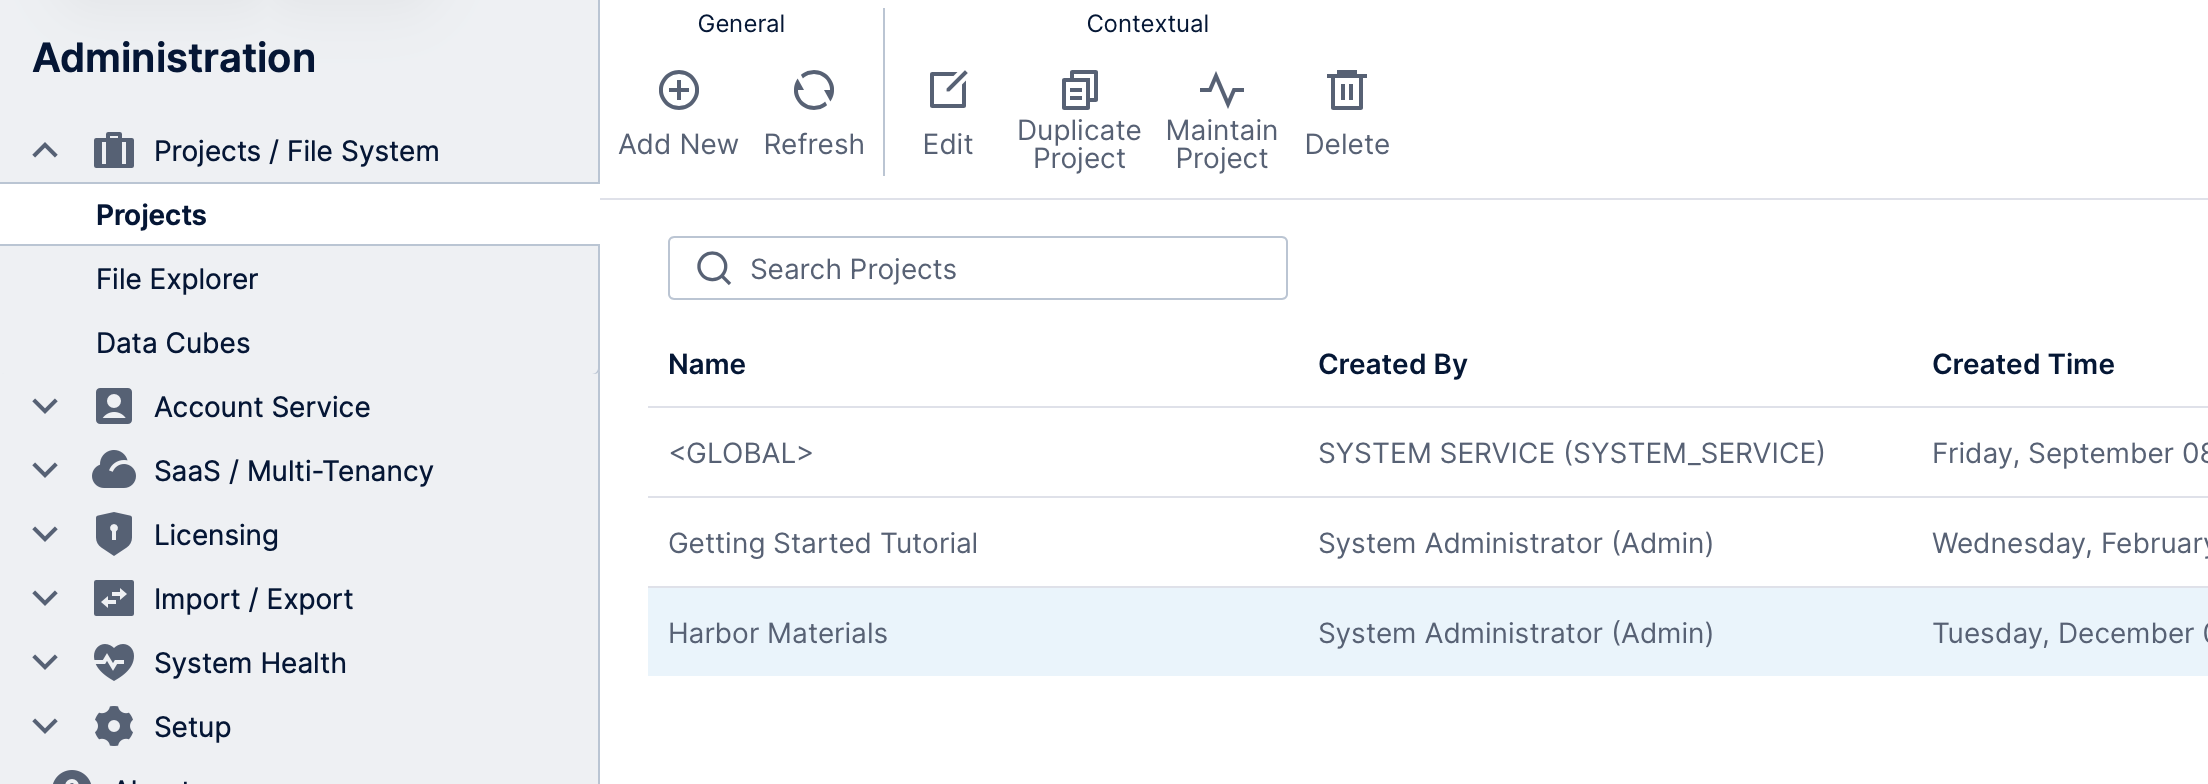
Click to select a project and choose from the options shown in the toolbar:
-
To view or modify the settings for a project in the list, including its name, tooltip description, and security privileges, click Edit in the toolbar to open the Properties dialog.
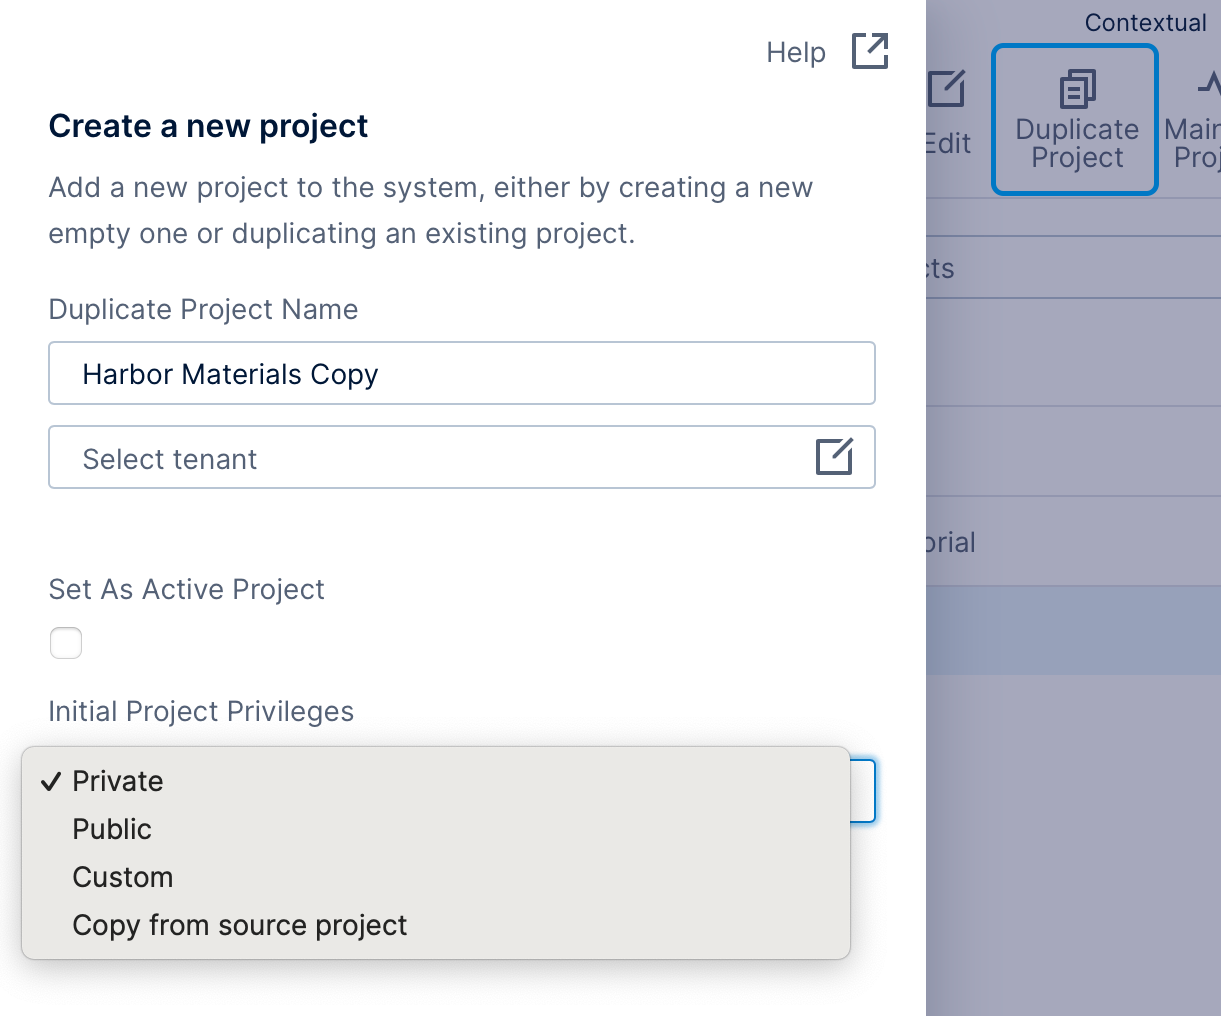
- Make a copy of an existing project by clicking Duplicate Project in the toolbar. You'll be asked to enter a new name for the copy and the Initial Project Privileges. The privileges dropdown provides the same options as for new projects, except that you can also choose Copy from source project to continue using the same security privileges in the new duplicate project.
-
Click Maintain Project in the toolbar to view, edit, and delete unused entities in the project.
- To delete a project, click Delete in the toolbar and then confirm the operation. Note that the built-in <GLOBAL> project and default tenant projects cannot be deleted.
Administrators can also access several of these options whenever right-clicking a project in any file explorer throughout the application, including in Open dialogs and the Explore window.
3.1. User projects
The list of projects in the Projects screen does not include each user's personal project (named 'My Project'). To access another user's personal project, edit the user's account, scroll down, and click the button for their project.
4. Using the file explorer
Under Projects / File System, the File Explorer option lets administrators navigate projects and manage the files and folders they contain. It provides administrators the same options as the Explore window but shows all projects at once.
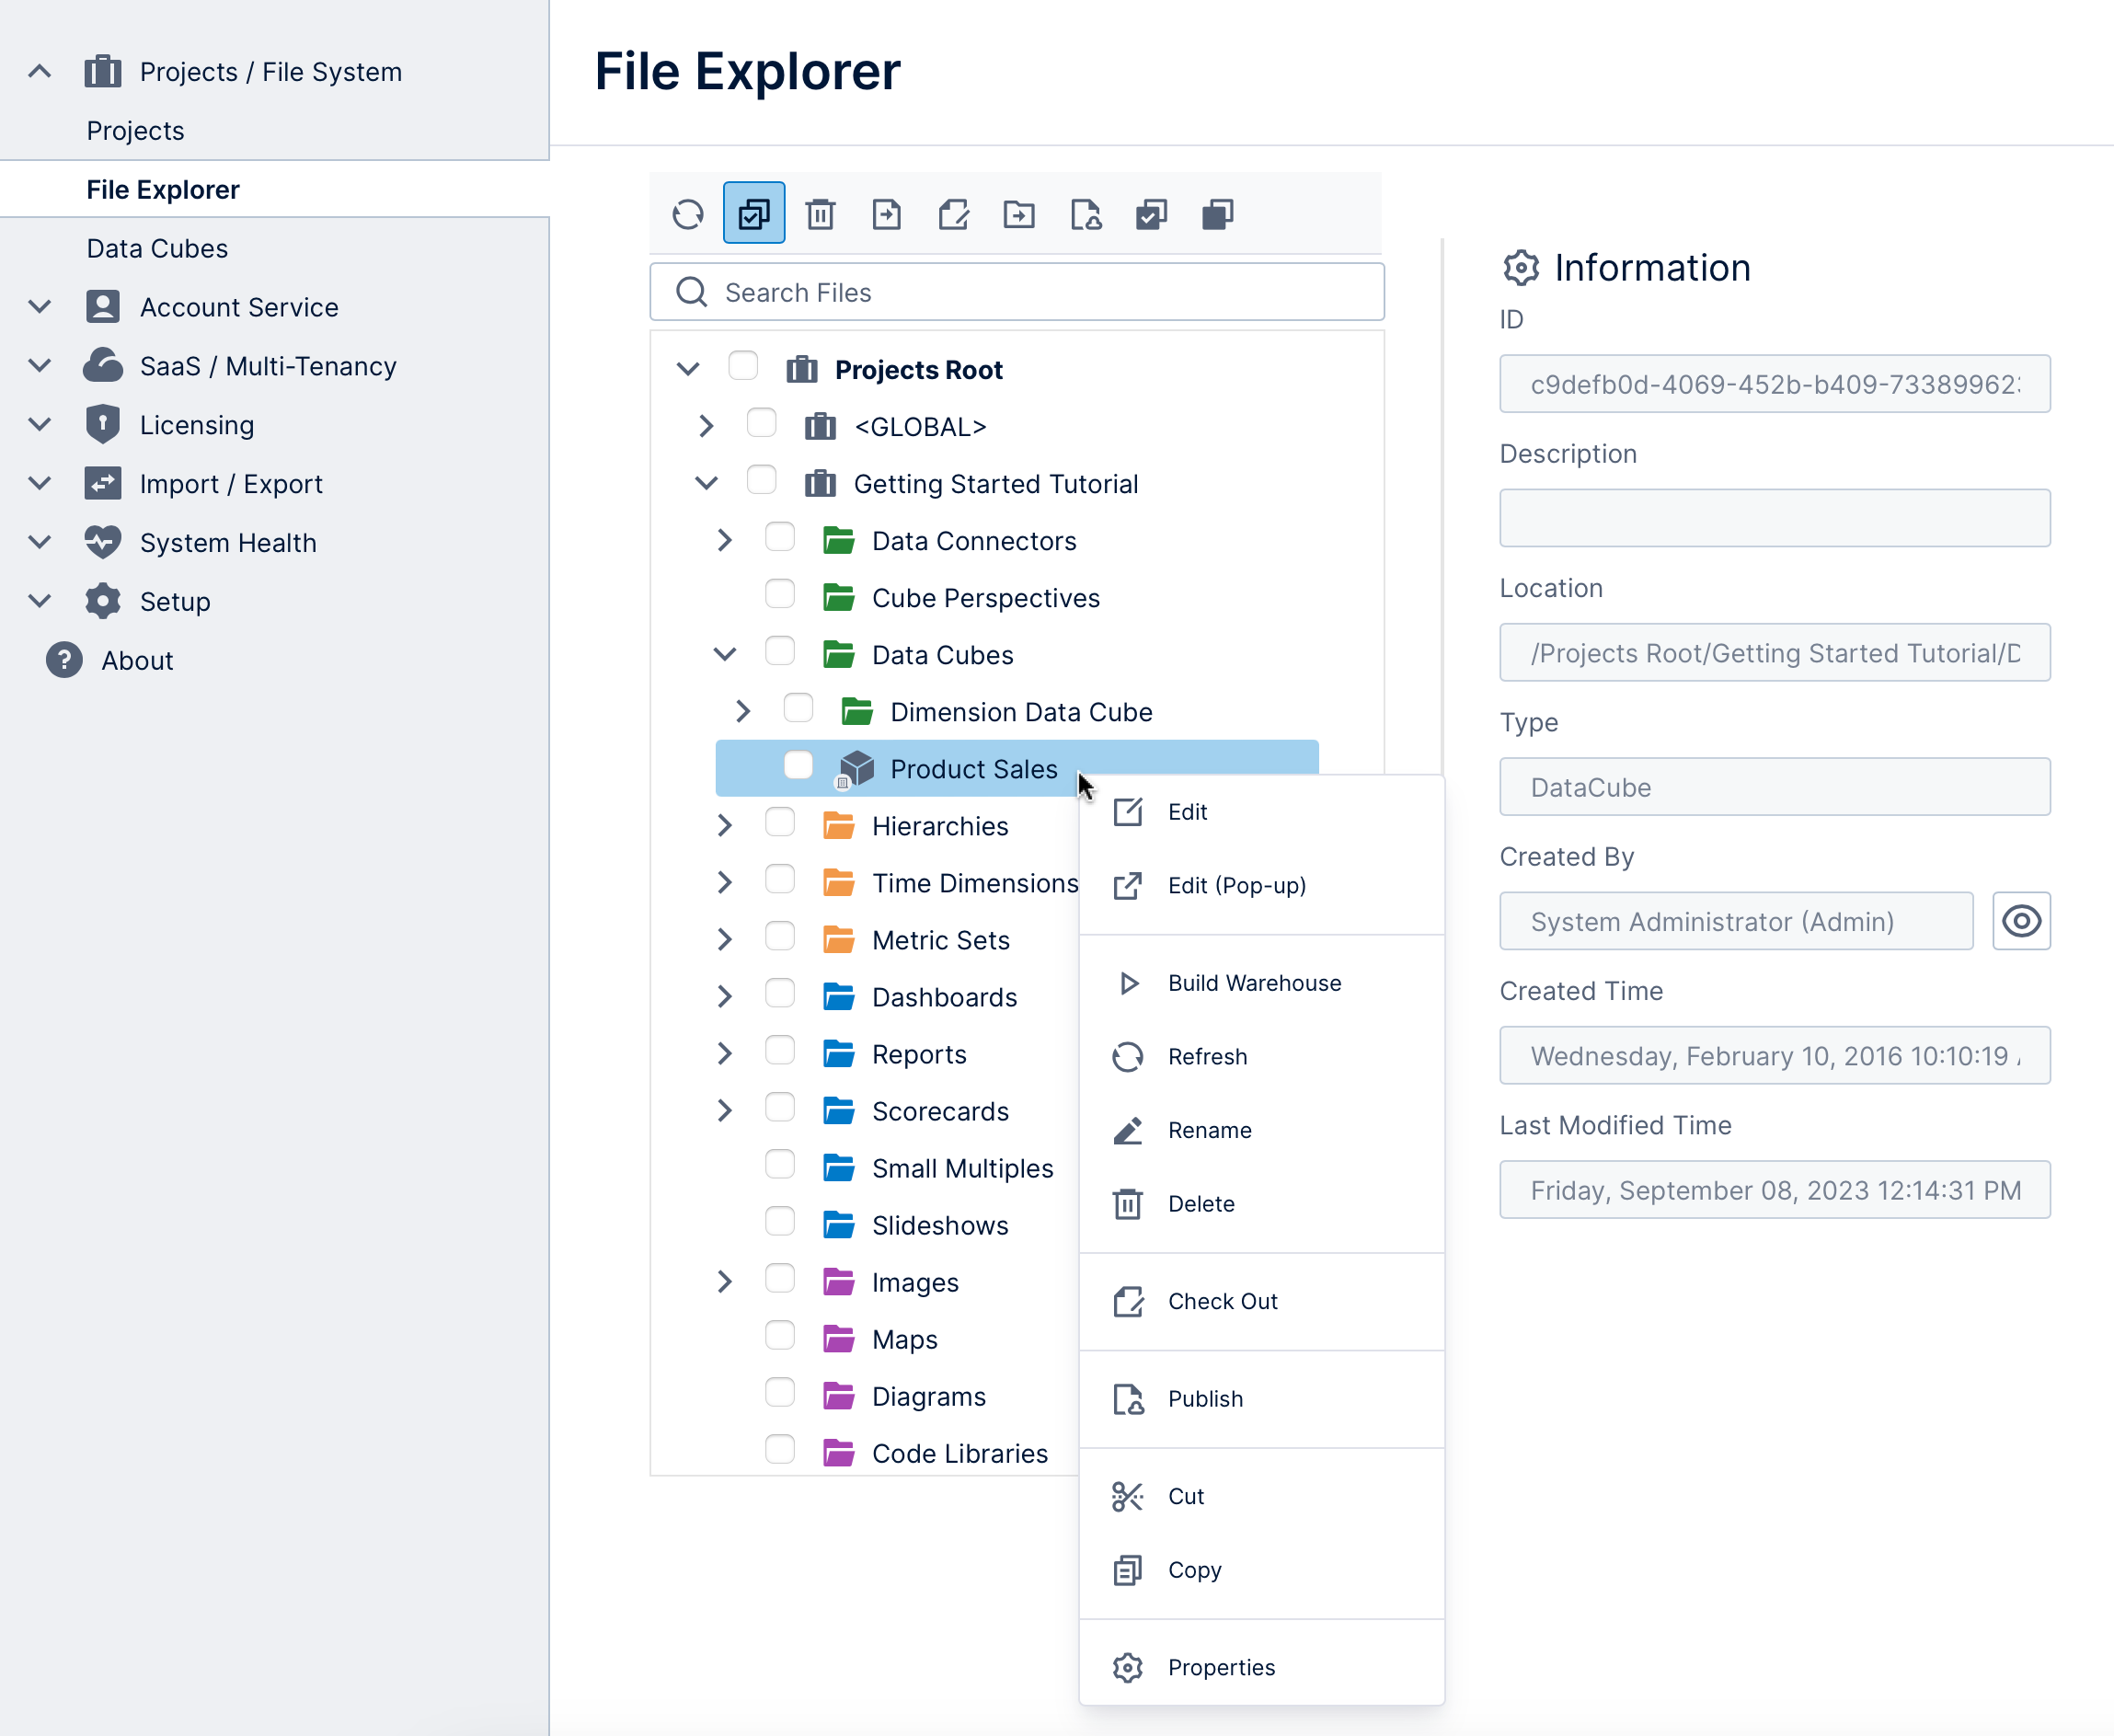
You can use either the File Explorer or the Explore window to:
- Right-click on an individual file or folder to edit or publish, manage check out status, cut/copy/paste between folders, create new files or folders, or view or edit properties such as security privileges.
- Use the checkboxes next to the files to select files and perform a batch operation on them, choosing options from the toolbar similar to the right-click operations.
- When you click on a file, some quick details are displayed to the right similar to the properties. You can toggle off the checkboxes from the toolbar if you want to click to select files only to view these details.
- Search for files by typing in search terms or by entering the file ID (e.g., if provided in an error message).
Depending on their security privileges, non-administrator users can also perform most of these operations from their Explore window within their current project.
Administrators have a Transfer Check Out option when another user has a file checked out. If that user is unavailable, for example, you can transfer their changes to your account and either check in or undo their changes and allow someone else to check out the file.
5. Managing data cubes
Under Projects / File System, click Data Cubes to manage data cubes and especially their storage options and build status.
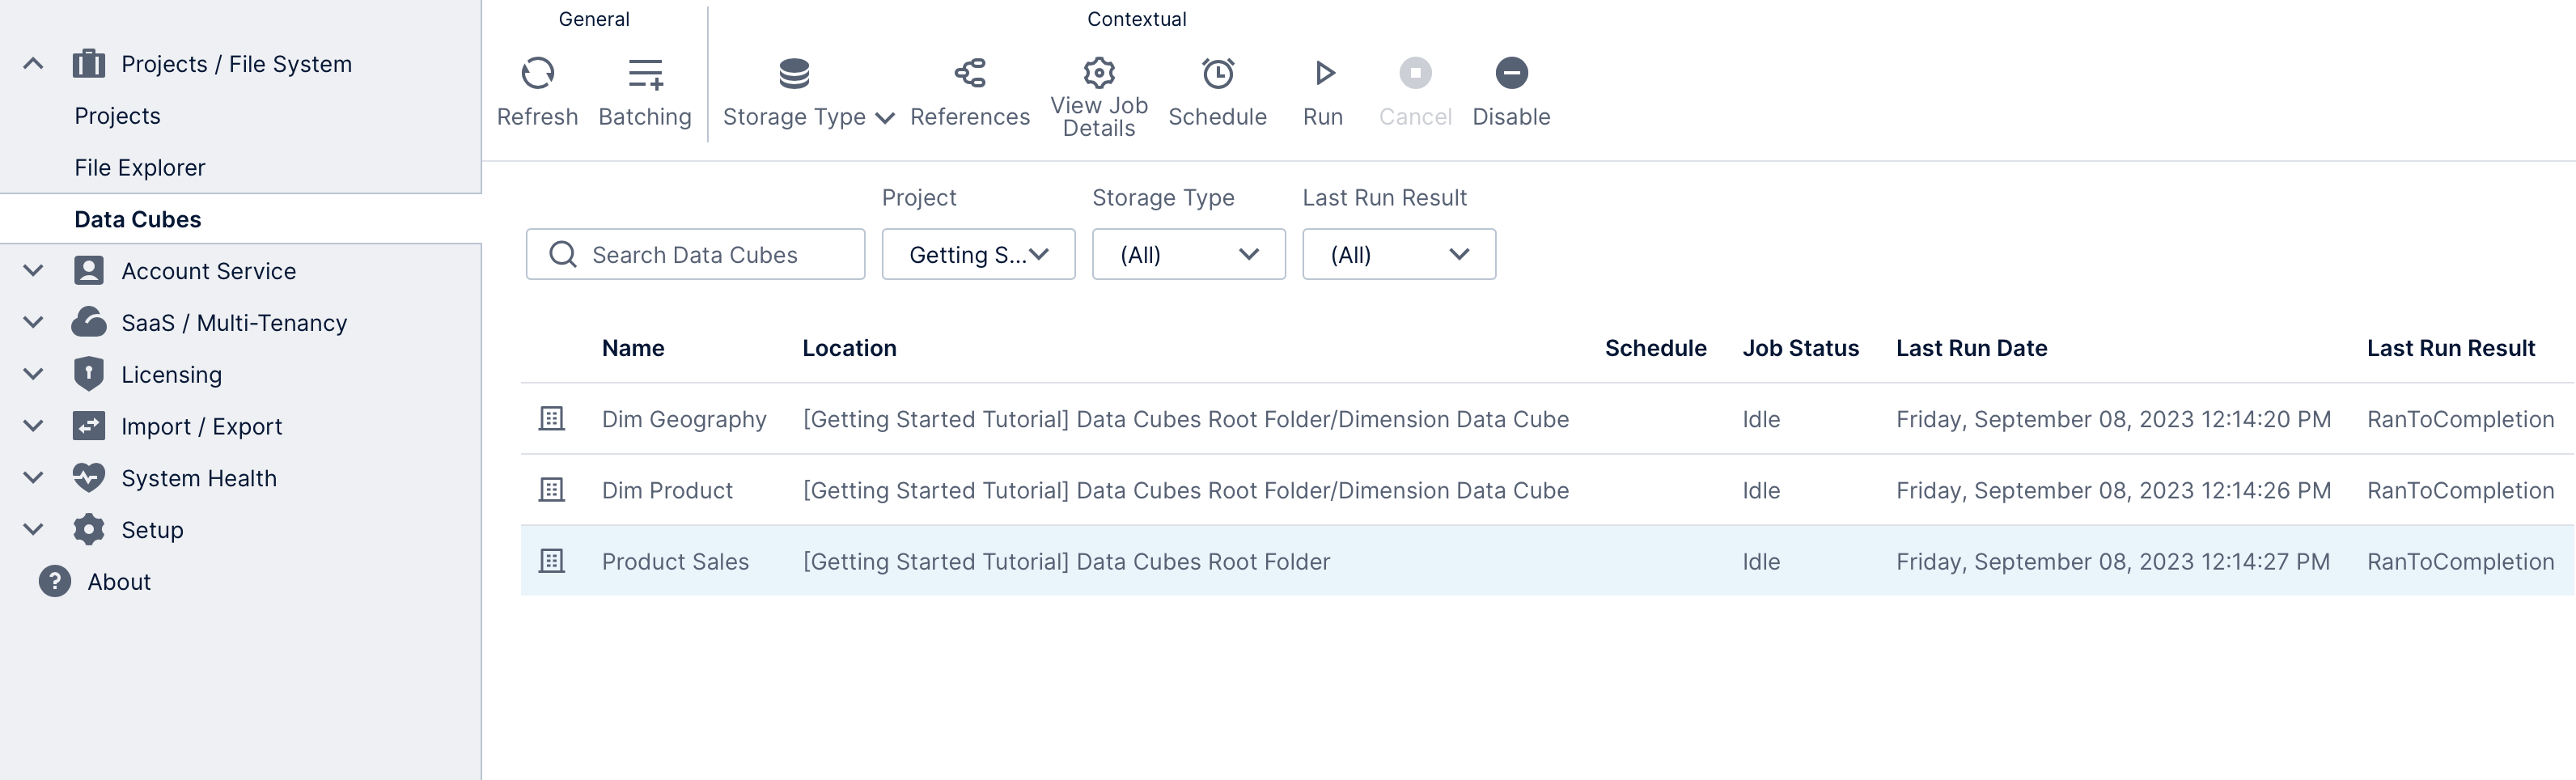
Data cubes are listed by name and filtered by the Projects dropdown, which you can use to switch between projects or to view all of them at once. You can also view and filter by the storage job status for data cubes using warehouse or in-memory storage (as indicated by their icons).
Click to select a data cube to choose from options in the toolbar:
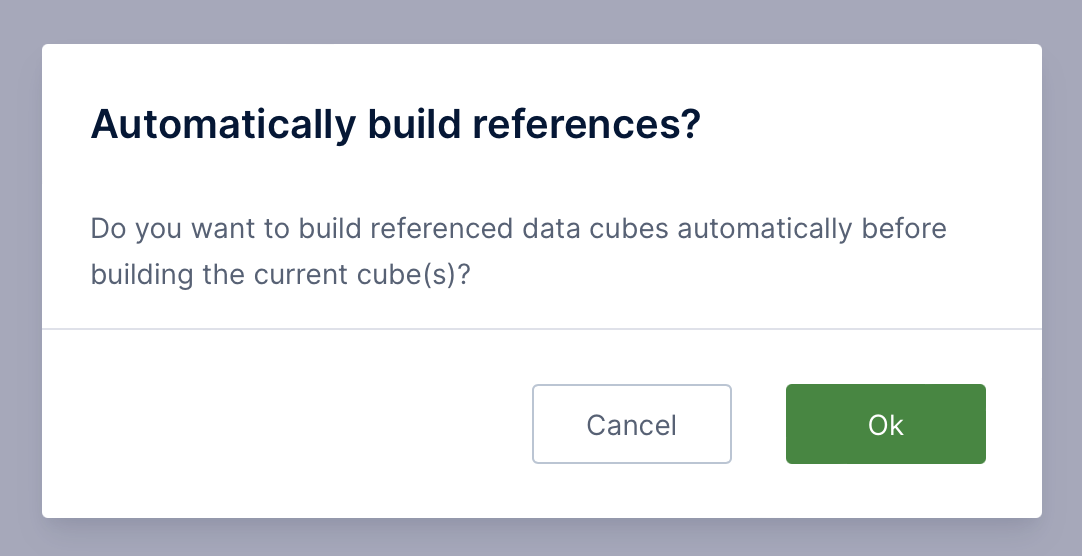
- You can quickly change the cube's Storage Type. For warehouse or in-memory storage, you'll be given the option to automatically build other cubes that it references directly via Data Cube transforms.
- Access the data cube's References, especially to find data cubes that reference each other or are dependencies, either directly or indirectly. This is the same dialog you can access from each file's Properties.
- For data cubes using a storage option, you can schedule, run, cancel, or disable its storage job, or navigate to its full job details page.
If you are managing a multi-tenant instance, the Tenant Filter field will be available on this screen. Set it to manage data cubes created by a tenant's users, or to view and edit optional separate schedules for each tenant for a data cube based on tenant overrides rather than use a single shared schedule.
5.1. Batching
When you have multiple data cubes that you want to build all at once, click Batching in the toolbar to be able to select multiple data cubes using checkboxes along the left.
You can then build all of the selected cubes at once by clicking Run in the toolbar.
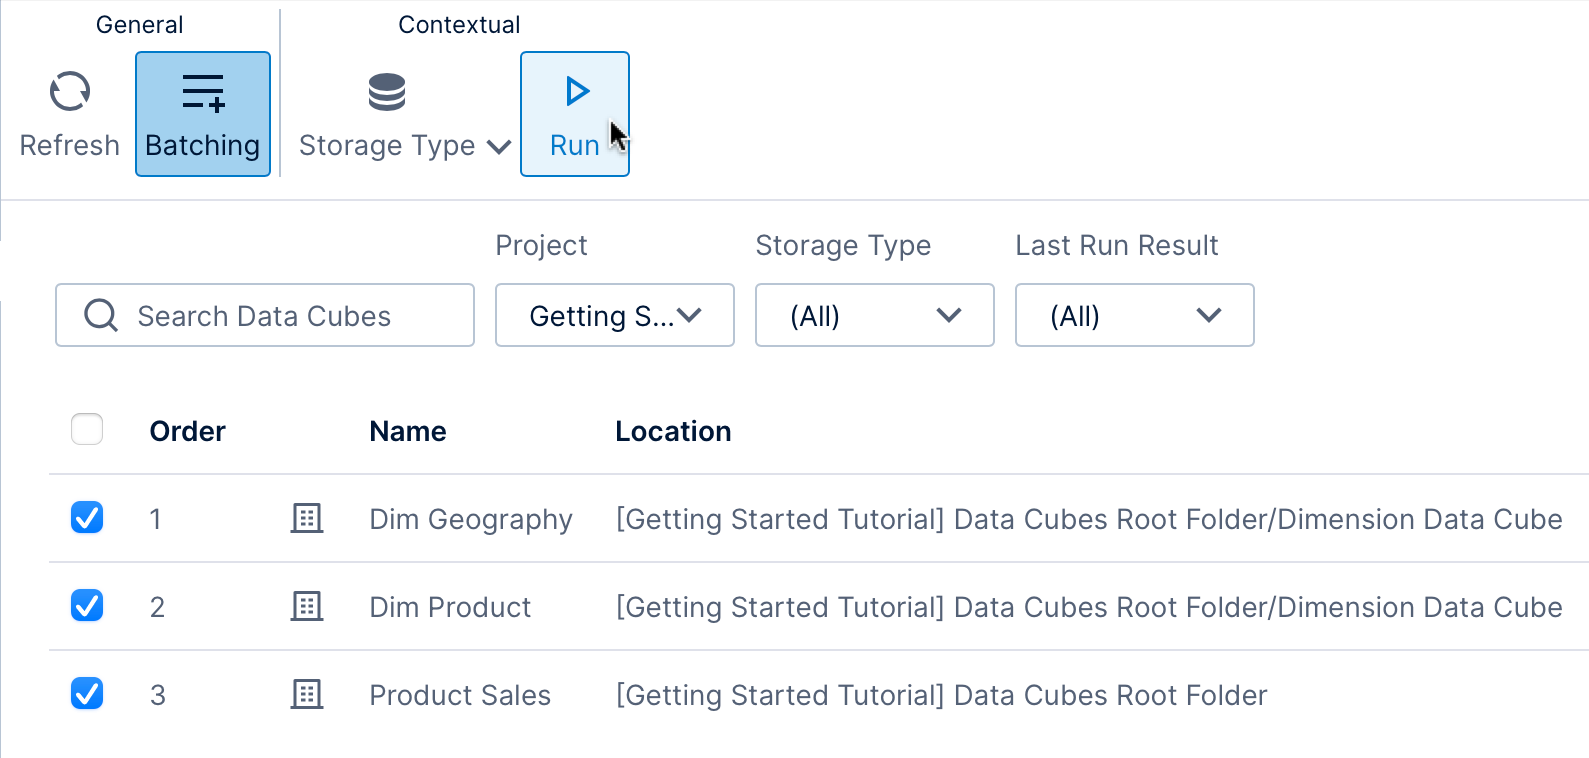
You can also set up scheduled builds for the selected cubes, optionally including references, which will build each cube in sequence together. If you have a particular order in mind, click the individual checkboxes to select them in that order, and their sequence will then be indicated in the Order column.
With one or more cubes selected, click Storage Type and choose from Warehouse or In-Memory storage. The Schedule Rule dialog will appear just like it does for individual data cubes, but in this case applies to multiple. After submitting this dialog, you will be given the option to automatically build directly-referenced data cubes at the same time.
Setting up a batched storage job like this creates a new sequence type job that builds storage for the cubes together in sequence in the order you selected.
Now when you view the schedule and build status for these cubes, or navigate to their job details, it will be for this sequence storage job.