
1. Overview
This article introduces the concepts behind reports, which are one type of view you can create. This type of report is sometimes called multi-page or paginated reports.
There are two main differences between dashboards and reports in Dundas BI and Logi Symphony:
- Reports are designed to be laid out into pages and you typically scroll them to see their content, while dashboards are usually designed for displaying on computer and mobile screens without scrolling when possible. Reports include page headers and footers and are ideal for saving as a PDF file and printing, although you can also view them directly in your browser where they are interactive like dashboards.
- Reports enable you to create detailed views made up of visualizations and other content repeated like a template for each of a series of values in your data. Using template regions, you can produce a wide variety of page-formatted reports.

Walkthrough: Designing an inventory report
Related video: Scorecards and Reports
2. Report regions
You can choose from the same visualizations as are available for dashboards, or any available component, and arrange them anywhere on the canvas. In a report, the canvas contains several specialized regions, many of which repeat the content that you lay out within it like a template. For example, the inventory report shown above includes a row for each product category (e.g., Accessories), and you are able to design the contents of each row to include whatever you like.
The diagram below illustrates the initial regions available in a report that repeats by one set of data. You can drop items onto these regions when editing, then switch to View in the toolbar to see the actual report consisting of repeated elements.
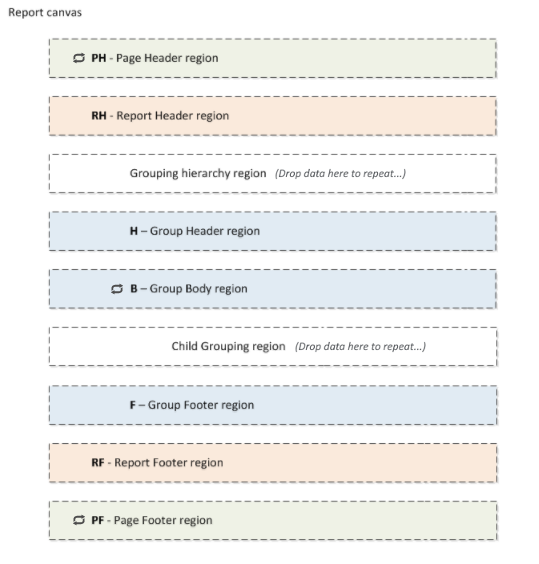
You can add more of any template region to better organize your reports. Simply select one and choose Add Template Area Before or Add Template Area After in the toolbar. Unused template areas will not be visible in the report unless you uncheck the Hidden If Empty property.
2.1. Report header and footer
The Report Header region lets you place elements that appear just once per report. For example, you can show a title for the overall report here. When you create a new report from the main menu, a Label component with the text Title is automatically added and placed in the Report Header region, which you can edit by double-clicking or by using the toolbar or Properties window. You can resize this region and add any other content you like.
Similarly, in the Report Footer region, you can add content to close off your report.
2.2. Page header and footer
Since reports are laid out onto pages, the Page Header and Page Footer regions let you add content to be repeated once per page. A Label component is automatically added with the text [PageNumber] in the Page Header region and another Label component with the text Page [PageNumber] of [TotalPages] in the Page Footer region. These are examples of placeholder labels that you can add yourself from the Labels window.
You can add other content to this header and footer such as a smaller title, a logo, or a separator line.
2.3. Grouping hierarchy region
The grouping hierarchy region (drop data to display as rows) is the key to repeating the Group Body region template. This region is equivalent to the Rows of the Data Analysis Panel for a regular metric set, where you also drag data from the Explore window to display a row for each value. For example, Product Category values were dragged here to achieve the repetition of the gray rows for each category in the inventory report shown earlier. You can drag a hierarchy, hierarchy level, column of data, or a complete metric set here to determine which rows to display.
This region makes up the Rows of the group metric set, which has its own Data Analysis Panel accessible from the icon displayed to its left. This Data Analysis Panel allows you to optionally further customize how the Group Body rows are repeated. For example, you can filter the hierarchy values to remove Accessories, or add a measure such as Qty Left and sort the categories by its values.
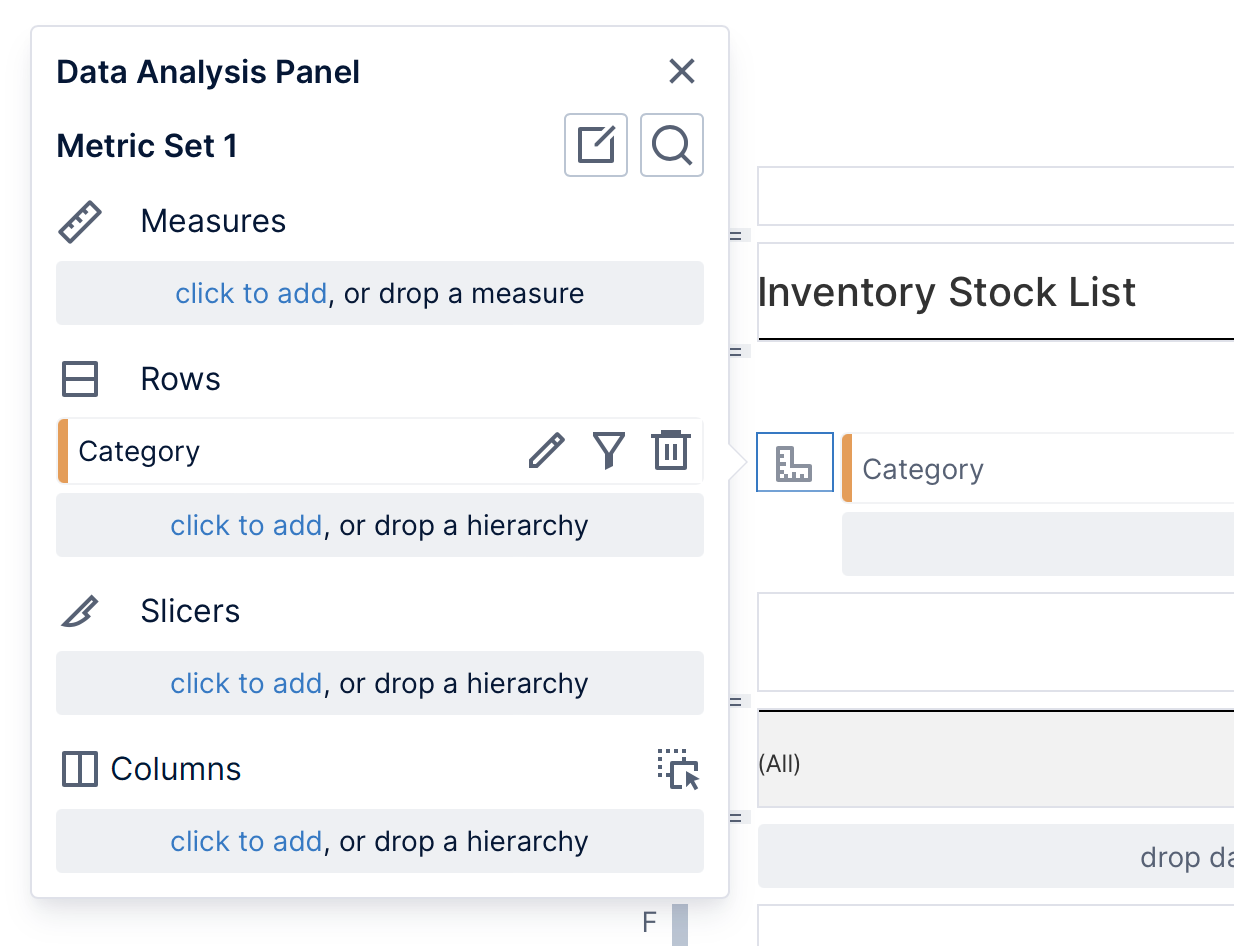
Like Rows in a regular metric set, adding multiple grouping hierarchies to the same region will repeat the group body for each combination of hierarchy values occurring in your data.
2.3.1. Columns hierarchies
In the group metric set's Data Analysis Panel shown above, add data to Columns to repeat content horizontally for each value in reports and scorecards in version 25.4 and higher, similar to small multiples. This can be used to display columns dynamically based on that data like other uses of Columns in the Data Analysis Panel, rather than laying out and positioning each column individually in edit mode.
After adding data to Columns, or if you click the icon to its right, you will enter into a selection mode where you can click to select and deselect which elements should be repeated for each column value. You can also click and drag to select a rectangular area around multiple elements to select them. These can be anywhere in that group's header, body, or footer, so that each column can optionally have headers, cell values, and total values, for example.
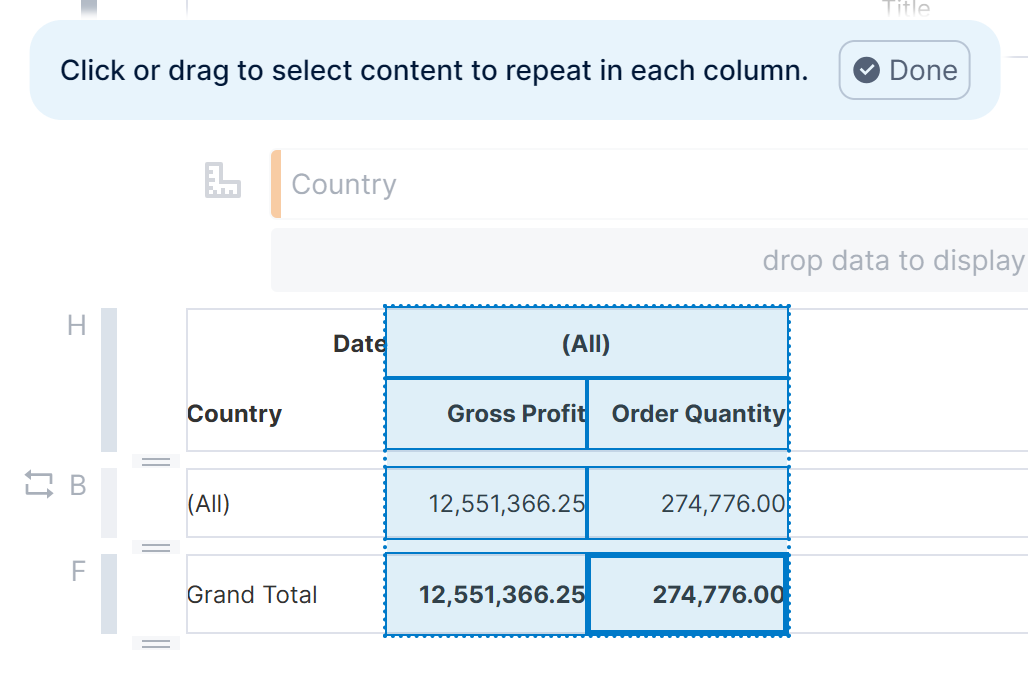
Click Done when finished. You can now reposition the elements and make other changes normally, where elements you chose to repeat as columns will be identified with an icon when selected.
When viewing the report, if there is not enough horizontal space to fit all of the columns at once, they will 'wrap' into a repetition of the group's header, body, and footer below with the remaining columns.
2.4. Group header and footer
The Group Header and Group Footer regions let you place content that appears once per group, either above or below its rows. For example, for the inventory report shown earlier, Header or Label components are added to the Group Header region in order to display the Qty Left and Unit Price column headings. You can also drag data or add visualizations here to display aggregated data in the header or footer summarizing the group items above or below.
Group headers and footers are not repeated unless this group is a 'child' or inner group placed inside another repeating group (see below).
2.5. Group body
When viewing a report, the Group Body region is repeated once for each grouping hierarchy value. For example, if Product Category values are added to the grouping hierarchy region, and there are 20 such categories in your data, the Group Body region will be repeated 20 times and will display data specific to each category.
Within this region, data labels are added automatically to display values as text like a column in a table. You can re-visualize to or add any visualization and display any additional data you like detailing or describing each grouping hierarchy value, such as a line chart displaying the historical stock quantities for each product category over time, or a map visualizing its geographic distribution.
2.6. Child groups
Child grouping regions let you add an inner or nested level of repetition in order to create a report that breaks down details further. For example, the inventory report shown earlier displayed rows for individual products after the row for each product category, which was done by adding Product as a child group within the Product Category group.
When you drag a hierarchy or level to this region, four new regions are automatically inserted into the report, forming a child group consisting of:
- a child group header region - (optional)
- a child group body region - this is the part that repeats
- a child grouping region - lets you insert another nested/child group
- a child group footer region - (optional)
In fact, you can keep on inserting child groups to create deeper and deeper levels of repetition. This allows you to design complex reports that break down details on multiple levels.
The child group has its own Group Body that you can design separately from the outer or parent grouping. In our inventory report example, the product category rows have a light gray background and bold fonts, while the product rows have normal fonts and display measure values toward the right.
Because they are displayed inside another group that is already repeating, child groups can appear multiple times - for example, there is a separate list of products inside each product category in our inventory report. You can choose to add content to the child Group Header or child Group Footer, and these will appear above and below each set of child group body rows.
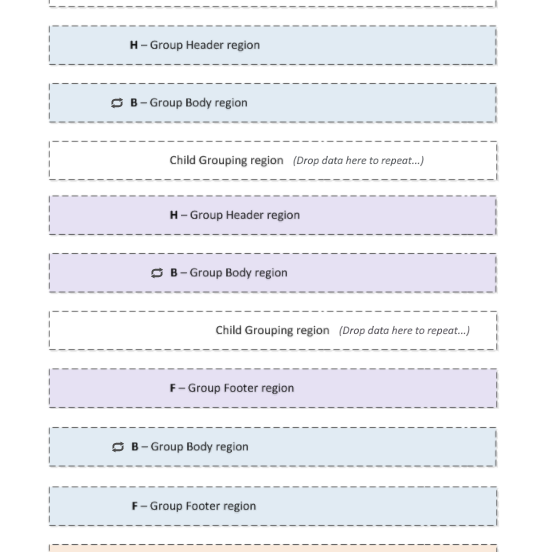
When there is a child group, the parent group has a second group body available for displaying content after the child group. The parent group's body regions and the child group's header and footer are similar, but child group regions do not appear if there are no child grouping hierarchy values. For example, if the parent group is displaying product categories and there is an empty category that contains no products, the parent group body will be displayed for this category but the child group header, body, and footer will not display.
2.7. Sibling groups
In addition to displaying groups inside other groups, you also have the option of adding sibling groups. These are independent from the neighboring groups and may contain data unrelated to the rest. Their repetitions are generated independently, either before or after all of the data from neighboring groups.
Sibling groups can be added using the + buttons to the right of the report canvas. Click the button corresponding to where you want to insert another group: this can be at the top level of the report (after the report header or before the report footer), or as a sibling to an existing child group below the same parent group (after its header or before its footer).
2.8. Table of contents
You can optionally add a table of contents as another section in the report's properties in the Properties window. This section will appear after the report header, and when the report is viewed it will automatically list the template areas you've enabled as table of contents entries along with their corresponding page numbers.
For more details, see Adding a table of contents.
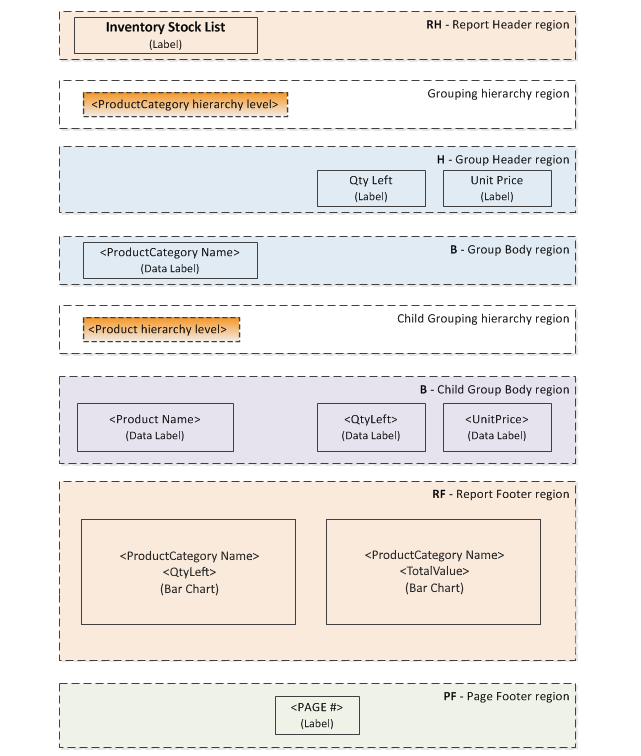
3. Layout for the example report
The following diagram illustrates a simplified design for the inventory report example from the top of this article (unused regions are omitted and are hidden when viewing). This report repeats visualizations on two levels: an initial group that displays each Product Category and a child group displaying each category's Product.
See this walkthrough to learn how to build a similar report.
4. See also
- Walkthrough: Designing an inventory report
- Design tips for reports and scorecards
- Adding a table of contents
- Sorting and filtering a report or scorecard
- Share or export your work
- Adding a data label
- Understanding the data model
- Slicers versus columns and rows
- Building a scorecard
- Video: Scorecards and Reports
- Video: Scorecards and Reports part 2
- Off the Charts: Reporting Capabilities