
1. Overview
A data annotation (measure correction) is a change to a measure value in a metric set, which is then also marked with a comment in visualizations like a regular note or annotation. The measure correction can be made public if the original value was incorrect, or it can be kept private for your own use for analysis or what-if scenarios and then removed.
Since annotations are associated with data, the same correction will automatically apply to other data visualizations or views that are displaying the same data point from the same metric set.
2. Privileges
All users with the power user seat type or higher can correct measure values for their own personal use (indicated as private in the measure value bar). For making measure value corrections that are public for other users to see, users require certain privileges:
- The Correct Measure Values application privilege must be allowed. By default, this is allowed for power users and above, but not for standard users. You can allow or deny privileges for groups of users or individual accounts.
- The user must have Write privileges for the metric set displaying the measure values. This is included when granting Full Control to a user or group for a project, for example, or you can customize permissions on individual files.
You can also prevent data corrections from being applied to certain measures regardless of user privileges, described later.
3. Correct a value
You can correct measure values where they are visualized in a dashboard or another view, or if you have the metric set checked out to you.
If editing a dashboard or another type of view, switch to View mode in the toolbar.
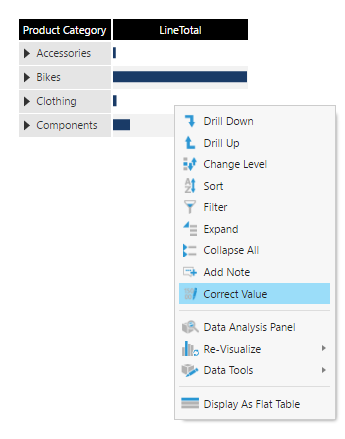
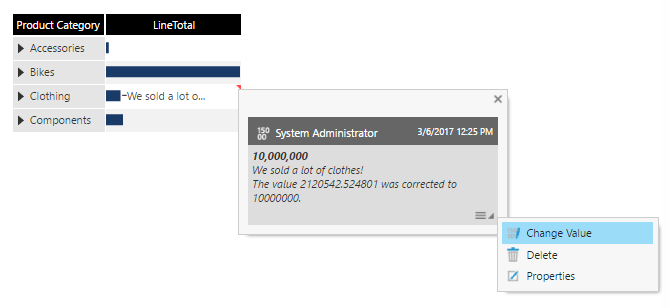
Right-click one of the measure values to open the context menu, and select Correct Value. In the example below, we've right-clicked the data bar for Clothing in a data bar table:
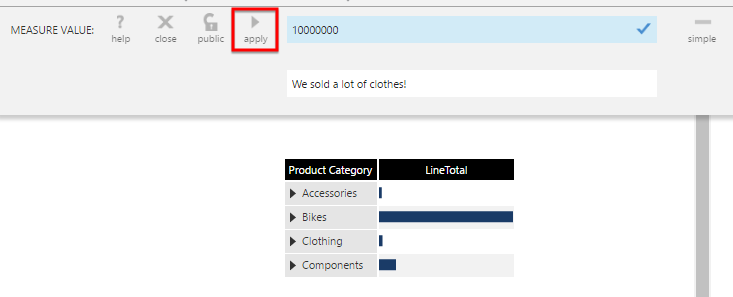
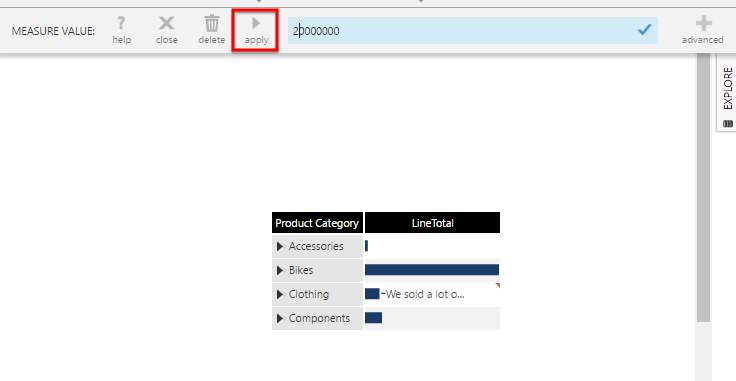
The measure value bar appears below the main toolbar. This is where you enter a new value for the selected measure.
Click the padlock icon to switch between a public or private data annotation. Private corrections are not visible to others and can be used for your own analysis or what-if scenario.
Click advanced if you want to include your own comment for this correction.

Click apply to add the correction.
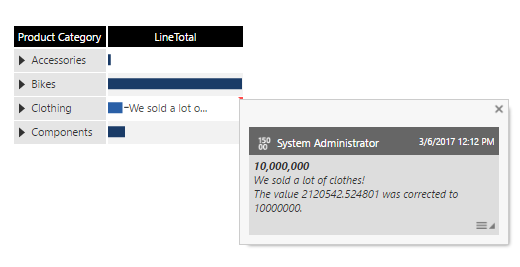
The value correction is applied to the actual data and visualized, but also marked with a note. Any user that sees this value correction can hover over the note to see its details in a popup, including the user that made the change and what the original value was.
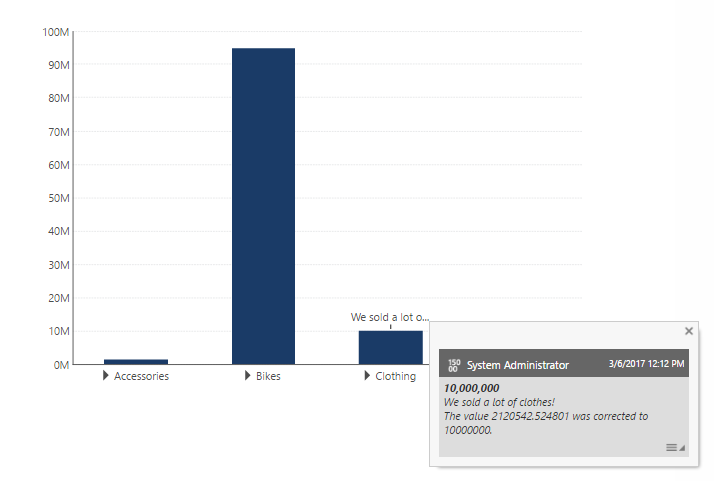
To demonstrate that the measure correction is associated with the data point of the metric set and not this specific visualization, right-click over the visualization and click Re-Visualize, then choose a different visualization. We will choose Bar under Charts in the toolbar. You can hover over the note again to see its details.
4. Change the correction
You or other users with the required permissions can also change the correction.
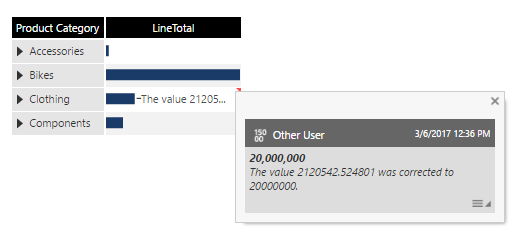
For example, as a different user, hover over an existing note to open its popup. Click the menu button in the bottom right corner. Then click Change Value.
The measure value bar appears below the main toolbar. Enter the revised correction, and then click apply.
The value correction is applied to the data and the note is updated. Hover over the note to see its details.
5. Delete a correction
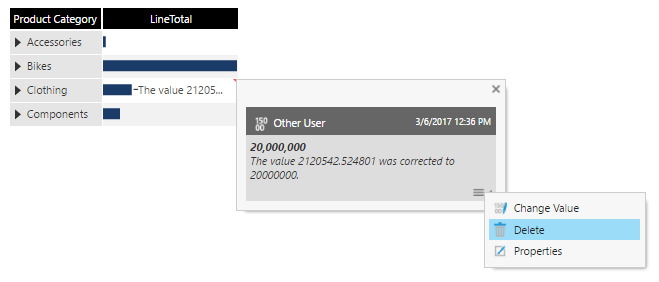
To delete a correction, hover over it to open its popup. Click the menu button in the bottom right corner, and select Delete from the menu.
6. Prevent corrections
Users require the privileges described earlier to be able correct measure values.
You can also prevent all users from making corrections for a specific measure as follows:
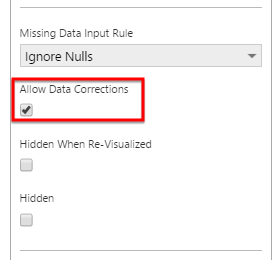
- From the Data Analysis Panel, click to edit the measure.
- In the Configure Metric Set Element dialog, uncheck the option Allow Data Corrections.
7. Notes
- Unlike regular notes, data annotations apply only to the current metric set, and not other metric sets based on the same data cube.
- Dynamic measures, hierarchies generated by formula functions, and metric sets with dynamic hierarchies do not support data annotations.
- Data annotations are not applied to measure values displayed using the Collapse All option or when expanding hierarchy members.
- The check in/check out state of the metric set does not apply to data annotations. Undo Check Out does not change or remove the applied corrections.
- Contextual measures that are checked out to you are changed directly, rather than a data annotation created on top of it.
- When working with OLAP data, the values for totals and the grand total are taken directly from the OLAP source and will not be affected by data annotations.
- Data annotations cannot be attached to a measure value when filtering it using a slicer or data cube parameter by a range of hierarchy member values.