
1. Overview
This article shows how to use CSS, images, HTML, JavaScript, and other custom files for integrating, extending, or applying corporate branding (white labeling) to the application.
As a system administrator, you can:
- Customize the web application's styling and appearance
- Add JavaScript or HTML to be included on each page in the application
- Add your own files to refer to, such as images or additional CSS or JS files
- Customize displayed text using localization overrides
2. Custom CSS
You can apply custom CSS that will be included in every page of the application. In version 26 and higher, this includes certain server-rendered pages with little interactivity such as About, Unsubscribe, and Error pages, however custom HTML and JavaScript will not be included for those pages.
2.1. Selecting styles
All browsers have developer tools you can use to extract IDs and classes from page elements. As an example, we will use Google Chrome to select the element used as the background of the login page to change its color.
With the login page open, press Ctrl+Shift+I on Windows, for example, or open the developer tools from the browser menu.

Click the element inspector button, then click on an element in the web application to select it in the Elements tab of the developer tools. Typically, you can find existing styles set on the inspected element in the Styles tab that you can override directly as shown in a later section that replaces the logo.
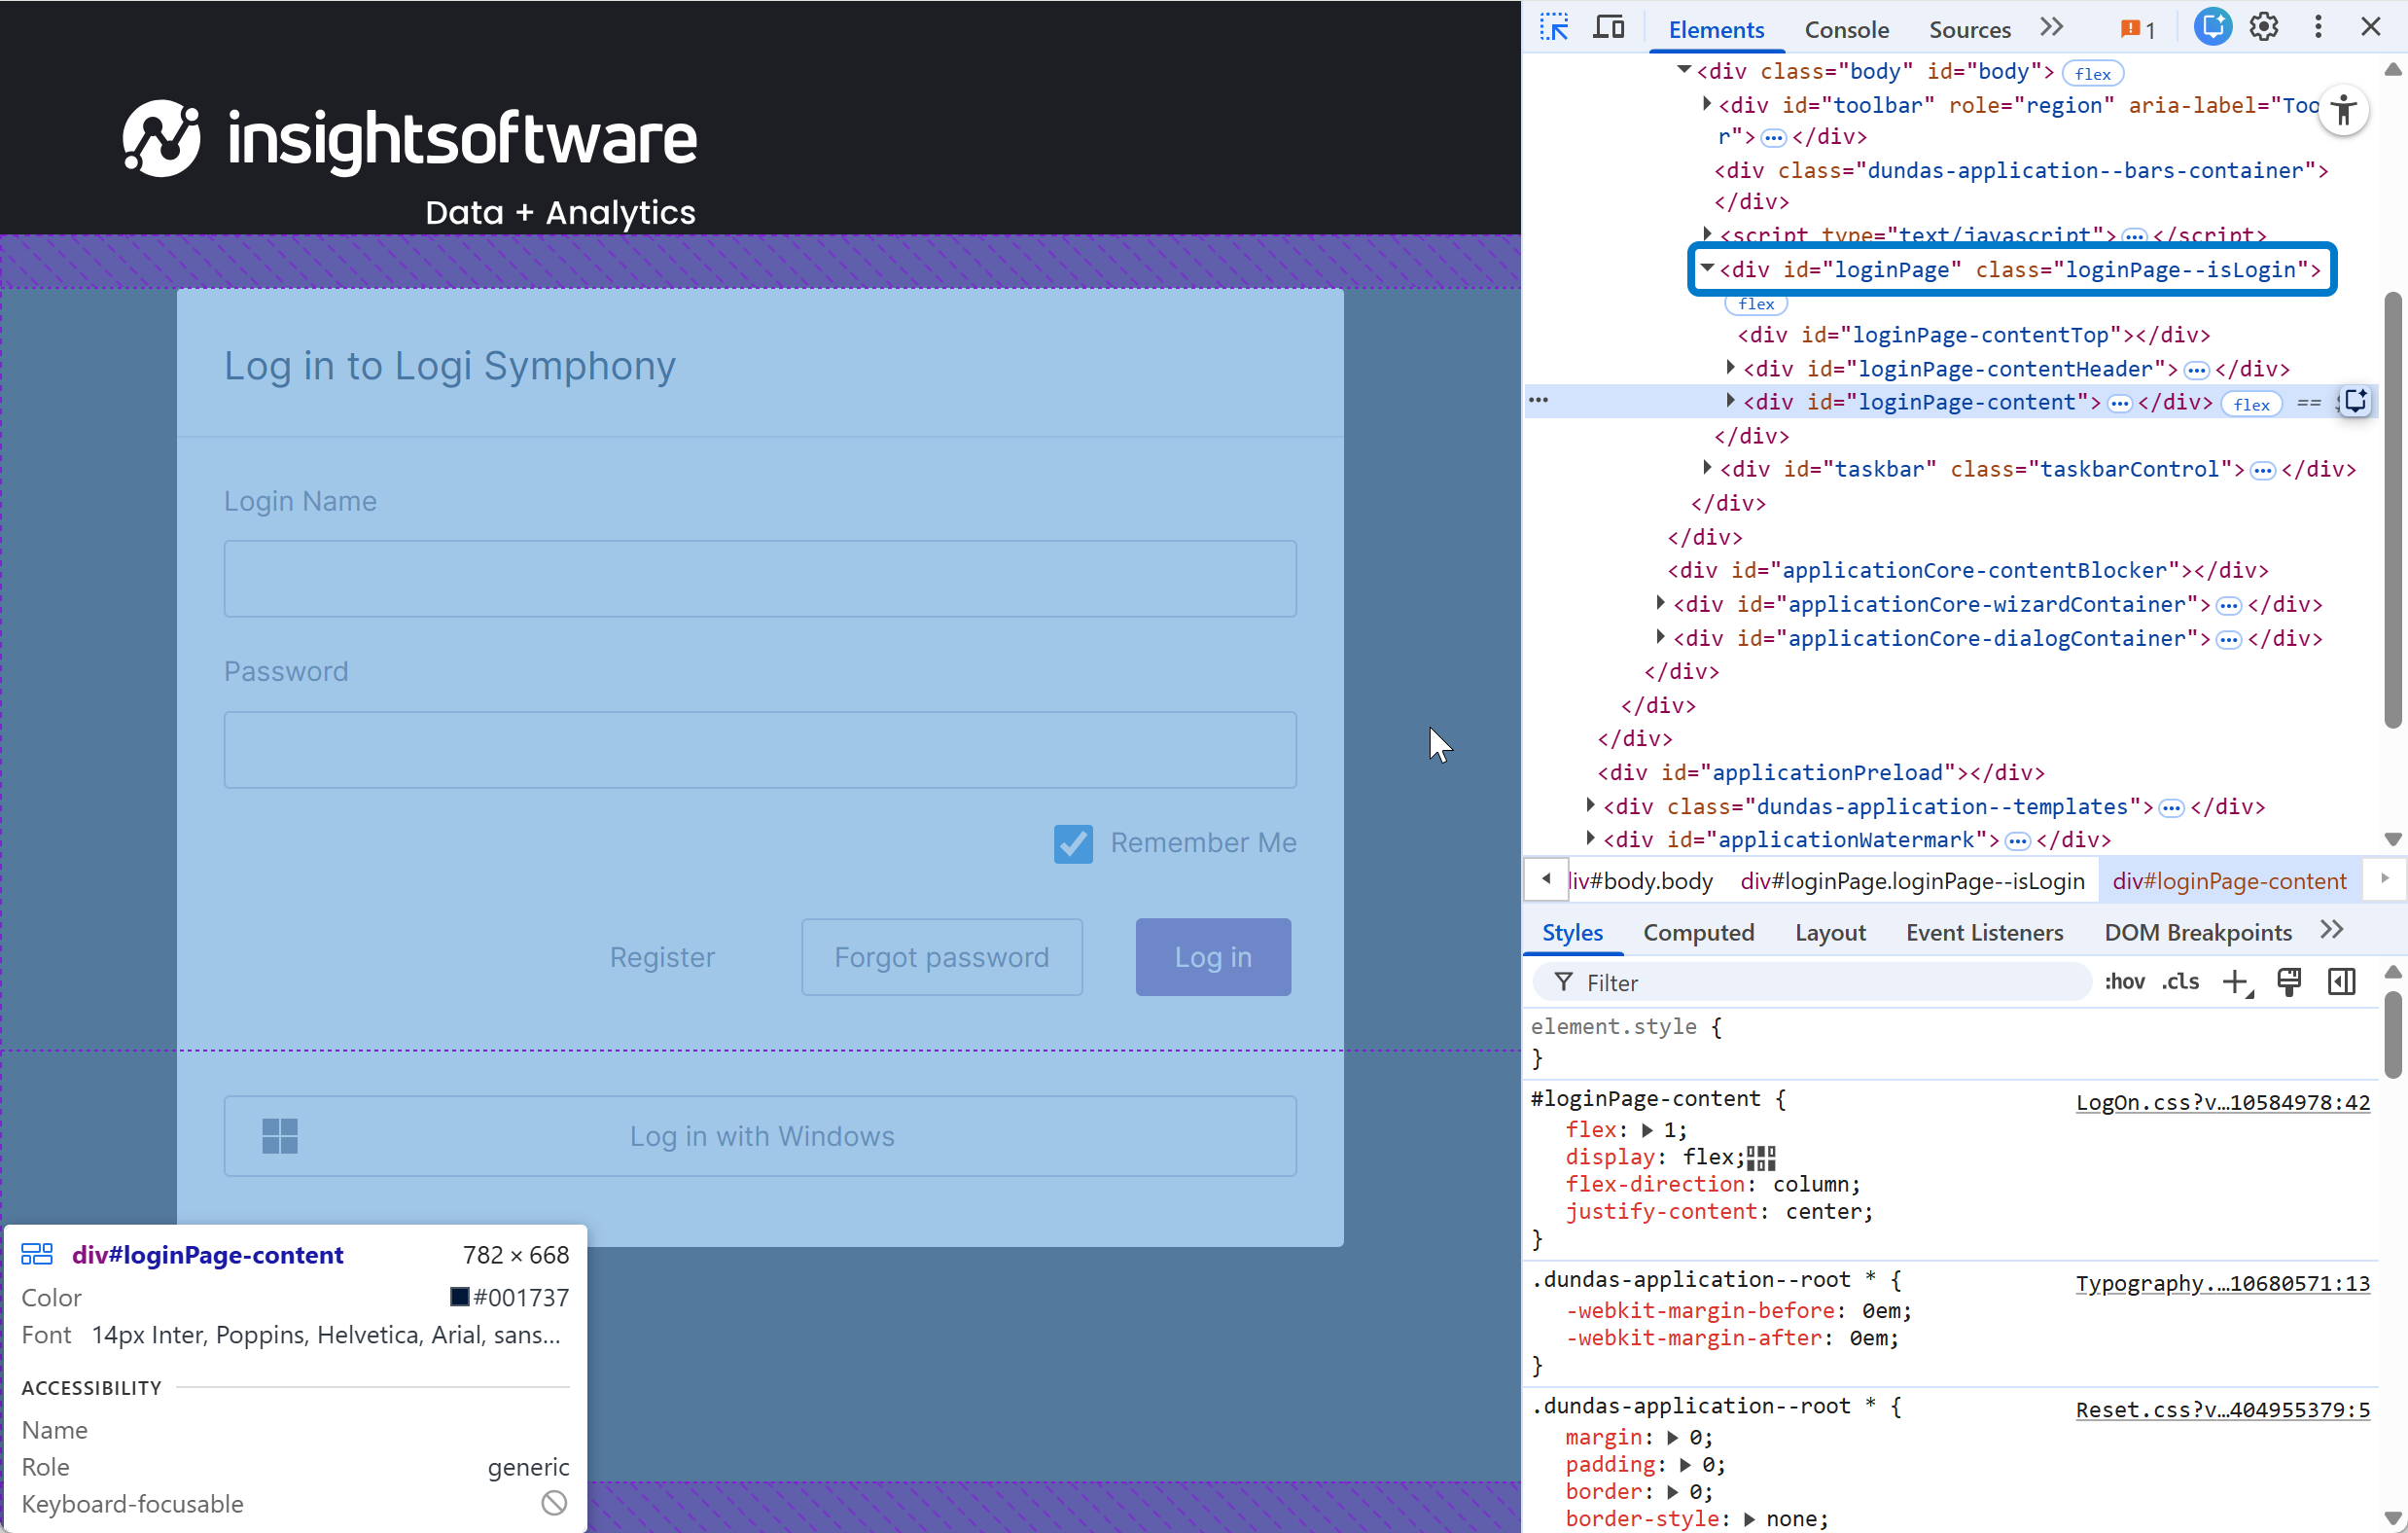
In recent versions, clicking to inspect the login page background will show several different elements that do not entirely cover the page. In the Elements tab we can select their parent element instead, which has the ID loginPage, and the developer tools will show with its highlighting that this element covers the entire page.
In the next section, we will set a custom background on the element with this ID loginPage, which will affect only this login page. See Chrome's documentation for more help on using their tools.
2.2. Modifying styles
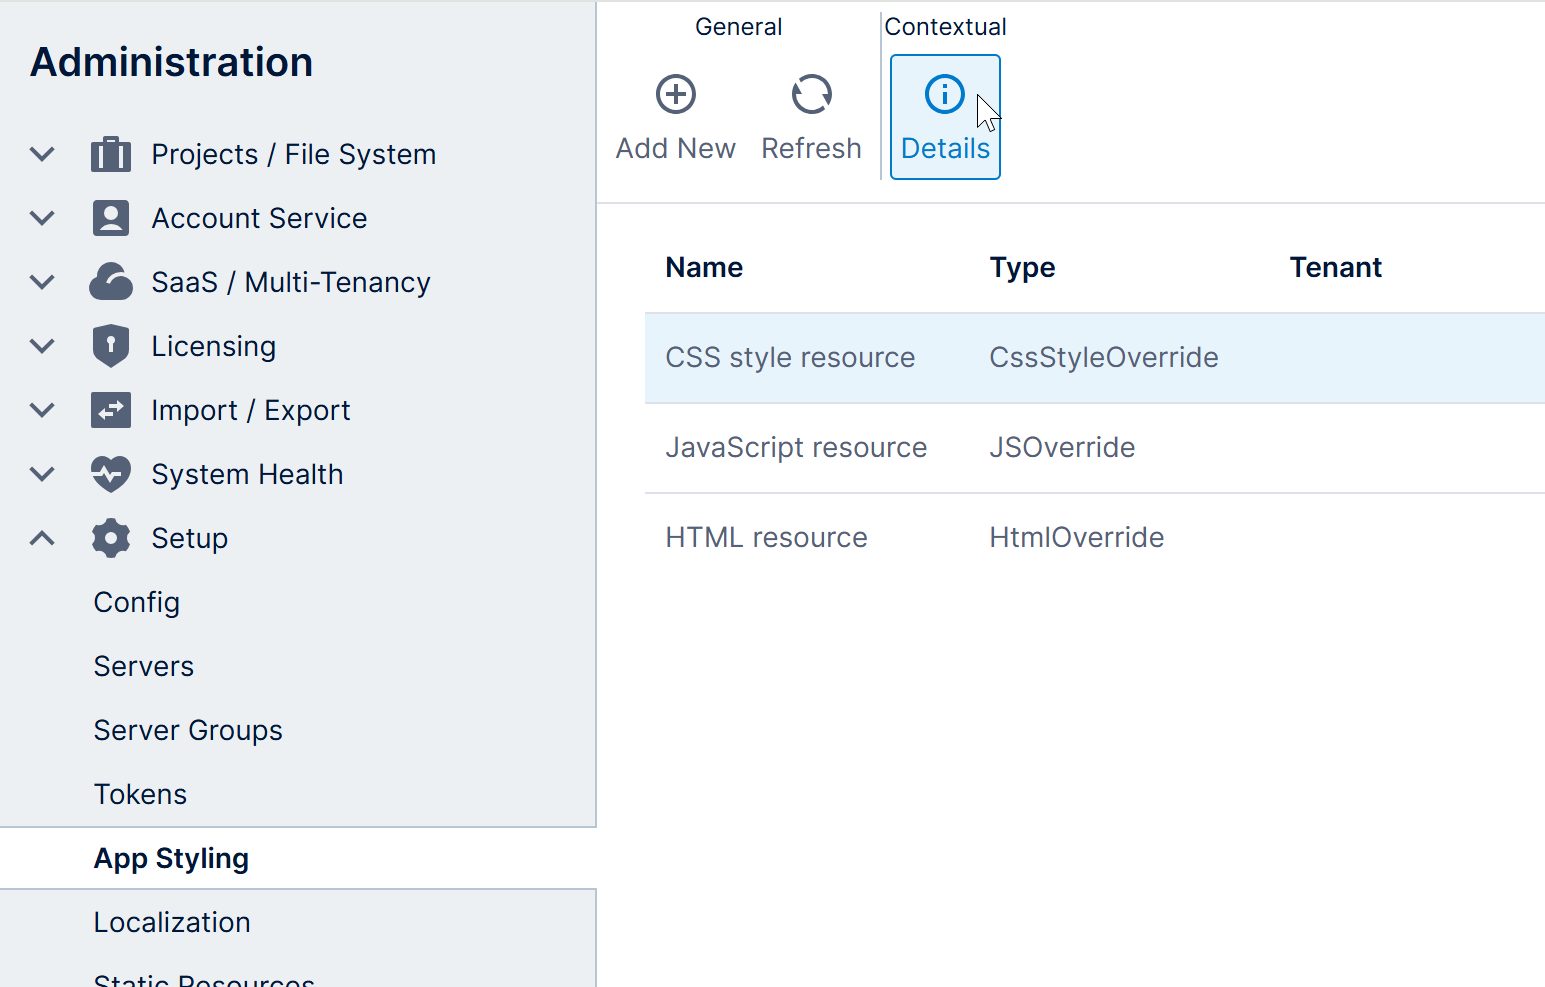
In the Administration area, expand Setup and then click App Styling.
Select the CSS style resource in the list and click Details on the toolbar.
In the Application Styling Resource dialog, enter the following CSS in the editor to modify the background on the element with the ID located above. You can also download the resource as a file, update it in another tool, then upload it or copy and paste:
/* Login page background */
#loginPage {
    background-color: #e8f0ff;
}
For class names, prefix the name with a period (.) instead of a number sign (#).
Click Save to apply the changes. The result is shown in a later section along with a custom logo.
3. Custom HTML
Similar to customizing the CSS style resource, you can add HTML to be included in every page of the application except for certain server-rendered pages. This could include <script> or <link> elements that refer to separate JS or CSS files.
Under the expanded Setup section in Administration, click on the App Styling page and then select the HTML resource.
Click Details and enter or upload your HTML into the Application Styling Resource dialog.
4. Custom JavaScript
You can also add JavaScript to be executed when any page loads except for certain server-rendered pages where the JavaScript API is unavailable. In addition to customizing the application, this could provide a set of common functions in a global variable that can then be called from the script editor in dashboards and other views.
On the App Styling page in Administration, select the JavaScript resource. Click Details, then enter or upload your JavaScript.
For example:
window.corporateLibrary = {

    palette: ["#418cf0", "#fcb441", "#e0400a", "#056492", "#bfbfbf", "#1a3c69", "#e1e480", "#119cdd", "#cb6a49", "#005cdb", "#f4d288", "#506381", "#f1b9a8", "#e0830a", "#7893be"],

    applyPaletteColors: function (colorRules) {
        var discreteRules = colorRules.filter(function (rule) {
            return rule instanceof dundas.controls.DiscreteColorRule;
        });
        discreteRules.forEach(function (rule, index) {
            var colorString = corporateLibrary.palette[index % corporateLibrary.palette.length];
            rule.value = dundas.controls.Color.fromString(colorString);
        });
    }
};
5. Images and other custom files
You can add your own files to the web application to refer to in CSS, HTML, and JavaScript, such as images, separate CSS or JavaScript files, or any other needed file type.
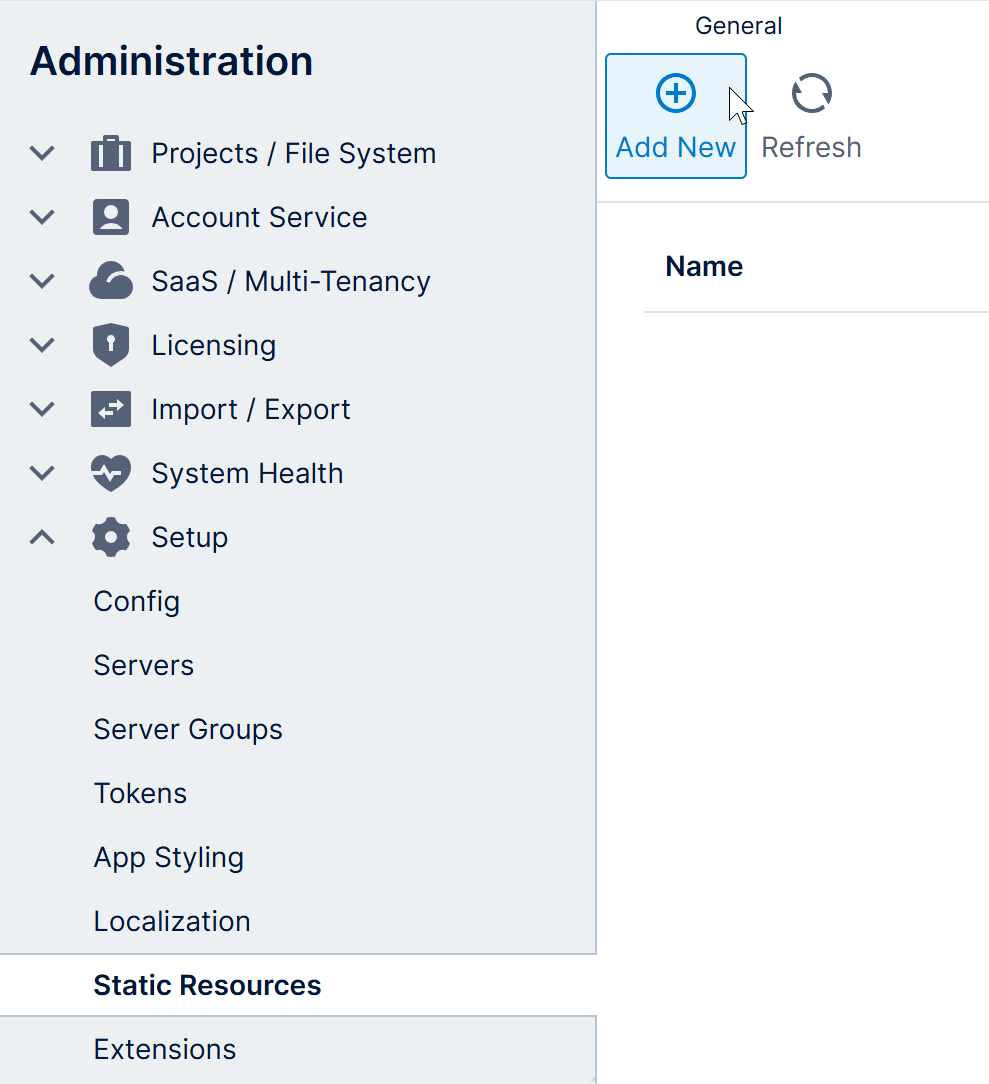
Under the expanded Setup section in Administration, click Static Resources, and then Add New in the toolbar.
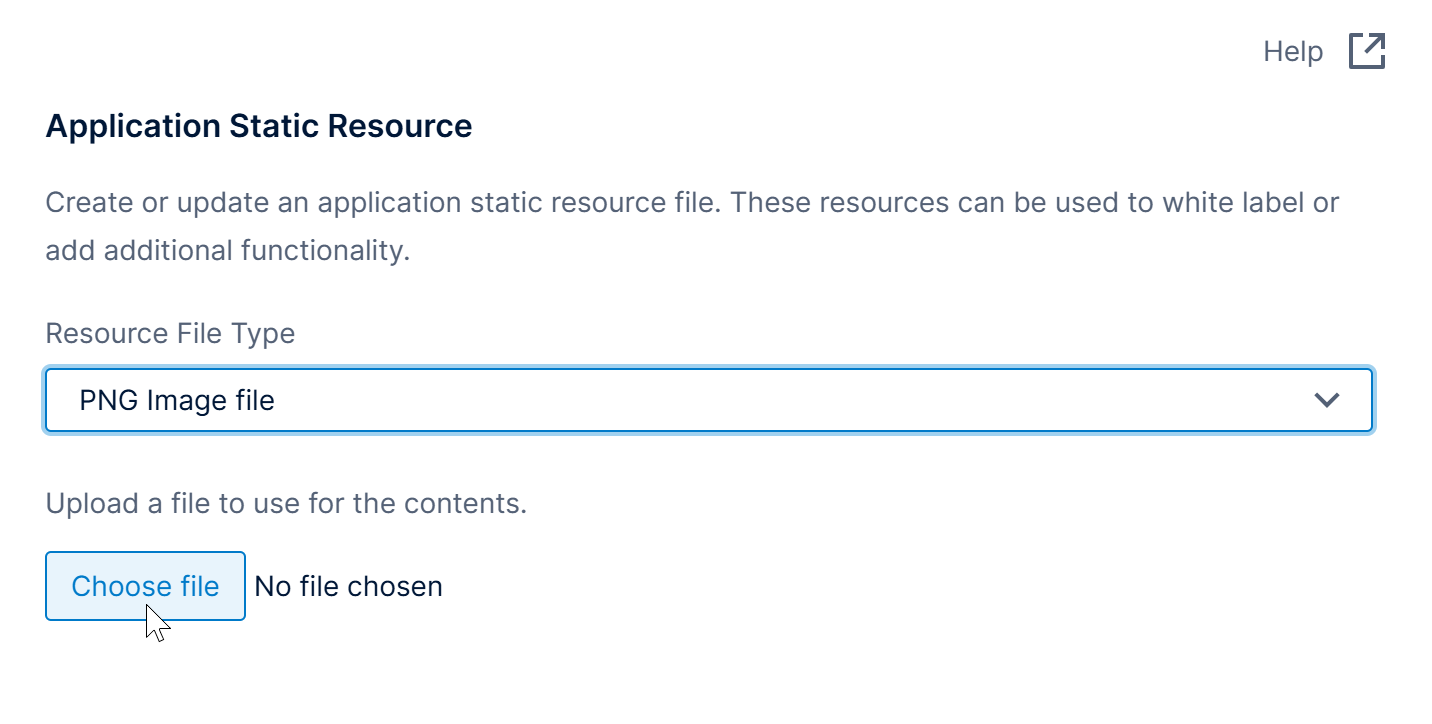
In the Application Static Resource dialog, set the Resource File Type to one of the common types listed, or choose Custom file and set the Custom Resource Type to the appropriate MIME type for your file.
Click Choose File to browse to and upload your file.
After the file uploads, it will be listed along with the full URL you can use to refer to it. To copy this URL, click to select the row and click Copy in the toolbar.
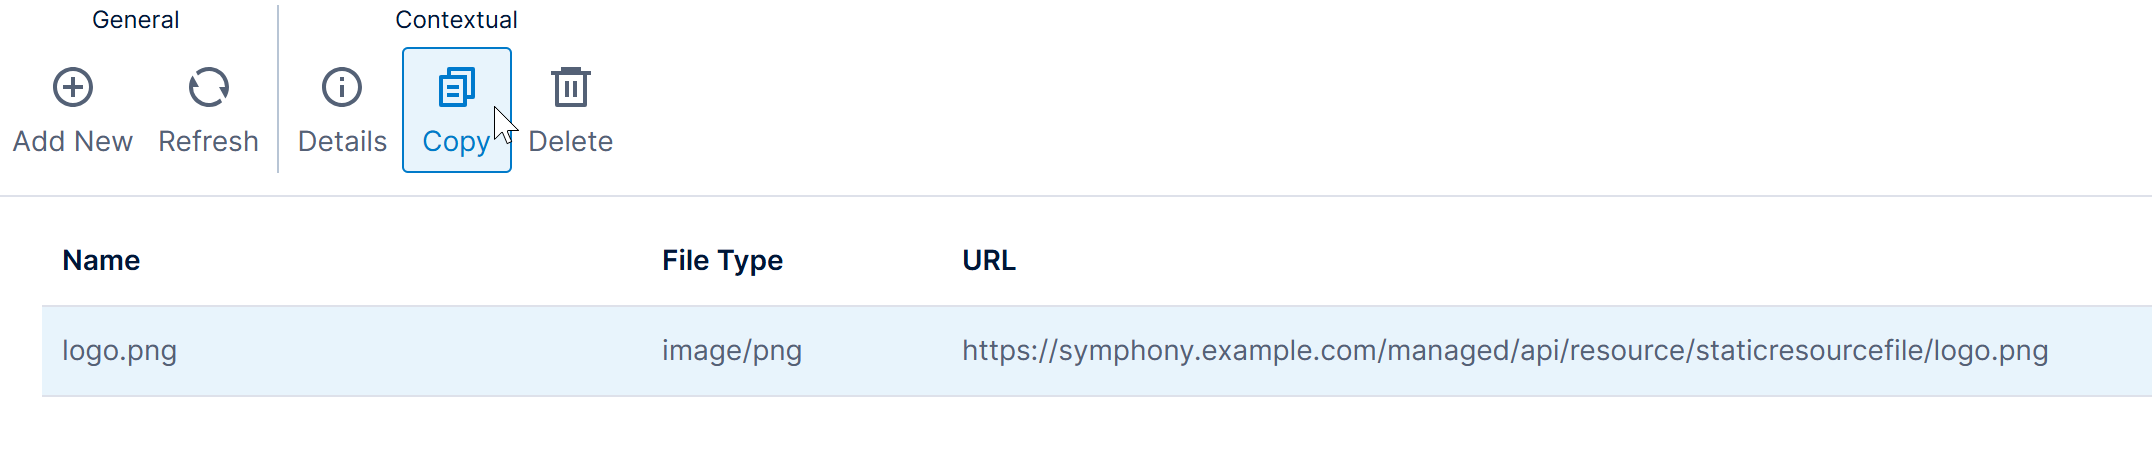
As an example of using static resources, the browser developer tools described earlier can be used to inspect the logo on the login page to find its class.
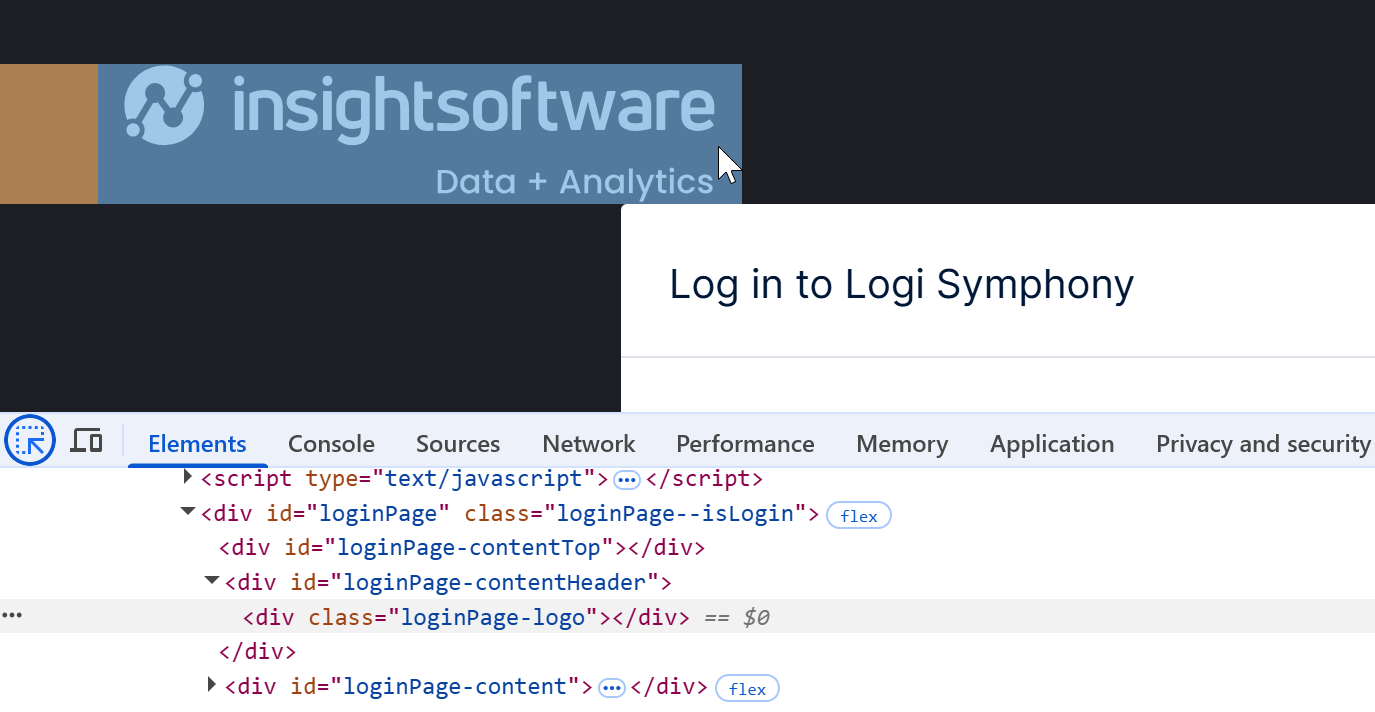
The logo has the class loginPage-logo, and is located inside an element with the ID loginPage-contentHeader.
After uploading a custom logo.png, we can target the logo element in the CSS style resource with the following CSS that replaces the default logo with our own static resource (base your URL on the one provided to you on the static resources page):
/* Custom Logo */
#loginPage-contentHeader .loginPage-logo {
    background-image: url(/managed/api/resource/staticresourcefile/logo.png);
}
This example uses a root-relative path beginning with /, but you could also use a relative or absolute path. When using relative paths, note that the application styling resources like this CSS resource are located under the Resource subfolder of the application rather than api/resource like static resources.
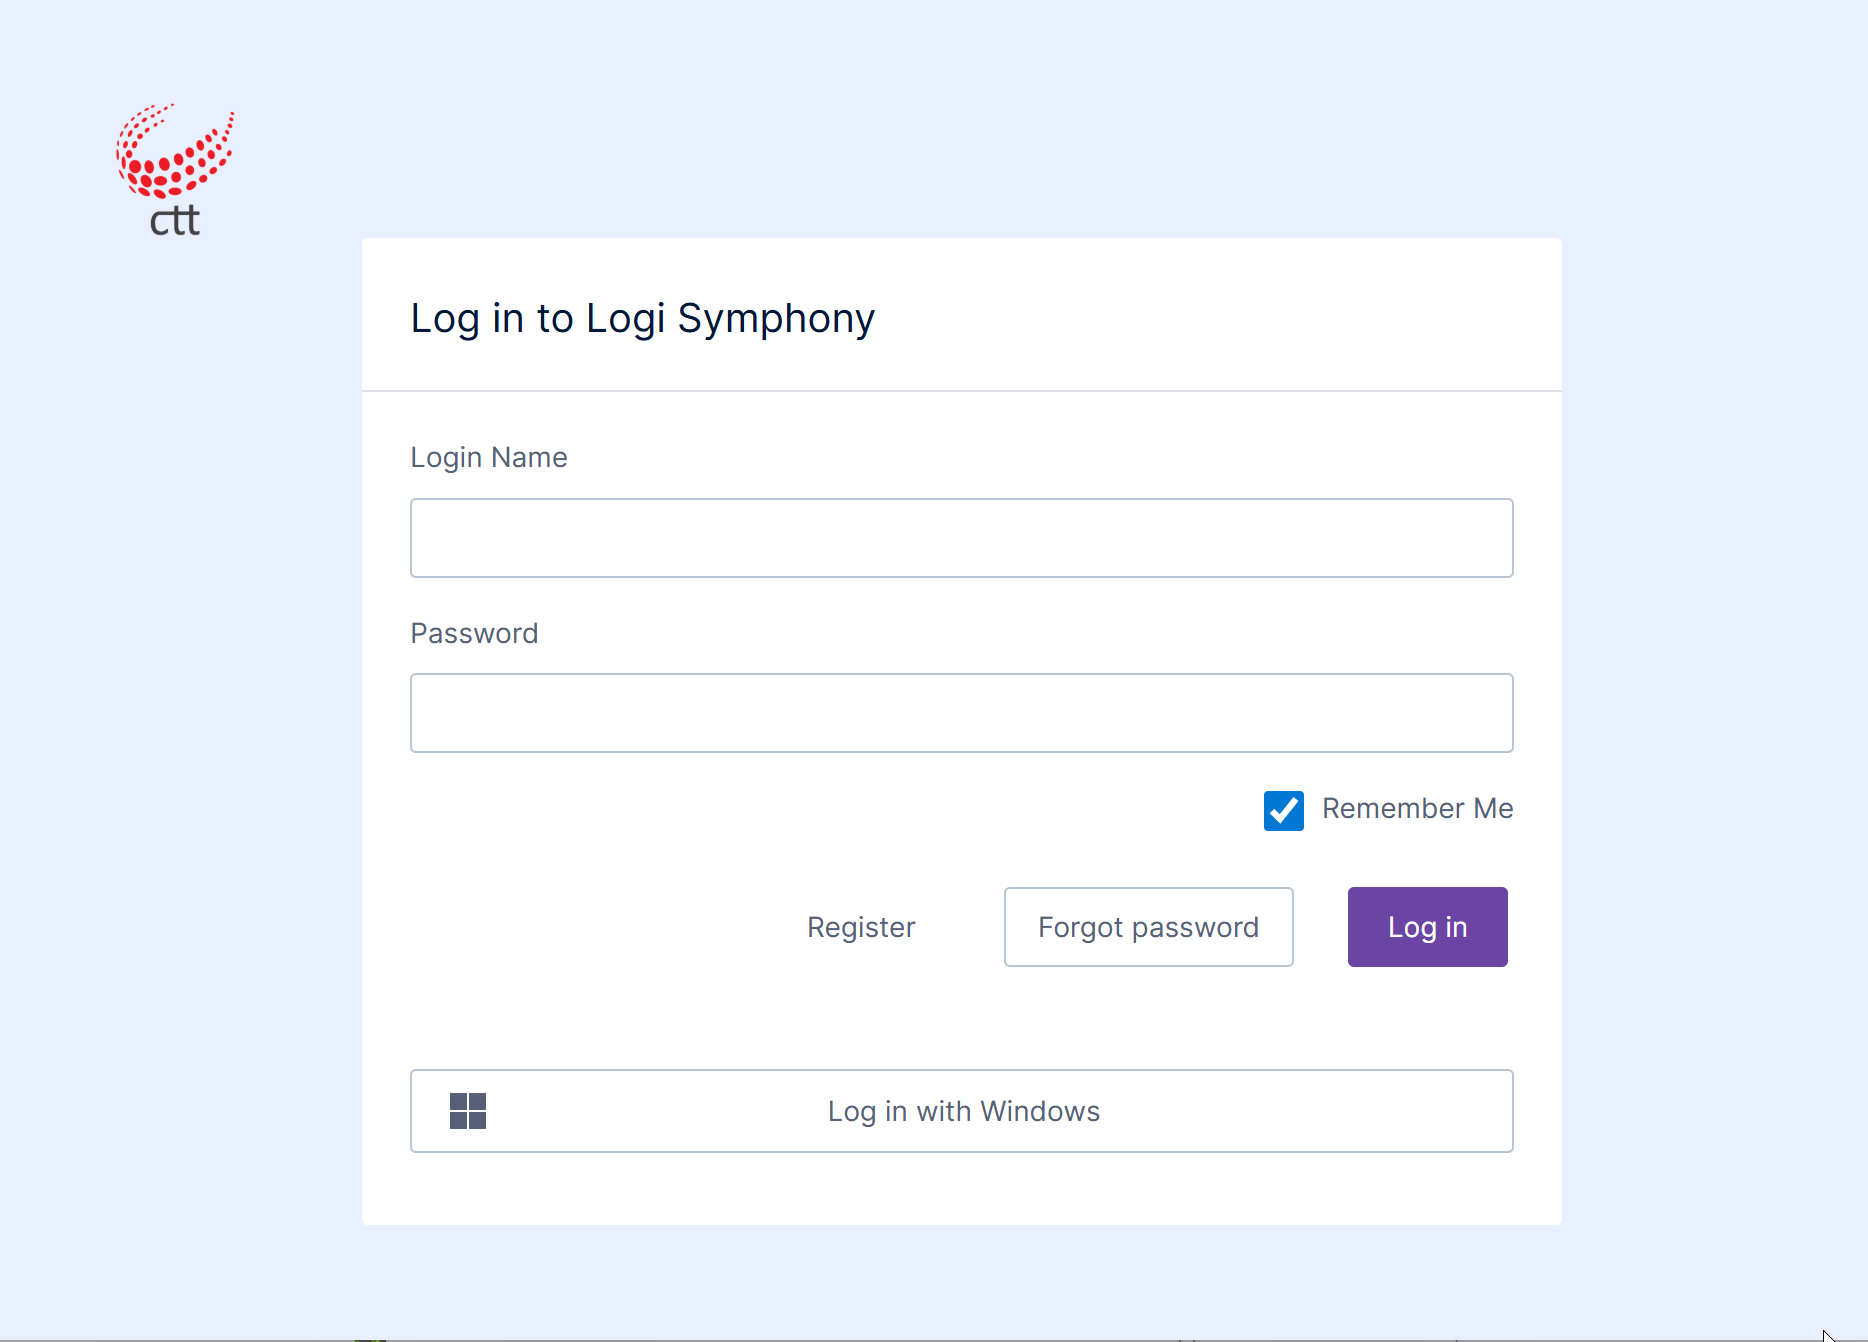
The next time the login page loads, the custom CSS is included that refers to the custom image (the custom background CSS from earlier is also applied):
6. Customizing text
You can use localization support to customize any of the predefined text displayed in the interface. In addition to translating it into other languages, you can override existing languages such as en (English) to customize some of its text.
As an example, we can localize the text Log in to Logi Symphony in the page title.

Click to expand Setup in Administration and click Localization. A list of localization resources is displayed on the right.
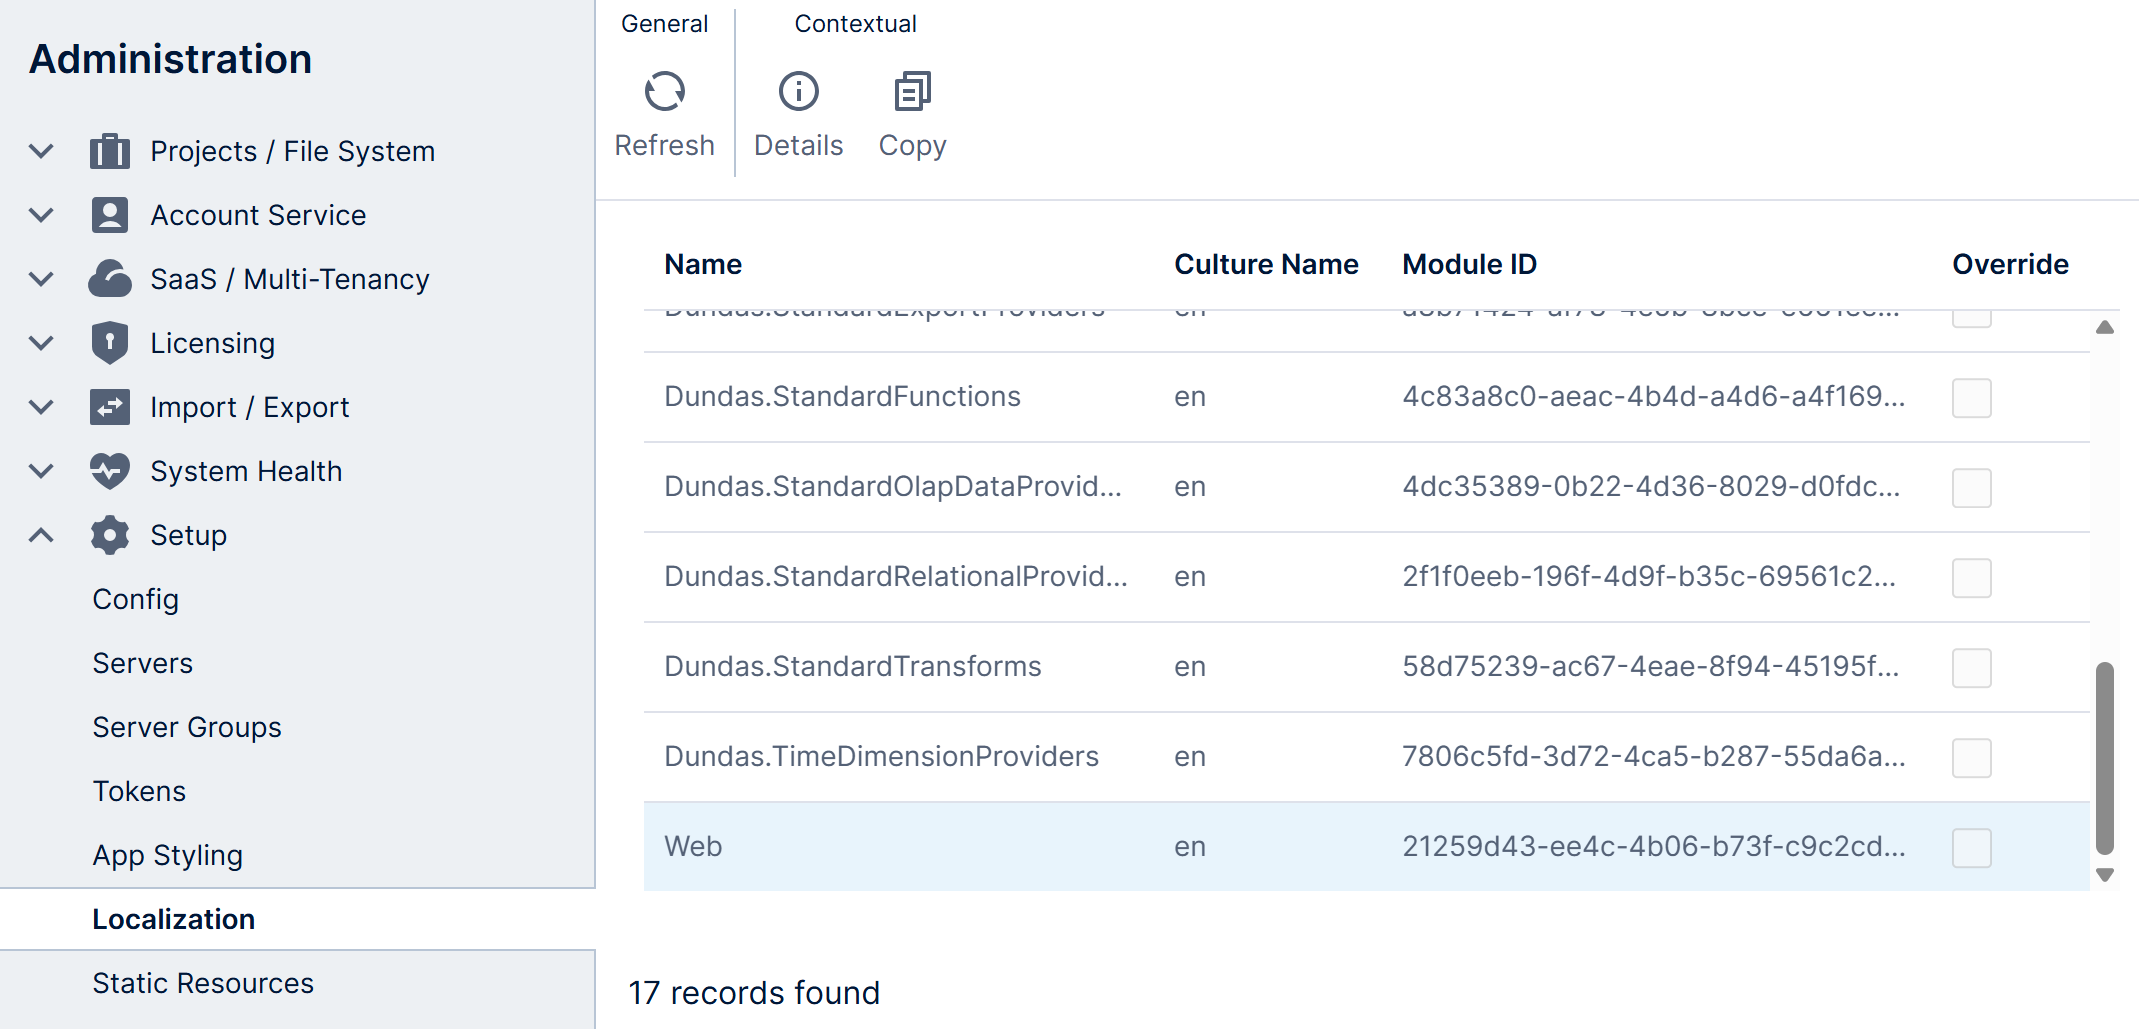
You can select an existing resource and click Details in the toolbar, then download and search through its existing XML to help locate which resource you need to override.
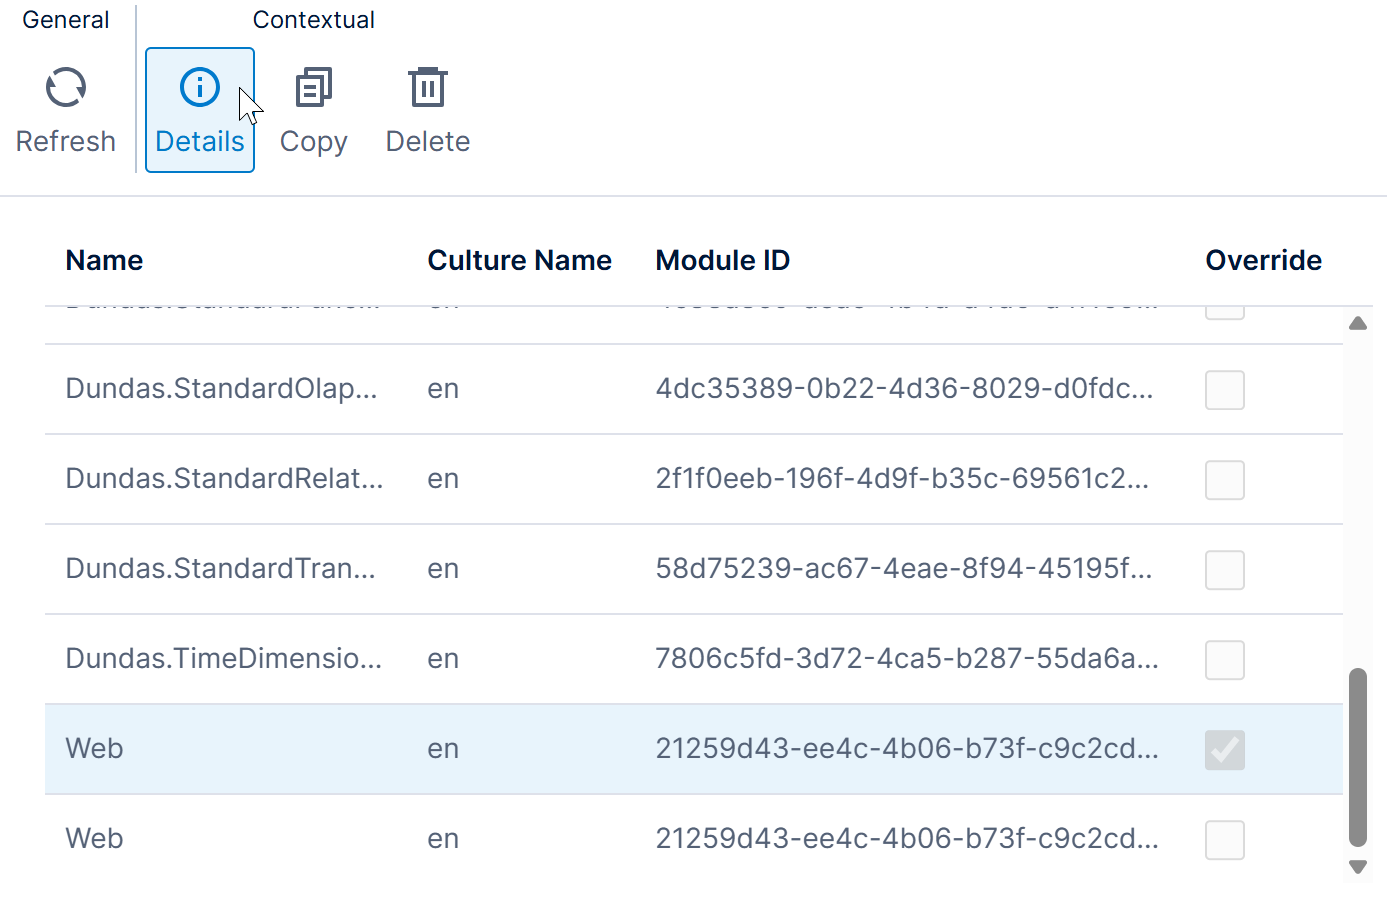
In our example, the Web resource contains the page title. Select it from the list, then click Copy in the toolbar to create an override.
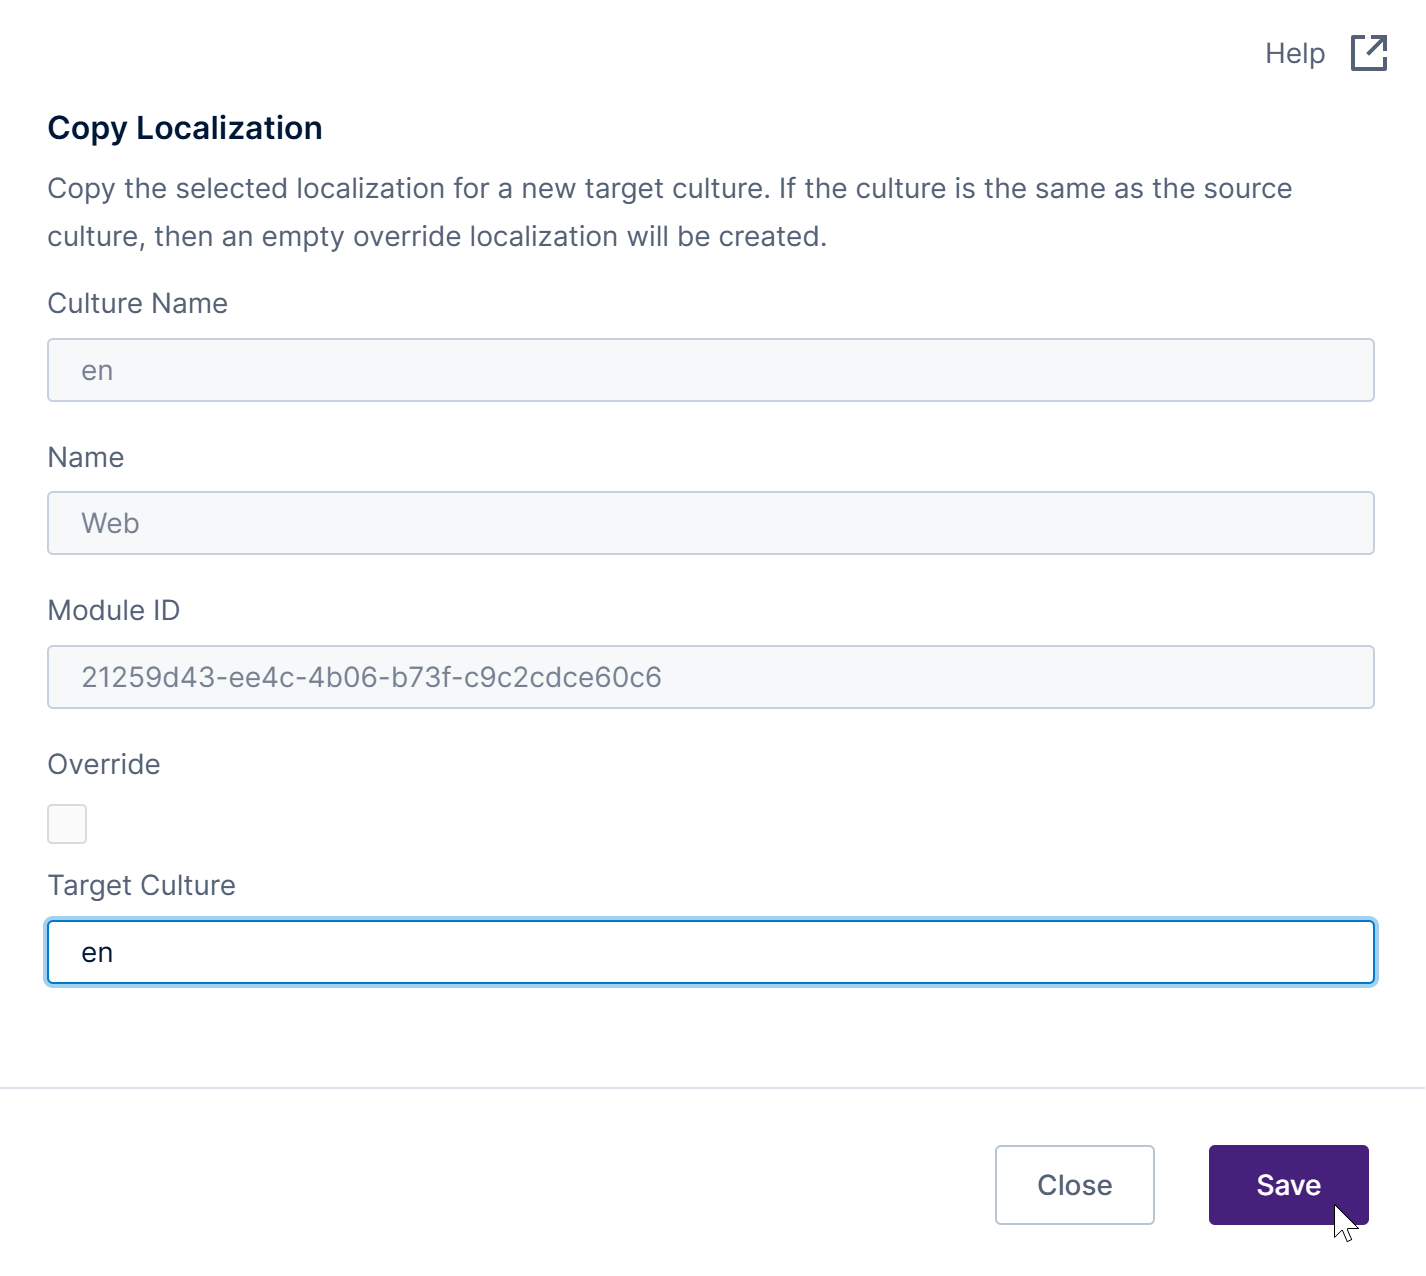
To override existing text, enter the same Target Culture name as the original localization resource (for example, en for English). Entering a different culture name can be used when instead translating the application's text into another language as described in the article Localization and multi-language support.
Click Save. The newly created localization resource is displayed on the list, but identified as an Override because the target culture was the same as the original localization.
Select and open the Details for the new resource. In the Localization dialog, you can update the resource directly in the editor, or you can upload a new localization resource file containing the required overrides by clicking the Choose File button.
When you populate the override, it should be the same format as the regular localization resources, but only needs to contain the strings you want to override. For example:
<?xml version="1.0" encoding="utf-8" ?>
<localization xmlns="http://dundas.com/schemas/BI/localization.xsd"
                   culture="en"
                   moduleId="21259D43-EE4C-4B06-B73F-C9C2CDCE60C6">
    <group name="LogOnView">
        <string key="GS_LogOn_Title">Log in to CTT</string>
    </group>
    <group name="Home" tags="client">
        <string key="GS_Home_Title">CTT Home</string>
    </group>
</localization>
Click Save and navigate to the login page or the home page to see the changes above.
7. Modifying the favicon
To modify the favorite icon displayed next to the page title by the browser, one option is to modify all of the images located in the folder BIWebsite\wwwroot\Content\Images\favicon in each of your application instance installations.
As an alternative, you can use the JavaScript resource to add or change the <link> and <meta> DOM elements within the header element on the page as needed.

8. Upgrading versions
Modifying the web application files directly on disk is not recommended when avoidable because you must manage these files yourself on each server or container when running multiple, and it may not be possible to maintain them when upgrading makes changes and writes new files to these folders. App Styling resources and static resources are maintained automatically across server nodes and containers, and are maintained when upgrading, so they are strongly recommended.
Custom files in subfolders named Override or whitelabel or in the favicon images folder will be preserved when upgrading. For example, images and override files in the following locations are not replaced after an upgrade:
- [BIWebsite]\wwwroot\Content\Images\favicon
- [BIWebsite]\wwwroot\Content\Images\whitelabel
- [BIWebsite]\wwwroot\Content\Override
- [BIWebsite]\wwwroot\Scripts\Override
- [BIWebsite]\wwwroot\Override
8.1. Upgrading to version 7
After upgrading to version 7 or higher from version 6 or below, some override files are converted into resources and are stored in the application database. Use the Administration interface described earlier in this article to customize these overrides.
The table shows examples of how the following override files are handled when upgrading to version 7 or higher:
| Override file | Converted to | Purpose |
|---|---|---|
| style.override.css | CSS style resource | Custom CSS styles |
| javascript.override.js | JavaScript resource | Custom scripts running at the site level |
| Html.Override.html | HTML resource | Contains HTML to include on each page |
| [localization].override.xml | Localization resource | Contains localized or customized application text |
Other override files from previous versions with the same file extensions as above are moved to their respective folder under the BIWebsite\wwwroot folder. Other types of custom files such as images can be found in the BIWebsite\Content.migrated folder and can be moved to the \wwwroot folder or added as static resources.