
Using a bridge parameter
- Overview
- Examples
- Multi-level hierarchy with single selection
- Multi-level hierarchy with single selection on multiple levels
- Single-level hierarchy with multiple selection
- Single-level hierarchy with inverted multiple selection
- Single-level hierarchy with single selection using MDX
- Date range selection
- Number range selection
- Handling All and other basic tokens
- Types
- Notes
- See also
1. Overview
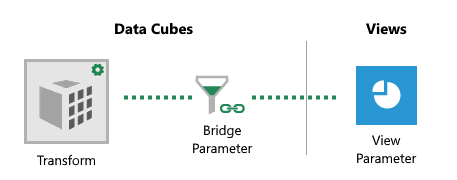
When you want to pass a parameter value from a dashboard or view directly into one of the transforms in your data cube, bridge parameters are an optional intermediate step where you can convert or customize the parameter value.
You can use a bridge parameter to convert values from a hierarchy or another type not directly compatible with your query or transform. For example, a hierarchy value filter on a dashboard selects an entire hierarchy member value, which your database query or stored procedure won't be able to recognize unless it's first converted.
Once you click Create parameter in the dialog for a new bridge parameter, each transform parameter in your data cube is listed with a checkbox. Select a checkbox to open a dialog with a script editor where you can convert the bridge parameter input value type to the type used by the transform parameter and then return it. The types of this conversion are listed above the script editor (e.g., SingleMember -> SingleNumber).
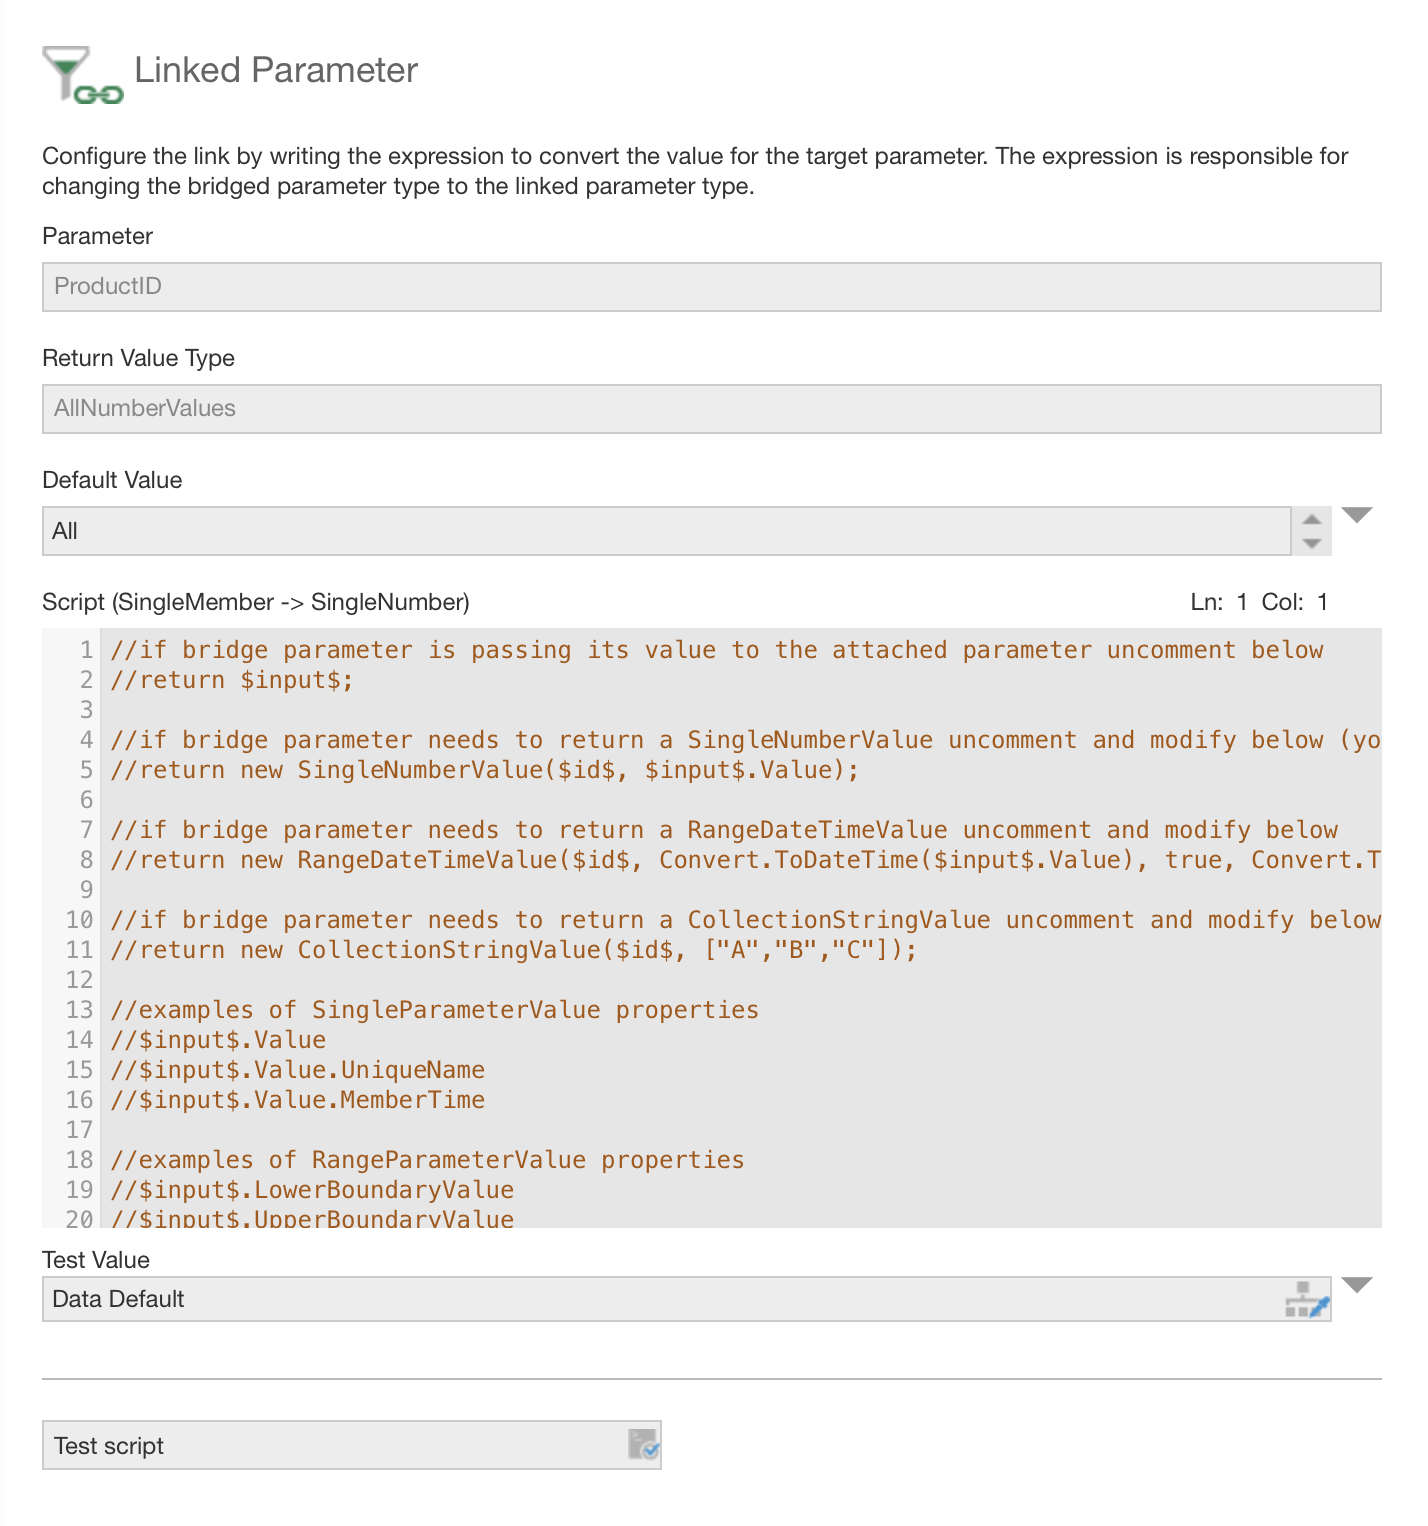
The script language used in bridge parameters is DundasScript, which is also used in other parts of the application such as calculated elements and is similar to C#. The script receives one of the derived types of ParameterValue as the $input$ placeholder, which will correspond to the Value Type you selected when creating the bridge parameter. Use the Test Value filter at the bottom to select a value, then click Test script to see a live result or an error message indicating where in the script there was a problem.
2. Examples
The following examples provide step-by-step instructions for some of the common uses of bridge parameters. Unless otherwise specified, all of these examples are based on the Adventure Works sample SQL Server database.
2.1. Multi-level hierarchy with single selection
In this example, the bridge parameter is used to convert a single member from a hierarchy value filter into an int numeric value used by a stored procedure.
We have created this stored procedure using the following command in the Adventure Works database, which includes the parameter @ProductID.
CREATE PROCEDURE [dbo].[sp_ProductID_Hierarchy]
      @ProductID int
AS
BEGIN
      SET NOCOUNT ON;
      SELECT [ProductID] AS ProductID, [OrderQty] as OrderQty
      FROM [Sales].[SalesOrderDetail]
      WHERE [ProductID] = @ProductID OR @ProductID IS NULL
END
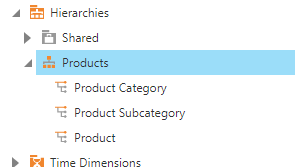
This example uses a Product hierarchy with three levels like the one demonstrated in Automatic joins and hierarchies.
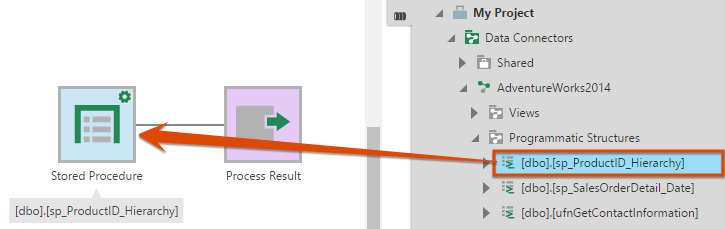
Create a new data cube and drag the sp_ProductID_Hierarchy stored procedure to the canvas. (If you added the stored procedure after creating your data connector, right-click it and choose Re-Discover.)
Click Bridge Parameters in the toolbar.
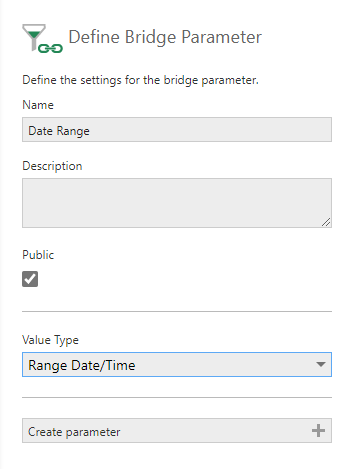
Click Add parameter, which opens the Define Bridge Parameter dialog.
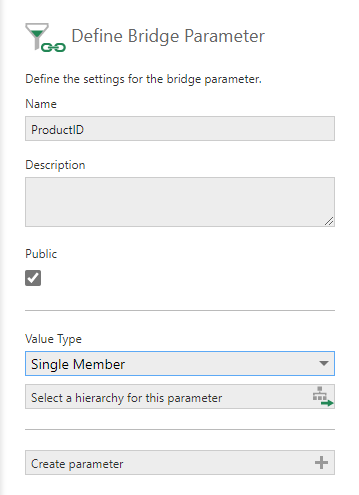
Enter a Name to identify this parameter on dashboards/views, and select Public to make it accessible to them. Set Value Type to Single Member for this example.
Click Select a hierarchy for this parameter, and in the Open dialog, locate and select your hierarchy. In this example, this is the Product hierarchy from the Hierarchies folder.
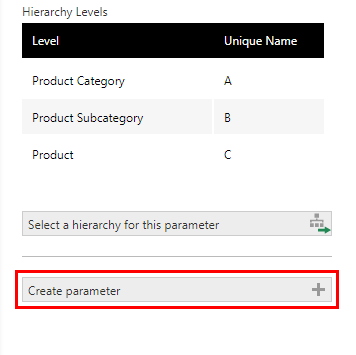
Returning to the Define Bridge Parameter dialog, click the Create parameter button. Then you can select the stored procedure's @ProductID parameter to link to it.
This opens a dialog where we can enter and test the script used to convert a hierarchy member into our required numeric value.
The following script calls the Resolve method on the SingleMemberValue $input$ to ensure token values are resolved into a member, then extracts the numeric value from the member's unique name and returns it:
// Get SingleMemberValue with tokens resolved
SingleMemberValue parameterValue = $input$.Resolve();

// Convert unique name into an integer ID
var productId = Convert.ToInt32(parameterValue.Value.UniqueName.Replace(".C",""));

// Return as a SingleNumberValue
return new SingleNumberValue($id$, productId);
To test the script, select a Test Value from the hierarchy from its lowest level for this example (e.g., Accessories > Bike Racks > Hitch Rack - 4-Bike), then click Test script.
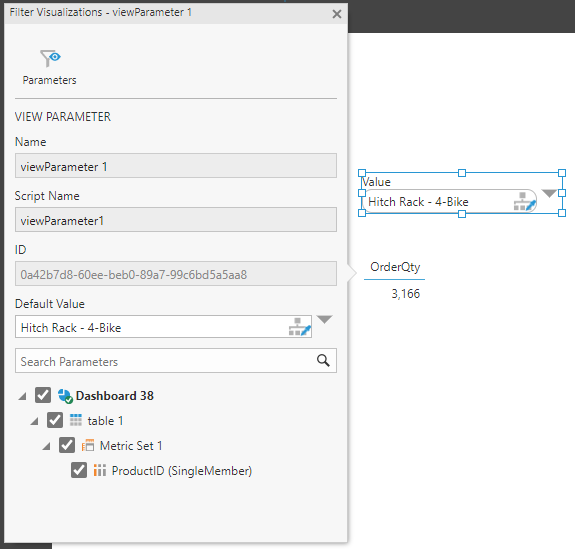
Now we can connect a filter to our public bridge parameter. Create or edit a dashboard, and in the Explore window, expand the Data Cubes folder and drag its OrderQty measure to the dashboard canvas.
Choose Filter in the toolbar, and add a hierarchy Value filter. Connect it to our bridge parameter with type SingleMember, then you can filter to one of the products at the lowest level of the hierarchy and see the result.
The filter has options you can set in the Properties window to allow selecting only members from the bottom level.
2.2. Multi-level hierarchy with single selection on multiple levels
In this example, the bridge parameter is used to convert a single member from either of two levels of a hierarchy value filter into a string value used by a stored procedure:
This example is based on a table named [dbo].[Sample_data] created in a database with the following sample data:
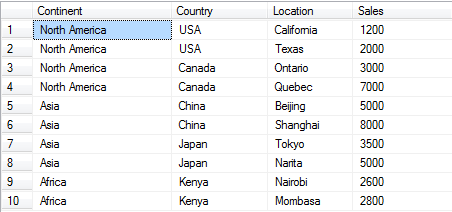
A stored procedure with two parameters is created in this example:
- @Level - The level of the selected member in the hierarchy filter.
- @Name - The selected member from either the Continent or the Country level.
CREATE PROCEDURE [dbo].[sp_Country_Sales]
    @Level nvarchar(2) = 'A',
    @Name nvarchar(1000) = 'North America'
AS
BEGIN
    SET NOCOUNT ON;
    IF (@Level = 'A')
        Begin
            SELECT [Location] , [Sales]
	    FROM [dbo].[Sample_data]
            WHERE [Continent] = @Name
        End
    IF (@Level = 'B')
        Begin
            SELECT [Location] , [Sales]
            FROM [dbo].[Sample_data]
            WHERE [Country] = @Name
        End
END
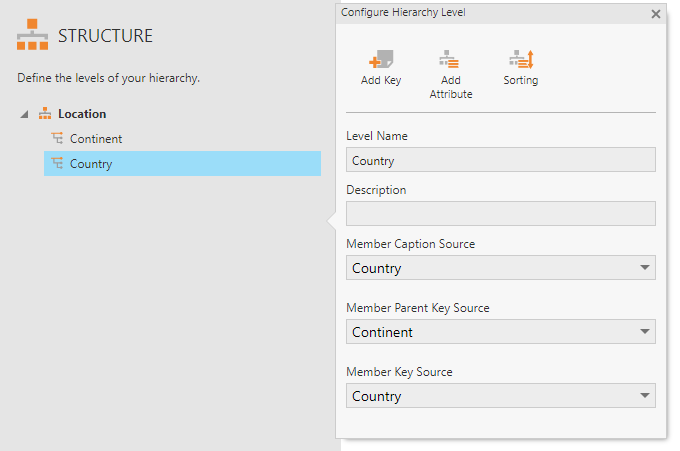
Create a hierarchy from the main menu, and add two levels based on the Sample_data table: Continent and Country.
Create a new data cube, and drag the sp_Country_Sales stored procedure to the canvas. (If you added the stored procedure after creating your data connector, right-click it and choose Re-Discover.)
Click Bridge Parameters in the toolbar, then click Add parameter to open the Define Bridge Parameter dialog.

Enter a Name to identify this parameter on dashboards/views, and select Public to make it accessible to them. Set Value Type to Single Member for this example.
Click Select a hierarchy for this parameter, and in the Open dialog, locate and select your hierarchy.
Returning to the Define Bridge Parameter dialog, click Create parameter and select the stored procedure's @Level parameter.
This opens a dialog where we can enter and test script to convert the parameter values. The following script passes the level unique name from the input SingleMemberValue directly to our stored procedure:
SingleMemberValue parameterValue = $input$.Resolve();
return new SingleStringValue($id$, parameterValue.Value.LevelUniqueName);
Select the stored procedure's @Name parameter. The following script removes the level unique name portion of the member unique name, leaving only the original key values:
SingleMemberValue parameterValue = $input$.Resolve();
var replacing = "." + parameterValue.Value.LevelUniqueName;
var keyValue = parameterValue.Value.UniqueName.Replace(replacing, "");
return new SingleStringValue($id$, keyValue);
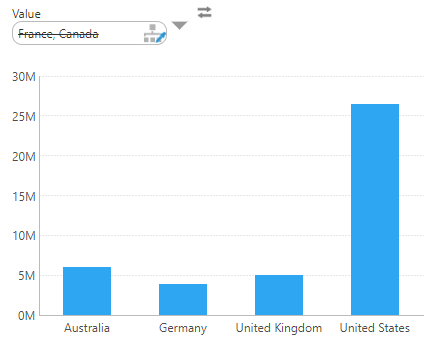
Create or edit a dashboard, and drag the Sales measure and the Location dimension from the data cube to the dashboard canvas. Note that only North America results are shown by default as was indicated in the stored procedure.
Add a hierarchy value filter and connect it to the bridge parameter. (First un-check Location if it was selected by default.)
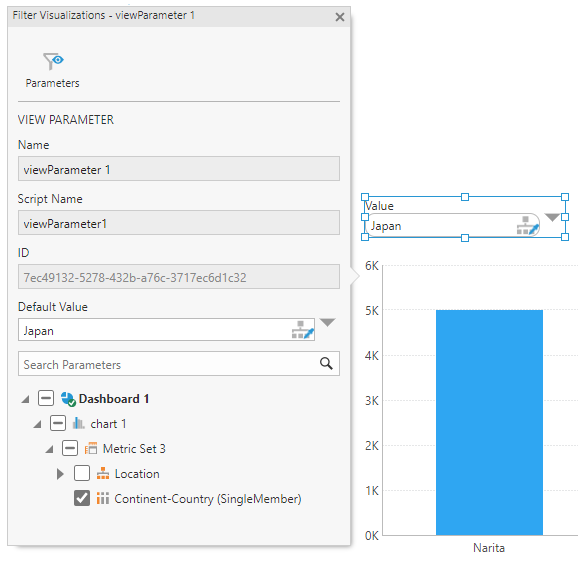
The filter is now connected to the hierarchy selected in the bridge parameter, and you can select either continent or country values.
2.3. Single-level hierarchy with multiple selection
In this example, a bridge parameter is used to select multiple hierarchy members from a filter connected to a single-level hierarchy.
Create a new hierarchy from the main menu, and drag the [Person].[CountryRegion] table to the canvas while holding the Shift key to add only a single level. Change the level's Member Key Source to Name, and rename the hierarchy and its level to Country.
Create a new Manual Query data cube. Select the Adventure Works data connector and use the following manual query:
SELECT B.Name as Country, SUM(A.SalesYTD) as SalesYTD
FROM [Sales].[SalesTerritory] A
INNER JOIN [Person].[CountryRegion] B
    ON A.CountryRegionCode = B.CountryRegionCode
WHERE $Country$
GROUP BY B.Name
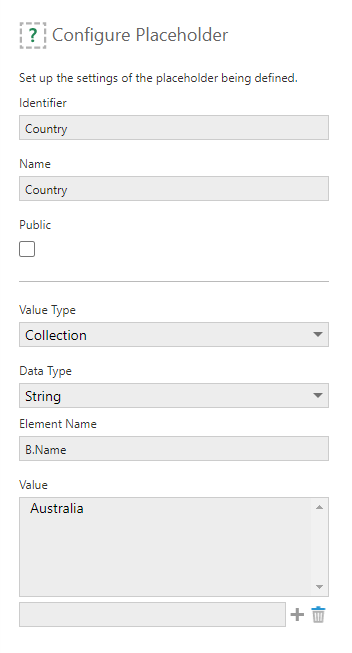
Set up the $Country$ placeholder with Identifier as Country, Value Type set to Collection and Data Type set to String.
Set Element Name to B.Name. This will replace the $Country$ placeholder in the query with B.Name IN <values>. Add at least one default Value such as Australia.
For more information on setting up a placeholder for a manual select, see the article Using manual select placeholders.
Click Bridge Parameters in the data cube's toolbar, then Add parameter.
Enter a Name to identify this parameter on dashboards/views, and select Public to make it accessible to them. Set Value Type to Collection Member for this example.
Click Select a hierarchy for this parameter, and locate and select your hierarchy in the Open dialog that appears.
Returning to the Define Bridge Parameter dialog, click Create parameter and select the Country parameter to link to it.
The following script extracts the member key values from the input CollectionMemberValue based on this hierarchy level's unique name and returns them as strings:
CollectionMemberValue parameterValue = $input$.Resolve();
var keyValues = new List<string>();
for (int i = 0; i < parameterValue.Values.Count; i++)
{
  keyValues.Add(parameterValue.Values[i].UniqueName.Replace(".A", ""));
}
return new CollectionStringValue($id$, keyValues);
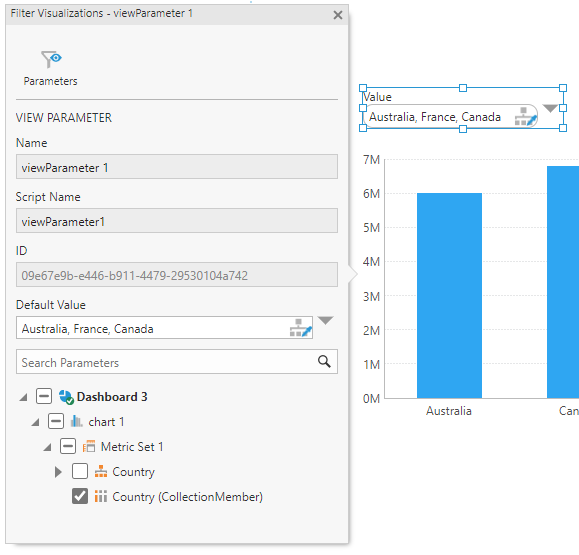
On a dashboard, drag SalesYTD and Country from your new data cube to the canvas and add a hierarchy value filter. Make sure the filter is connected to the CollectionMember bridge parameter.
2.4. Single-level hierarchy with inverted multiple selection
To handle inverted selection, you need to check the parameter value property IsInverted. You can pass it to your query as an additional parameter, for example.
This example modifies the previous one with the following manual query:
SELECT B.Name as Country, SUM(A.SalesYTD) as SalesYTD
FROM [Sales].[SalesTerritory] A
INNER JOIN [Person].[CountryRegion] B
    ON A.CountryRegionCode = B.CountryRegionCode
WHERE ($IsInverted$ = 0 AND $Country$)
    OR ($IsInverted$ = 1 AND NOT $Country$)
GROUP BY B.Name
This includes an additional placeholder IsInverted that should be set as Single Boolean.
Link the bridge parameter to this additional placeholder parameter and use script that checks whether the parameter value is inverted:
var parameterValue = $input$.Resolve();
return new SingleBooleanValue($id$, parameterValue.IsInverted);
On a dashboard, you can now choose the Invert Selection option from the filter's token menu.
2.5. Single-level hierarchy with single selection using MDX
This example uses a bridge parameter to convert a single member from a single-level hierarchy to a value used in an MDX query.
Use a single-level Country hierarchy like the one from the previous examples.
Create a new Manual Query data cube. This example uses a data connector connected to the SQL Server Analysis Services sample database Adventure Works with the following MDX query:
SELECT {[Measures].[Internet Sales Amount]} DIMENSION PROPERTIES MEMBER_TYPE ON COLUMNS,
{ DESCENDANTS(StrToMember($Country$),[Customer].[Customer Geography].[State-Province]) }
    DIMENSION PROPERTIES MEMBER_TYPE ON ROWS
FROM [Adventure Works]
Set up a $Country$ placeholder as type Single String, and set a default value such as [Customer].[Customer Geography].[Country].&[Canada]. See Passing placeholder value from dashboard to manual MDX select for more details on placeholders.
Click Bridge parameter in the data cube's toolbar, then Add parameter.
Enter a Name to identify this parameter on dashboards/views, and select Public to make it accessible to them. Set Value Type to Single Member for this example.
Click Select a hierarchy for this parameter, and in the Open dialog, locate and select the Country hierarchy for this example.
Returning to the Define Bridge Parameter dialog, click Create parameter and select the placeholder parameter to link to it.
The following script forms the OLAP cube's unique name from the key extracted from Dundas BI's hierarchy member unique name, accessed from the input SingleMemberValue:
SingleMemberValue parameterValue = $input$.Resolve();
var keyValue = parameterValue.Value.UniqueName.Replace(".A","");
var uniqueName = string.Format("[Customer].[Customer Geography].[Country].&[{0}]", keyValue);
return new SingleStringValue($id$, uniqueName);
2.6. Date range selection
In this example, a bridge parameter converts a range of dates into two date parameters.
The following stored procedure is used:
CREATE PROCEDURE [dbo].[sp_SalesOrderDetail_Date]
    @DateFrom datetime,
    @DateTo datetime
AS
BEGIN
    SET NOCOUNT ON;
    SELECT
        [ModifiedDate] AS ModifiedDate,
        [LineTotal] AS LineTotal
    FROM [Sales].[SalesOrderDetail]
    WHERE [ModifiedDate] >= @DateFrom AND [ModifiedDate] < @DateTo
END
Create a new data cube and drag the sp_SalesOrderDetail_Date stored procedure to the canvas.
Click Bridge Parameters in the toolbar, then click Add parameter to open the Define Bridge Parameter dialog.
Enter a Name to identify this parameter on dashboards/views, and select Public to make it accessible to them.
Value Type can be set to Range Date/Time or Range Member, depending on which filter types you want to use. If you choose Range Member, click Select a hierarchy for this parameter and select a hierarchy under a time dimension to use in your filters.
Click Create parameter and select the stored procedure's @DateFrom parameter to link to it. This script returns the date value selected as the beginning of a Date/Time range from the input RangeDateTimeValue:
return new SingleDateTimeValue($id$, $input$.LowerBoundaryValue);
For the Range Member data type, the lower boundary value is a member value. The following script resolves the parameter value into members in case a token was selected, then returns the inclusive start date from the input RangeMemberValue:
var parameterValue = $input$.Resolve();
var datetime = parameterValue.LowerBoundaryValue.MemberTime;
if (!parameterValue.IncludeLowerBoundary) {
  datetime = parameterValue.LowerBoundaryValue.UpperBoundaryTime;
}
return new SingleDateTimeValue($id$, datetime);
Select the @DateTo parameter to link to it and use script to return the date selected as the end of the range:
return new SingleDateTimeValue($id$, $input$.UpperBoundaryValue);
For Range Member, the following script would return the range end member value's exclusive upper boundary date:
var parameterValue = $input$.Resolve();
var datetime = parameterValue.UpperBoundaryValue.UpperBoundaryTime;
if (!parameterValue.IncludeUpperBoundary) {
  datetime = parameterValue.UpperBoundaryValue.MemberTime;
}
return new SingleDateTimeValue($id$, datetime);
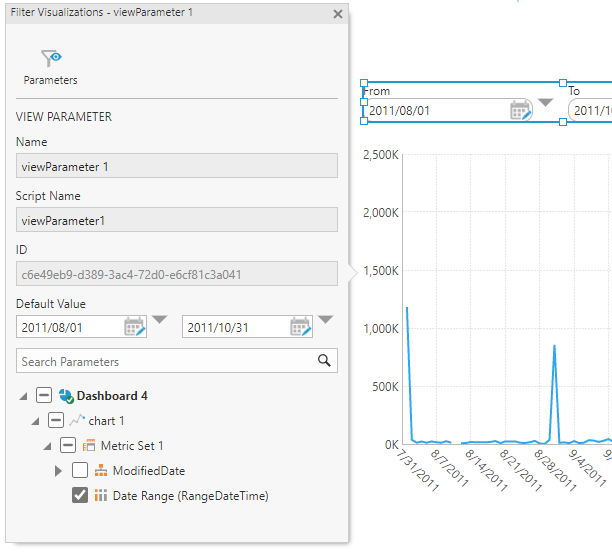
Create or edit a dashboard, and drag the LineTotal measure and the ModifiedDate hierarchy to the dashboard canvas from your data cube in the Explore window.
Add a filter such as Range Date or Calendar Range and connect it to your bridge parameter. (De-select other parameters such as your time hierarchy.)
2.7. Number range selection
In this example, a range of numbers is passed to two parameters in a manual query:
SELECT OrderQty, OrderDate
FROM Sales.SalesOrderDetail INNER JOIN Sales.SalesOrderHeader
ON SalesOrderDetail.SalesOrderID = SalesOrderHeader.SalesOrderID
WHERE ProductID >= $Start$ AND ProductID <= $End$
Click Bridge parameter in the data cube's toolbar, then Add parameter.
Enter a Name to identify this parameter on dashboards/views, and select Public to make it accessible to them. Set Value Type to Range Number.
Click Create parameter and select the start value parameter to link to it. The following script returns the number selected as the beginning of the range from the input RangeNumberValue:
RangeNumberValue rangeNumberValue = $input$.Resolve();
return new SingleNumberValue($id$, rangeNumberValue.LowerBoundaryValue);
Select the end value parameter and use script to return the number selected as the end of the range:
RangeNumberValue rangeNumberValue = $input$.Resolve();
return new SingleNumberValue($id$, rangeNumberValue.UpperBoundaryValue);
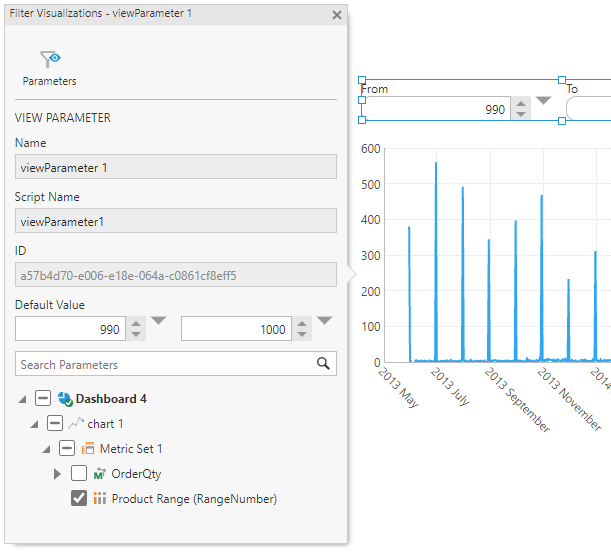
Create or edit a dashboard, and drag the OrderQty measure and the OrderDate hierarchy to the dashboard canvas from your data cube in the Explore window.
Add a filter such as Range Number and connect it to your bridge parameter (de-select other parameters such as the OrderQty measure).
2.8. Handling All and other basic tokens
All types of view parameters and filters support choosing the built-in All token value by default. Range value types such as Range Date/Time and Range Number can also be set to the token value Open Boundary Range when only the From value or only the To value is defined.
You can customize filters to disable these tokens if not needed, otherwise the bridge parameter's script should handle them. Calling the Resolve method like in the examples above does not work for these special token types because there is no specific value of type string, number, date, etc., that can correspond in all cases to All or Open Range Value. (Bridge parameter script does not execute when the Data Default token is selected.)
For example, you can insert script like the following before your other script, in case the All token is selected:
if ($input$.Token == ParameterToken.All) {
  return new SingleStringValue($id$, $input$.Token);
}
This assumes the transform parameter can accept the All token value. For some parameters, such as for a manual select placeholder or stored procedure, you may need to instead return a special value compatible with your specific query or stored procedure. Otherwise, SingleStringValue should be replaced if necessary by whatever return type is expected for this transform parameter, which is listed above the script editor.
If you set the bridge parameter Value Type to a range so that $input$ is a range value type, you can add script like the following to handle the Open Range Boundary token:
if ($input$.LowerBoundaryToken == ParameterToken.OpenRangeBoundary) {
  return new SingleNumberValue($id$, 0);
}
// (and/or)
if ($input$.UpperBoundaryToken == ParameterToken.OpenRangeBoundary) {
  return new SingleNumberValue($id$, 1000000);
}
3. Types
In addition to the usual types available to use in DundasScript, the following can be used in bridge parameter script, many of which are used in examples above:
- MemberValue
- SingleBooleanValue
- SingleDateTimeValue
- SingleMemberValue
- SingleNumberValue
- SingleStringValue
- CollectionBooleanValue
- CollectionDateTimeValue
- CollectionMemberValue
- CollectionNumberValue
- CollectionStringValue
- RangeDateTimeValue
- RangeMemberValue
- RangeNumberValue
- RangeStringValue
- LogicalValue
- ConnectorElementValue
- AnalysisElementValue
- FileValue
- HierarchyLevelValue
- TimeHierarchyOffsetValue
- Number
- PredefinedToken
- ParameterToken
4. Notes
- When you create a bridge parameter and link to a transform parameter, the Default Value in the dialog that appears takes precedence for that parameter over the default value set when configuring its transform.