
Enabling federated authentication
1. Overview
Federated authentication enables users to log on by authenticating using a third-party identity provider. For example, instead of the built-in logon screen, users may be redirected to an Okta logon screen, where they will authenticate with the relevant credentials and redirect back with information about the user. Once authenticated with the identity provider, federated authentication behaves as Single Sign On (SSO), enabling the user to access multiple services without the need for further authentication.
Setting up federated authentication requires two things:
- A Federated Authentication Manifest – a JSON array containing all of the properties required for the federated authentication.
- A Federated Authentication Bridge – a web application in the overall application infrastructure.
Once federated authentication is set up, External User accounts may be created automatically or an administrator may create External User accounts and External Group accounts, which can be logged on only through federated authentication. See the article on adding an account for more details.
2. Federated authentication manifest
The authentication manifest defines and configures one or more Federated Authentication Providers, which are external applications you are entrusting with authenticating on behalf of the application.
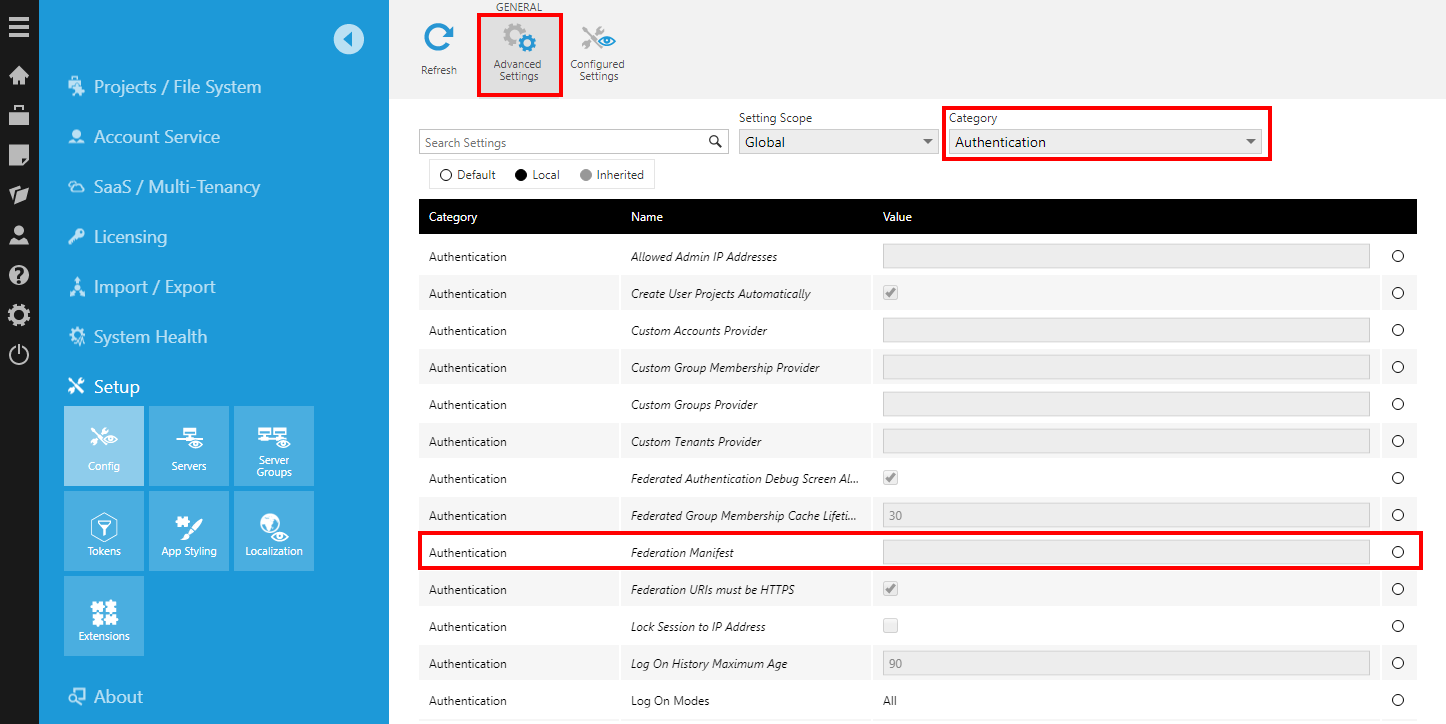
To create the manifest, go to the Administration area, expand the Setup section, and click Config to edit the configuration settings.
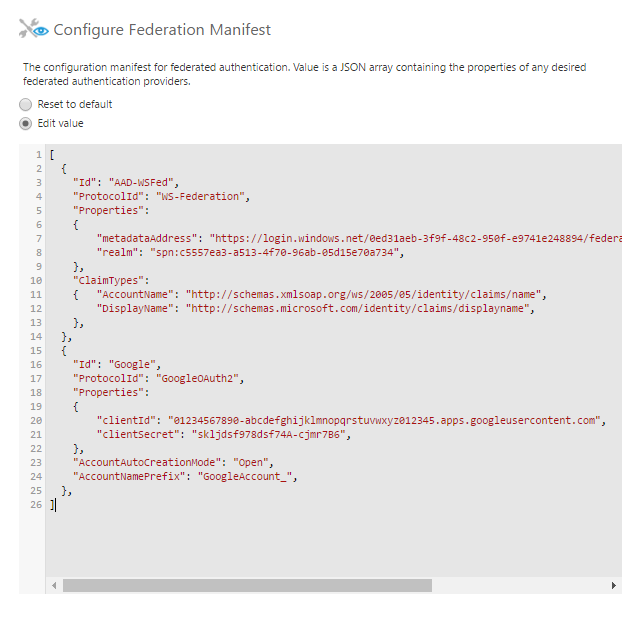
Change the Category to Authentication, ensure Show Advanced Settings is selected on the toolbar, select the Federation Manifest setting and then click Edit on the toolbar.
The manifest is configured in the form of a JSON array containing the following properties for each authentication provider you wish to configure:
- Id (optional). An arbitrary string used to identify the provider (referred to elsewhere on this page as providerId). May be omitted if the manifest only contains one provider. Must be unique when specifying multiple authentication providers in the manifest. Note: for compatibility reasons, the value should only contain characters which can be used in a URL without being escaped.
- Caption (optional). Specifies the text that should be displayed on the Logon page button for this authentication provider, or set to "-" in version 11 or higher if it should not be shown. If not set, the caption will default to the provider ID.
- ProtocolId. Specifies the ID of the protocol to be used by the authentication provider. The following protocols are supported as of version 23.2, or see the sections below for details and earlier versions:
- Saml2
- OpenIdConnect
- GoogleOAuth2
- MicrosoftIdentity
- Jwt
- Properties. A JSON object containing protocol-specific information, such as a metadata URL, client ID, and client secret. See the protocol-specific section for details on the properties that may be specified here.
- ClaimTypes (optional). A JSON object providing a mapping between claim types and specific kinds of information required by the application (see the Claim type mappings section below). The minimum required mapping is that one claim corresponds to AccountName. Specifying explicit claim type mappings is not required if the default mappings are already correct.
- CustomAttributeClaimTypeMapping (optional). A JSON object providing a mapping of custom attribute IDs to claim types. When a user authenticates, the value of each specified custom attribute on their logon session will be populated with the data from the corresponding claim.
- AccountAutoCreationMode (optional). Specifies how the application should behave when a user successfully authenticates. The value may be one of the following:
- None. An external user account should never be automatically created. Only users with pre-existing accounts in the application should be able to log on.
- Group (default). If the claim contains a group name corresponding to an External Group account, a virtual user account should be created for the user.
- Open. A non-virtual user account should be created for any user that successfully authenticates. The created External User account will default to authenticate only via the used identity provider, which can be modified later.
- AccountAutoCreationSeatMode (optional). Specifies the account auto-creation seat mode in version 23.2 or higher. If not specified, the default value will take effect. The value may be one of the following, subject to the availability of licensed Standard User seats:
- Floating (default). An external user account will be automatically created with a floating seat.
- Reserved. An external user account will be automatically created with a reserved seat.
- AccountNamePrefix (optional). A prefix that is prepended to the account names extracted from the claims.
- AllowMissingTenantClaim (optional). A value indicating whether the application will allow authentication when there is a tenant name or ID mapping, but no corresponding claim was returned with that information. The value may be either true or false. The default value is false.
- EnableFederatedLogout (optional). If set to true, logs out of the identity provider in version 23.3 and higher when the user actively logs out through the UI or navigates to the path /LogOn/LogOff under the application instance. SAML 2.0 requires a signing certificate to be configured for this option – for details, see the note in the SAML 2.0 section.
Minimal example:
[
  {
    "ProtocolId": "SAML2",
    "Properties":
    {
        "idpMetadataLocation": "https://identityprovider.example.com/FederationMetadata.xml",
    },
  },
]
Extended example:
[
  {
    "Id": "ADFS-Saml2",
    "ProtocolId": "SAML2",
    "Caption": "Windows Active Directory Logon",
    "AccountAutoCreationMode": "Open",
    "Properties":
    {
        "idpMetadataLocation": "https://identityprovider.example.com/FederationMetadata.xml",
        "clientSecret": "skljdsf978dsf74A-cjmr7B6",
    },
    "ClaimTypes":
    {
        "AccountName": "http://schemas.xmlsoap.org/ws/2005/05/identity/claims/name",
        "DisplayName": "displayName",
    },
    "CustomAttributeClaimTypeMapping":
    {
        "9f984590-01c6-4b3f-a892-03c10d405823": "http://schemas.xmlsoap.org/ws/2005/05/identity/claims/postalcode",
        "38e91753-09fd-4f91-87bb-b2fa8510d61b": "http://schemas.xmlsoap.org/ws/2005/05/identity/claims/country",
    },
  },
  {
    "Id": "Google",
    "ProtocolId": "GoogleOAuth2",
    "AccountAutoCreationMode": "Open",
    "AccountNamePrefix": "GoogleAccount_",
    "Properties":
    {
        "clientId": "01234567890-abcdefghijklmnopqrstuvwxyz012345.apps.googleusercontent.com",
        "clientSecret": "skljdsf978dsf74A-cjmr7B6",
    },
  },
]
2.1. Claim type mappings
The default claim type mappings are as follows:
| Item | Claim Type |
|---|---|
| AccountName | http://schemas.xmlsoap.org/ws/2005/05/identity/claims/nameidentifier |
| DisplayName | http://schemas.xmlsoap.org/ws/2005/05/identity/claims/name |
| http://schemas.xmlsoap.org/ws/2005/05/identity/claims/emailaddress | |
| Culture | http://schemas.xmlsoap.org/ws/2005/05/identity/claims/locality |
| GroupName | http://schemas.microsoft.com/ws/2008/06/identity/claims/role |
These default mappings may be overridden by information built-in to the authentication protocol, and further by the authentication provider using the ClaimTypes property in the federation manifest. See the corresponding protocol-specific section below for information on which claim type mappings are overridden by that protocol (if any).
When using multi-tenancy, additional claim types can optionally be specified in a provider's ClaimTypes property, in order to allow automatically-created accounts to be associated with a particular tenant:
- TenantId - The GUID of the tenant.
- TenantName - The Name of the tenant.
If both a tenant ID and a tenant name are included in the claims, the ID takes precedence. If neither are included, but a claim type mapping has been set up for the tenant ID and/or name, then an error will occur when attempting to automatically create the account (unless the AllowMissingTenantClaim property has been specified with a value of True.)
2.2. Authentication protocols
This section lists the supported federated authentication protocols. Note that SAML 2.0 and OpenID Connect are standards adopted by various identity providers.
2.2.1. SAML 2.0
Protocol ID: SAML2
Properties:
- idpMetadataLocation. The URL of the identity provider's metadata document.
- spEntityId (optional). This is the service provider ID the application will use to identify itself to the identity provider. If the value is not specified, it will default to the Federation Bridge URL. Note: if a value is specified for this property, it must be a well-formed URI.
- requestSigningBehavior (optional). The preferred behavior for signing requests. The values may be Always, Never, or IfIdpWantAuthnRequestsSigned (outgoing requests will be signed only if the identity provider metadata specifies that this is required). If the value is not specified, it will default to IfIdpWantAuthnRequestsSigned.
- minIncomingSigningAlgorithm (optional). The minimal security hash algorithm (SHA) acceptable in the signature. To allow SHA1, the value should be http://www.w3.org/2000/09/xmldsig#rsa-sha1. If the value is not specified, it will default to SHA2.
In Dundas BI version 10 and below, this protocol may require installing an extension.
2.2.2. OpenID Connect
Protocol ID: OpenIdConnect
Properties:
- metadataAddress (optional). The URL of the identity provider's metadata document.
- authority (optional). The authority to use when making OpenID Connect calls. This is required if the metadata location is not specified.
- clientId. The client_id parameter used in the protocol.
- clientSecret (optional). The secret key provided by the identity provider used to redeem an authorization code for an access token. Not required in many cases.
- scope (optional). The value of the scope parameter in the OpenID Connect flow. If not specified, defaults to "openid profile".
If required by your identity provider, the redirect URL should be in one of the following formats.
Linux installations and all installations v10 and above:
{Dundas/Managed Base URL}/AuthBridge/signin-oidc/{providerId}
v9 installations and earlier on Windows:
{Dundas/Managed Base URL}/AuthBridge/
For example, if you have set up a provider in the federated authentication manifest with "Id": "MyProvider", the URI may be something like https://dbi.example.com/AuthBridge/signin-oidc/MyProvider.
2.2.3. Microsoft Identity (Office 365 and Azure Active Directory)
Protocol ID:
- Version 10 and higher: MicrosoftIdentity
- Earlier versions: OpenIdConnect
To configure federated authentication using Azure Active Directory, perform the following steps in the Azure Portal (https://portal.azure.com):
- Create a new App Registration for the application. The redirect URI should be set in the format {Dundas/Managed Base URL}/AuthBridge/signin-oidc/{providerId} for version 10 and higher. For more details or for other versions, set this according to the Redirect URI section above for OpenID Connect.
- Use the Manage > Certificates & secrets blade to create a new client secret for the App Registration. Use this as the value of the clientSecret property in the federation manifest.
- In the Manage > Authentication blade, enable the ID tokens option under the Implicit Grant section, and save your changes.
- Use the Manage > API Permissions blade to grant basic permissions to the application. The following delegated permissions will need to be granted under Microsoft Graph:
- User.Read (Sign in and read user profile)
- Directory.AccessAsUser.All (Access directory as the signed in user)
- Once the above permissions have been added, click the Grant admin consent button, and then Yes on the confirmation popup.
- Edit the Manifest of the App Registration, and change the value of the groupMembershipClaims property to "SecurityGroup".
Properties: (v10 and higher)
- tenantId. The tenant GUID (Directory ID) for the Azure subscription associated with your Azure Active Directory instance.
- clientId. The application ID from the App Registration in the Azure Portal.
- clientSecret. The secret key which was generated in the Azure Portal.
- domain (optional). The explicit name of the domain to use for authentication.
- instance (optional). The URL of the instance to authenticate against. If not specified, defaults to https://login.microsoftonline.com/.
- metadataAddress (optional). The URL of the identity provider's metadata document.
- authority (optional). Typically something like https://login.microsoftonline.com/<TENANT_GUID>.
Overridden claim type mappings: (v10 and higher)
| Item | Claim Type |
|---|---|
| AccountName | preferred_username |
| DisplayName | name |
| preferred_username | |
| GroupId | groups |
Properties: (v9 and lower)
- authority. Typically something like https://login.microsoftonline.com/<TENANT_GUID>.
- clientId. The application ID from the App Registration in the Azure Portal.
- clientSecret. The secret key which was generated in the Azure Portal.
- mode. This must be set to AAD.
- aadTenantId. The tenant GUID (Directory ID) for the Azure subscription associated with your Azure Active Directory instance.
- aadResourceId (optional). The Azure Active Directory resource ID to use when redeeming an authorization code for an access token. If not specified, will default to https://graph.windows.net.
Overridden claim type mappings: (v9 and lower)
| Item | Claim Type |
|---|---|
| AccountName | http://schemas.xmlsoap.org/ws/2005/05/identity/claims/name |
| DisplayName | name |
| http://schemas.xmlsoap.org/ws/2005/05/identity/claims/name |
2.2.4. Google OAuth 2.0
Protocol ID: GoogleOAuth2
Use the Google Developer Console to create a new OAuth 2.0 client ID and register the Authentication Bridge web application. Specify Web application as the application type. An authorized redirect URI must be specified in the following format:
{Dundas/Managed Base URL}/AuthBridge/signin-google/{providerId}
For example, if you have set up a Google provider in the federated authentication manifest, and the ID of the provider is MyGoogleProvider, the URI may be something like https://dbi.example.com/AuthBridge/signin-google/MyGoogleProvider.
Properties:
- clientId. The client ID provided when setting up the OAuth 2.0 credentials in the Google API Manager.
- clientSecret. The Google-assigned client secret.
Overridden claim type mapping:
| Item | Claim Type |
|---|---|
| AccountName | http://schemas.xmlsoap.org/ws/2005/05/identity/claims/emailaddress |
2.2.5. Facebook
Protocol ID: Facebook
The Facebook Developer Portal has to be used to register the Authentication Bridge web application. An authorized redirect URI must be specified for the Web platform in the following format:
{Dundas/Managed Base URL}/AuthBridge/signin-facebook/{providerId}
For example, if you've set up a Facebook provider in the federated authentication manifest, and the ID of the provider is MyFacebookProvider, the URI may be something like https://dbi.example.com/AuthBridge/signin-facebook/MyFacebookProvider.
The account name for this provider is in the format Facebook_<nameid>, where nameid corresponds to the ID of the Facebook account.
Properties:
- appId. The application ID provided when setting up the application in the Facebook Developer Portal.
- AppSecret. The Facebook-assigned client secret.
Overridden claim type mapping:
| Item | Claim Type |
|---|---|
| AccountName | http://schemas.dundas.com/dbi/2016/11/claims/prefixednameid |
2.2.6. JWT (JSON Web Tokens)
Protocol ID: Jwt
The JWT protocol is available in version 23.2 and higher. Instead of redirecting users to another URL to authenticate, your web application triggers the authentication process by making the following POST request to the application's federated authentication bridge application:
{Dundas/Managed Base URL}/AuthBridge/Jwt-{ProviderId}/ProcessJwt
- URI Parameters: You can include the optional query string parameters listed in the configuration section below.
- Body: Your JWT created including sub (username) and other claims should be provided in the body of the request, either using URL encoding (application/x-www-form-urlencoded) with the key jwt, or with the JWT as the entire body. For example, a form with an action attribute set to the request URL, and containing a hidden input with name set to jwt and value containing the JWT string, will make this request.
- Response: Upon successful authentication, an application session will be created, the JWT will no longer be referenced, and the user will be redirected to the web application as a logged-in user or to your specified return URL.
Properties:
- signingKey. The secret key used to sign the JWT.
- issuer (optional). If specified, the application will ensure that the issuer included in the JWT matches the value specified here.
- validateAudience (optional). If true, the audience property of the JWT is both required and verified. The default value is true. To disable, set to false. The audience value of the JWT is expected to be equal to the AuthBridge URL (i.e., {Dundas/Managed Base URL}/AuthBridge).
3. Groups
When a user logs on using federated authentication, the list of groups associated with the user is read from the collection of GroupName claims. For each External Group Account set up whose name exactly matches one of the groups from the claims, the user's logon session identifies a membership in that group.
For example, the administrator creates an External Group Account named Group 1. When a user logs on using federated authentication, the list of claims returned by the identity provider contains two claims corresponding to the http://schemas.microsoft.com/ws/2008/06/identity/claims/role claim type (this is the default claim type mapping for GroupName); Group 1 and Group 2. Because an External Group Account named Group 1 exists in the application, the user will be a member of that group for the duration of their logon session. There is no External Group Account in named Group 2, so that claim is ignored.
Because it's possible to use multiple identity providers, the application offers the ability to restrict automatic group assignment to one or more specific providers, using the Federated Authentication Providers property of the External Group Account.
4. Federated authentication bridge
Federated authentication is accomplished through a series of redirections, primarily handled by the Federated Authentication Bridge (FAB) web application included as part of the overall application's infrastructure. This web application is an optional module installed as a subpath (e.g., virtual directory) named AuthBridge under the primary web application (BIWebsite).
4.1. Installation
On a Windows server, open the Dundas BI Deployment application and go to the Extras tab.
Select Add Federated Authentication Module and follow the deployment steps. There is also an option here if you need to remove the module later.

On Linux, launch the Deployment wizard and choose the option to Add Federated Module To Instance. Follow the prompts, including choosing a new port number for the AuthBridge website.
Next, launch the Deployment wizard again to Hookup Reverse Proxy to Instance, which will redirect traffic from the AuthBridge subpath under your Dundas BI website to the AuthBridge website. If you have already configured the reverse proxy before adding the federated authentication module, you may need to temporarily stop the nginx service (e.g., systemctl stop nginx) to be able to choose the same port number in the Deployment wizard and replace the original configuration, otherwise it will be in use and cannot be re-configured.
For Dundas BI version 10 and below, choose the option during installation to install the SAML 2.0 protocol extension if you intend to use this protocol (included automatically in version 11 and higher and in Docker images).
The Authentication Bridge (authbridge) can also be configured when running Docker containers or a Kubernetes cluster.
4.2. Configuration
When a user wants to log on using a specific authentication provider, you need to construct an Authentication URL that goes to the FAB in the following format:
{Dundas/Managed Base URL}/AuthBridge/Auth/ExternalAuth?providerId={providerId}&returnUrl={return URL}
Where:
- {Dundas/Managed Base URL} is the base URL of the Dundas BI web application or for Managed Dashboards & Reports.
- {providerId} is the ID of the federated authentication provider specified in the manifest. If only one federated authentication provider has been defined, this can be omitted.
The following optional elements may be added to the query string of the Authentication URL:
- {return URL} – A relative URL to where the user should be redirected once authorization succeeds. The URL is relative to {Dundas/Managed Base URL}. If not specified, the user will be redirected to the home screen.
- debug – If specified with a value of true, an intermediate screen will be shown before the final redirection, containing information about the authentication operation (the claims sent from the identity provider, the property values that were able to be extracted from those claims, and the result of attempting to create a logon session corresponding to the user).
- deleteOtherSessions – Specified with a value of true or false. If enabled, and the logon cannot succeed because the required seat is not available, the least-used session preventing the logon from succeeding will be terminated. If not specified, the Delete Other Sessions On Log On configuration setting determines the behavior in version 8 and above.
- explicitCultureName – The culture to associate with the logon session (for example, explicitCultureName=en-CA). If not specified, the culture associated with the account or the default culture for the application will be used.
- rememberMe – If not specified or specified with a value of true, the session cookie corresponding to the user's logon session will be created with a long-term expiry. If specified with a value of false, the session cookie may be forgotten when the user's browser is closed.
4.3. Automatic log on using federated authentication
Automatic log on using federated authentication can be achieved by pointing the Custom Logon URL configuration setting to the authentication URL. The return URL placeholder will be automatically set by the application.
For example:
https://dbi.example.com/AuthBridge/Auth/ExternalAuth
4.4. Service provider metadata
4.4.1. SAML 2.0
When using the SAML 2.0 protocol, Service Provider (also known as Relying Party) metadata is available using a URL constructed as follows:
{Dundas/Managed Base URL}/AuthBridge/Auth/FederationMetadata/{providerId}
For example:
https://dbi.example.com/AuthBridge/Auth/FederationMetadata/MySamlProvider
If there is only one federated authentication provider specified in the manifest, the provider ID may be omitted.
4.4.2. Other protocols
If the identity provider requires a URL to identify the application (may be referred to as "sign-on URL", "home page URL", "relying party URL", "SP entity ID" etc.), provide the URL to the Federated Authentication Bridge.
For example:
https://dbi.example.com/AuthBridge/
5. Identity provider-specific notes
This section contains information to help in setting up federated authentication for specific identity providers.
5.1. Okta SAML 2.0
In order to integrate with Okta, create a SAML 2.0 application integration including the following steps. For the sake of the example, we will assume that Dundas BI or Managed Dashboards & Reports is accessible via https://dbi.example.com.
- Create a new SAML 2.0 Application in Okta
- In the App visibility section, check the boxes so that the application is not displayed to users (i.e., a chiclet will not be shown to users). The application being set up here will not work as a clickable chicklet, so it's best to prevent it from being displayed.
- In the Single sign on URL field, enter a temporary URL (e.g., http://www.example.com). This will be updated later.
- In the Audience URI (SP Entity ID) field, enter the URL to the Federated Authentication Bridge (e.g., https://dbi.example.com/AuthBridge/)
- On the next page, find the link to Identity Provider metadata and copy the URL. It will be something like https://example.okta.com/app/asdfsadfiuoh00h7/sso/saml/metadata. You may be able to find this from the Actions menu of the records in the SAML Signing Certificates section of the Sign On tab.
- Create an entry for your Okta provider in the Federation Manifest configuration setting. Use the URL from the previous step as the value for the idpMetadataLocation property.
- To obtain the correct Single Sign On URL to use in Okta, you will need to examine the Service Provider metadata from the application. See above for instructions on how to do this. Once you have the XML, extract the value of the ACS URL for the HTTP-POST binding. It will be something like https://dbi.example.com/AuthBridge/AuthServices-Saml2-MyProvider/Acs.
- In Okta, go back and edit your SAML 2.0 application. Update the Single sign on URL to the value you extracted in the previous step.
Once the above steps are completed, federated authentication should be working correctly with your Okta application. You should see a new button on the Logon page that will initiate the authentication flow. However, pay attention to the following additional considerations:
- If you want to bypass the Logon page and have your users automatically get signed in, you will still need to set the Custom Logon URL configuration setting (see above).
- If you want your users to be able to access your installation from an Okta chiclet, you will need to set up a new Bookmark Application in Okta, which will redirect your users to the base URL of your installation (e.g., https://dbi.example.com/).
6. Troubleshooting
If federated authentication does not succeed, the following tips may be useful for troubleshooting:
- Check the application log. Often this will contain details corresponding to a failed federated authentication attempt.
- Take advantage of the debug option in the query string of the authentication URL, in order to see detailed information about the authentication operation. For example: https://dbi.example.com/AuthBridge/Auth/ExternalAuth?providerId=MyProvider&debug=true.
- Check any logs on the identity provider.
- Check the Console and Network tabs of the browser's Developer Tools window for errors which could be related to the federated authentication operation.
6.1. Diagnostics
It's also possible to access application diagnostics for the federated authentication bridge web application similar to those you can access from the About page for the main web application to view various details about the running process. (Available in version 8 and above.)
First, find and copy your Logon Session ID when you are logged on as an administrator from the About page.
Next, navigate to the following URL assuming dbi.example.com navigates to Dundas BI or Managed Dashboards & Reports, filling in the missing sessionId portion:
https://dbi.example.com/AuthBridge/Home/DiagnosticsFile?mode=view&sessionId=<sessionId>
To download the diagnostics as a file rather than viewing them in the browser, remove the portion mode=view& of the URL.