
Calculated Element
The Calculated Element transform lets you create new elements by writing DundasScript expressions. In addition to using built-in operators and methods, you can pass data into a formula function. The result of each expression is a new output element.
Related video: Data Cleansing with Data Cubes
1. Input
The Calculated Element transform requires input data from one transform.
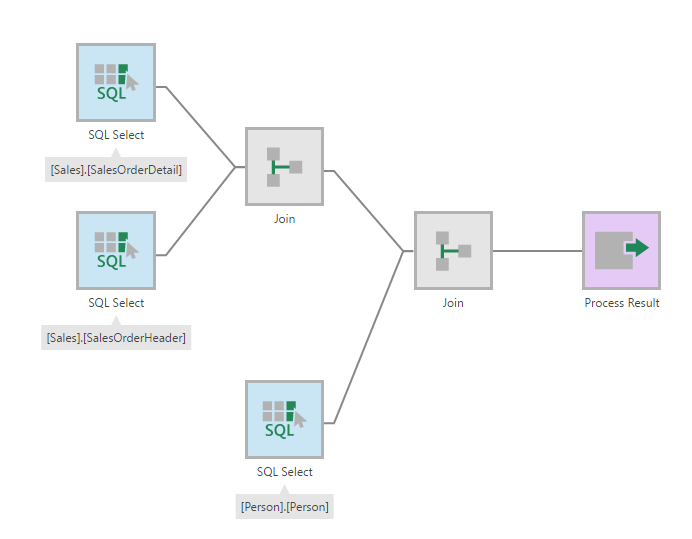
For example, we will use the data cube created in the article Using a data cube to join tables.
2. Add the transform
To add the transform, select the connection between the second Join and the Process Result.
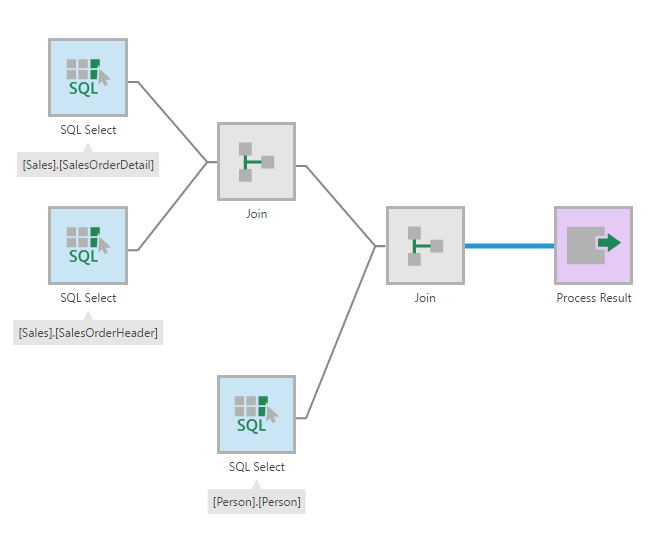
Click Insert Common in the toolbar and select Calculated Element.
3. Configure the transform
Double-click the Calculated Element transform to configure it.
In the Calculated Element transform configuration dialog, you can optionally provide a Name and Description for the transform for your reference. The name will be displayed below this transform on the canvas.
De-select any columns you want to omit from the output.
Click Add Calculated Element.
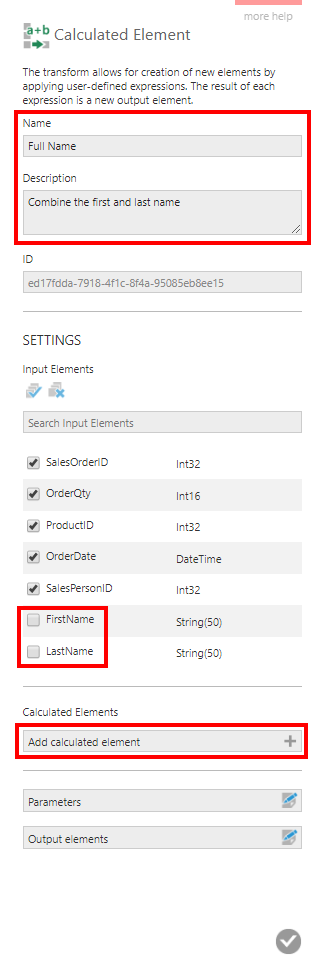
In the Calculated Element dialog, provide a name and optional description for the new element, and set Data Type to the value your script will return. When you choose String as the data type, you can specify a value for Maximum Length. The default value is 200.
When using the Decimal data type, two additional optional fields become available. If set, your values cannot exceed these limits when using cube storage:
- Precision - Maximum count of digits in each number.
- Scale - Maximum count of digits after the decimal separator.
Write your DundasScript in the expression field, which must include a return statement. For example:
return $FirstName$ + " " + $LastName$;
Type the dollar sign ('$') to begin entering a placeholder for another column's values, and choose from the popup menu that appears.
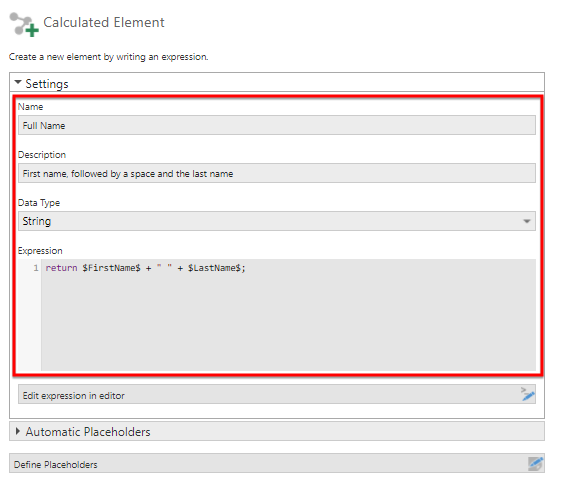
Click the submit button at the bottom of the dialog when finished.
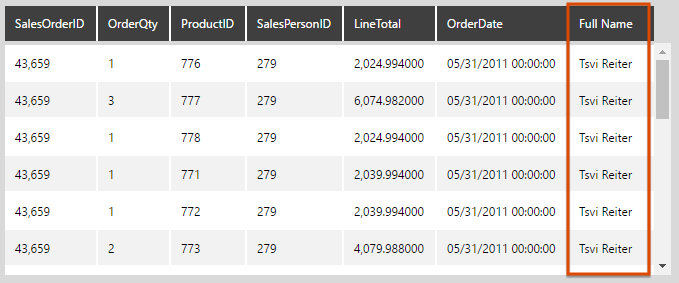
4. Output
Select the Process Result transform and expand the Data Preview window to see the new columns in the output.
5. Working with placeholders
The transform automatically defines a placeholder for each input element. The above example makes use of two such placeholders (FirstName and LastName).
To view a list of automatically defined placeholders, expand the Automatic Placeholders section.
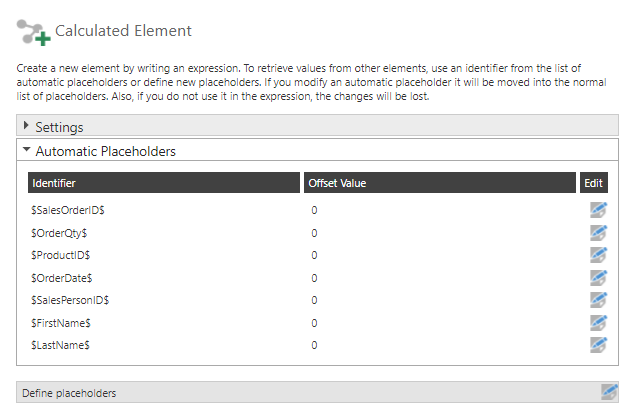
Note the offset value next to each placeholder, which is set to a default of 0. The offset is a number of records to go back or forward when retrieving a value used in the script. You can introduce an offset to the input element used for a placeholder by clicking the Edit icon and changing the value.
For example, to use the value of the ProductID from the previous row, set the Offset Value for the $ProductID$ placeholder to -1.
To use values from a single column/input element multiple times but with different offsets, click Define Placeholders and add additional placeholders. You can add more than one for the same element but with different identifiers and offsets to refer to in your script.
6. Expression samples
The following are some common expressions for calculated elements:
-
Get the year part from a date column:
DateTime date = $ModifiedDate$;
return date.Year;
-
Add 3 months to a date column:
DateTime date = $StartDate$;
return date.AddMonths(3);
-
Check the Year and return a string:
DateTime date = $Date$; string text; if (date.Year == DateTime.Today.Year) { text = "This Year"; } else { text = "Other Year"; } return text; -
Get the lowercase equivalent of a string:
string s = $FirstName$;
return s.ToLower();
-
Apply title case capitalization to a string:
string s = $Title$;
return CultureInfo.CurrentCulture.TextInfo.ToTitleCase(s);
-
Split a string up by commas into multiple values and return the first:
var values = $CommaSeparated$.Split(','); return values[0]; -
Change a UNIX timestamp to the DateTime type:
DateTime dateTime = new DateTime(1970, 1, 1, 0, 0, 0, 0, DateTimeKind.Utc);
dateTime = dateTime.AddSeconds($Timestamp$).ToLocalTime();
return dateTime;
-
Use the median function from formulas:
return MEDIAN($Sales Amount$);
7. Limitations
- Column names that contain $ are not allowed to be used with Calculated Elements. You can rename this column to refer to it in script.